


29
CARING FOR FILTERS
Remove the filter, pushing the lever to
-
wards the back of the unit while pulling
downward.
Wash the filter without bending it. Leave
it to dry thoroughly before reinstalling. If
the surface of the filter changes color over
time, efficiency will not be affected.
To reinstall the filter, push the filter up into
position while pulling the latch forward,
then release the latch to lock into place
11
2
3
CLEANING METAL GREASE FILTERS
The metal grease filtaers can be cleaned in hot detergent solution or washed
in the dishwasher.
They should be cleaned every 2 months use, or more frequently if use is
particularly heavy.
NOTES:
• Cleaning in a dishwasher may dull the finish of the metal grease filters.
• Ensure that the filters are completely dry before installing them back into
the Range Hood.
CLEANING EXTERIOR SURFACES
Please note, abrasives and scouring agents can scratch range hood finishes
and should not be used to clean finished surfaces.
Stainless Steel finish cleaning instructions:
Clean exterior surfaces with a commercially available stainless steel cleaner.
EN
77
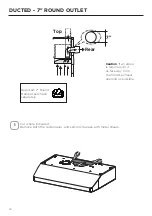
INSTALLATION
Fitting the Hood canopy
BEFORE FITTING THE HOOD TO THE WALL UNIT, PROCEED AS FOLLOWS:
• Disconnect the wires to the Commands at the connectors.
• Disconnect the wires to the Light at the con-
nectors.
• The Hood can be installed directly on the
underside of the wall unit (Minimum 650 mm
from the Cooker Hob).
• Create an opening in the bottom of the wall unit,
as shown.
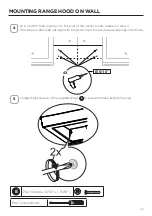
• Insert the hood until the side supports snap into
place.
• Fasten using the 10 screws
12a
provided.
• Lock in position by tightening the screws
Vf
from
underneath the hood.
• Open the suction panel by turning the specific knob.
• Disconnect the panel from the hood canopy by sliding the
fixing pin lever.
• Remove grease filters.
• Screw the Frame into place
using the 6 screws
12f
, re-
connect the wires to the
Commands and Light, re-
place the metal grease filter
and the Panel.
260
13
495 - 675
EN
77
INSTALLATION
Fitting the Hood canopy
BEFORE FITTING THE HOOD TO THE WALL UNIT, PROCEED AS FOLLOWS:
• Disconnect the wires to the Commands at the connectors.
• Disconnect the wires to the Light at the con-
nectors.
• The Hood can be installed directly on the
underside of the wall unit (Minimum 650 mm
from the Cooker Hob).
• Create an opening in the bottom of the wall unit,
as shown.
• Insert the hood until the side supports snap into
place.
• Fasten using the 10 screws
12a
provided.
• Lock in position by tightening the screws
Vf
from
underneath the hood.
• Open the suction panel by turning the specific knob.
• Disconnect the panel from the hood canopy by sliding the
fixing pin lever.
• Remove grease filters.
• Screw the Frame into place
using the 6 screws
12f
, re-
connect the wires to the
Commands and Light, re-
place the metal grease filter
and the Panel.
260
13
495 - 675
Содержание LEVANTE G LEVG24SS300
Страница 6: ...6 RANGE HOOD DIMENSIONS 3 23 15 16 29 15 16 35 15 16 3 23 15 16 29 15 16 35 15 16 24 30 24 30...
Страница 7: ...7 MIN 24 OVER ELECTRIC MIN 30 OVER GAS INSTALLATION HEIGHT REQUIREMENTS Min 24 30...
Страница 39: ...39 DIMENSIONS DE LA HOTTE 3 23 15 16 29 15 16 35 15 16 3 23 15 16 29 15 16 35 15 16 24 po 30 po 24 po 30 po...
Страница 72: ...72 DIMENSIONES DE LA CAMPANA DE COCINA 3 23 15 16 29 15 16 35 15 16 3 23 15 16 29 15 16 35 15 16 24 30 24 30...
Страница 73: ...73 M N 24 SOBRE PLACA EL CTRICA M N 30 SOBRE PLACA DE GAS REQUISITOS DE ALTURA DE LA INSTALACI N M n 24 30...
Страница 100: ...991 0624 255_01 200825 D00007087_00...


