background image

 Installatievoorschrift e-BoX 1000/450 I,ST 

14 < 

<


<


<


Содержание e-BoX 1000 I

Страница 1: ...Installatievoorschrift Installation manual Installationshandbuch Manuel d installation e BoX 1000 450 I ST NL ENG DE FR 40012054 2045 ...

Страница 2: ...2 ...

Страница 3: ...3 Inhoudsopgave table of contents Inhaltsverzeichnis Table des matières Installatievoorschrift NL 4 Installation manual ENG 15 Installationshandbuch DE 29 Manuel d installation FR 43 ...

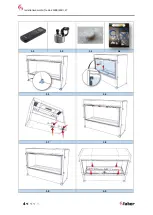
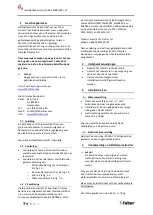
Страница 4: ...Installatievoorschrift e BoX 1000 450 I ST 4 1 1 1 2 1 3 1 4 1 5 1 6 1 7 1 8 1 9 2 0 ...

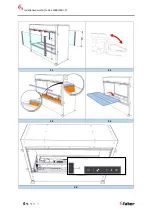
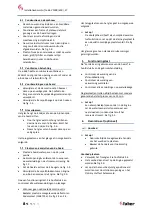
Страница 5: ...Installatievoorschrift e BoX 1000 450 I ST 5 2 1 2 2 2 3 2 4 3 0 ...

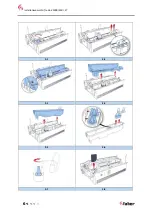
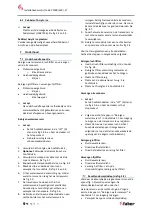
Страница 6: ...Installatievoorschrift e BoX 1000 450 I ST 6 3 1 3 2 3 3 3 4 3 5 3 6 3 7 3 8 ...

Страница 7: ...wij dat het door Glen Dimplex Benelux B V uitgebrachte Faber sfeertoestel door zijn ontwerp en bouwwijze voldoet aan de Europese veiligheidsstandaard EN60335 2 30 en de Europese standaard voor Elektromagnetische compatibiliteit EMC EN55014 EN60555 2 en EN60555 3 Deze voorschriften hebben betrekking op de essentiële eisen van de EEC richtlijnen 2014 35 EU en 2014 30 EU Product electric fire Opti my...

Страница 8: ...ding en de stroomvoorziening Zie fig 1 7 Zet de haard vast met de 4 beugels zie fig 1 9 Verwijder de transportblokken tussen Engine en e BoX en centreer de Engine Zie fig 2 0 Doe een functioneringstest Zie hoofdstuk 5 en controleer alle wateraansluitingen op lekkage Wanneer geen optionele decoratie set is besteld plaats de meegeleverde deflector en bodemplaat 11687196 Zie fig 2 3 en 2 4 Het terugp...

Страница 9: ... het waterreservoir te reinigen Reinig hiermee ook de transducers inclusief de schijfjes onder de conus De conus kan met de klok mee los gedraaid worden Zie fig 3 7 9 Spoel het waterreservoir en de transducers na met schoon water om de resten afwasmiddel te verwijderen 10 Reinig het mondstuk met een zachte borstel en spoel deze schoon met water Zie fig 3 4 Voor het terugplaatsen van alle onderdele...

Страница 10: ...ctie Geen vlammen Geen netspanning Laag waterniveau De transducer s zijn niet goed aangesloten Controleer of het netsnoer goed aangesloten is en dat de hoofdschakelaar in de AAN I positie staat Zie fig 3 0 A Zie Eerste keer ingebruikname van de haard hoofdstuk 4 in de gebruikershandleiding Controleer de aansluitingen zie fig 3 2 51 De e BoX start niet of is onverwachts gestopt en de LED s knippere...

Страница 11: ...ndere frontglas e BoX ST Vuurbeeld staat op maximaal Omgevingstempratuur te laag in de ruimte De luchtvochtigheidsgraad is te hoog in de ruimte De frontglazen omwisselen Zet de vlamhoogte met de eco remote op een lagere stand Verwarm de ruimte Ventileer de ruimte De afstandsbediening doet het niet Lage batterijspanning Afstandsbediening niet gekoppeld Afstand naar haard te groot Plaats nieuwe batt...

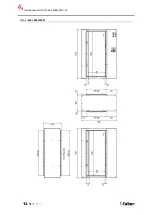
Страница 12: ...Installatievoorschrift e BoX 1000 450 I ST 12 10 Maattekeningen e BoX 1000 450 I ...

Страница 13: ...Installatievoorschrift e BoX 1000 450 I ST 13 e BoX 1000 450 ST ...

Страница 14: ...Installatievoorschrift e BoX 1000 450 I ST 14 ...

Страница 15: ...Installation manual e BoX 1000 450 I ST ENG 15 ...

Страница 16: ...Installation manual e BoX 1000 450 I ST 16 ...

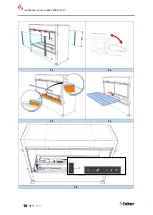
Страница 17: ...Installation manual e BoX 1000 450 I ST 17 1 1 1 2 1 3 1 4 1 5 1 6 1 7 1 8 1 9 2 0 ...

Страница 18: ...Installation manual e BoX 1000 450 I ST 18 2 1 2 2 2 3 2 4 3 0 ...

Страница 19: ...Installation manual e BoX 1000 450 I ST 19 3 1 3 2 3 3 3 4 3 5 3 6 3 7 3 8 ...

Страница 20: ...Installation manual e BoX 1000 450 I ST 20 ...

Страница 21: ...35 2 30 and the European Standard Electromagnetic Compatibility EMC EN55014 EN60555 2 and EN60555 3 these cover the essential requirements of EEC Directives 2014 35 EU and 2014 30 EU Product electric fire Opti myst Model e BoX 1000 450 I ST This declaration will become null and void as soon as the unit is in any way modified without written authorization of Glen Dimplex Benelux B V 2 Safety instru...

Страница 22: ...nal decoration set is ordered place the supplied deflector and base plate 11687196 See fig 2 3 and 2 4 Replacing the glass is done in reverse order Please note The front of the see through fireplace is the warm air outflow Make sure that the small glass plate S is placed on the warm air outlet side See fig 2 1 The glass may be cleaned with a standard window cleaner 5 Functional test See Using the ...

Страница 23: ...an water to remove all traces of washing up liquid 10 Clean the nozzle with a soft brush and flush out thoroughly with water See fig 3 4 Reverse the steps above to reassemble Cleaning air filter Gently slide the air filter upwards out of its plastic holder see fig 3 8 Gently rinse with water in the sink and dry with fabric towel before returning Replace the air filter Place the fuel bed see chapte...

Страница 24: ...e connector s is inserted correctly see fig 3 2 51 e BoX will not start or stopped working and the LED s continuously to blink twice Low water level The absorption valve overflow protection is activated See First time water fill chapter 4 in the user manual Switch the mains switch to the OFF 0 position see fig 3 0 A Check all connections on water leakage and turn the mains switch back in the ON po...

Страница 25: ...m Ventilate the room Remote is not working Low batteries Remote isn t paired to receiver Distance to fire is too far Place new batteries see chapter 5 in user manual Pair the remote control with the receiver see chapter 5 in user manual Shortens the distance Large amount of smoke appears grey or colourless Lamp failure Replace circuit board with lamps 57 e BoX will not operate the LED s continuous...

Страница 26: ...Installation manual e BoX 1000 450 I ST 26 10 Dimensional drawings e BoX 1000x450 I ...

Страница 27: ...Installation manual e BoX 1000 450 I ST 27 e BoX 1000x450 ST ...

Страница 28: ...Installation manual e BoX 1000 450 I ST 28 ...

Страница 29: ...Installationshandbuch e BoX 1000 450 I ST DE ...

Страница 30: ...Installationshandbuch e BoX 1000 450 I ST 30 ...

Страница 31: ...Installationshandbuch e BoX 1000 450 I ST 31 1 1 1 2 1 3 1 4 1 5 1 6 1 7 1 8 1 9 2 0 ...

Страница 32: ...Installationshandbuch e BoX 1000 450 I ST 32 2 1 2 2 2 3 2 4 3 0 ...

Страница 33: ...Installationshandbuch e BoX 1000 450 I ST 33 3 1 3 2 3 3 3 4 3 5 3 6 3 7 3 8 ...

Страница 34: ...Installationshandbuch e BoX 1000 450 I ST 34 ...

Страница 35: ...ßlich Batterien siehe Abb 1 1 Wandler 2x siehe Abb 1 2 Schwamm siehe Abb 1 3 Wasseranschlussset siehe Abb 1 4 CE Erklärung Das Produkt entspricht den europäischen Sicherheitsnormen EN60335 2 30 und den europäischen Norm für elektromagnetische Verträglichkeit EMV EN55014 EN60555 2 und EN60555 3 deckt die grundlegenden Anforderungen der EG Richtlinien 2014 35 EG und 2014 30 EG ab Produkt elektrische...

Страница 36: ... 9 Entfernen die Transportblöcke zwischen Maschine und Box und zentrieren Sie die Engine Siehe Abb 2 0 Führen einen Leistungstest durch Siehe Kapitel 5 und überprüfen Sie alle Wasseranschlüsse auf Leckage Wenn kein optionaler Dekorationsset bestellt wird Platzieren Sie den mitgelieferten Deflektor und die Bodenplatte 11687196 Siehe Abb 2 3 und 2 4 Das montieren die Glasscheibe erfolgt in umgekehrt...

Страница 37: ...ach hinten und entfernen Sie die Schallköpfe siehe Abb 3 6 8 Geben Sie eine kleine Menge Spülmittel in den Wassertank und reinigen Sie den Sumpf mit einer weichen Bürste Reinigen Sie auch die Schallköpfe einschließlich der Scheiben unter den Kegeln Entfernen Sie den Kegel indem Sie ihn im Uhrzeigersinn drehen siehe Abb 3 7 9 Spülen Sie den Wassertank nach der Reinigung gründlich mit klarem Wasser ...

Страница 38: ...g Figuren Hitze 1373 W 1495 W Nur Flamme 463 W 504 W Bereithalten 32 W 35 W Batterien Fernbedienung 2x 1 5 AA V Wasserverbrauch 0 3 L h Eingangswasserdruck 0 5 8 Bar Wasserverbindung or Inch Code Symptome Ursache Aktion Der Flammeneffekt startet nicht Keine Stromversorgung Niedriger Wasserstand Die Wandler sind nicht richtig angeschlossen Überprüfen Sie ob das Netzteil richtig an die Steckdose ang...

Страница 39: ...Feuerbild ist auf Maximum eingestellt Die Umgebungstemperatur im Raum ist zu niedrig Die Luftfeuchtigkeit im Raum ist zu hoch Wechseln Sie die Frontgläser aus Stellen Sie das Brandbild mit Hilfe der ECO Fernbedienung auf eine niedrigere Einstellung ein Heizen Sie den Raum Lüften Sie den Raum Die Fernbedienung funktioniert nicht Schwache Batterien Die Fernbedienung ist nicht mit dem Empfänger gekop...

Страница 40: ...Installationshandbuch e BoX 1000 450 I ST 40 10 Maßzeichnungen e BoX 1000 450 I ...

Страница 41: ...Installationshandbuch e BoX 1000 450 I ST 41 e BoX 1000 450 ST ...

Страница 42: ...Installationshandbuch e BoX 1000 450 I ST 42 ...

Страница 43: ...Manuel d installation e BoX 1000 450 I ST FR 43 ...

Страница 44: ...Manuel d installation e BoX 1000 450 I ST 44 ...

Страница 45: ...Manuel d installation e BoX 1000 450 I ST 45 1 1 1 2 1 3 1 4 1 5 1 6 1 7 1 8 1 9 2 0 ...

Страница 46: ...Manuel d installation e BoX 1000 450 I ST 46 2 1 2 2 2 3 2 4 3 0 ...

Страница 47: ...Manuel d installation e BoX 1000 450 I ST 47 3 1 3 2 3 3 3 4 3 5 3 6 3 7 3 8 ...

Страница 48: ...Manuel d installation e BoX 1000 450 I ST 48 ...

Страница 49: ...ir fig 1 2 o Eponge voir fig 1 3 o Matériel de raccordement pour le raccordement d eau voir fig 1 4 Déclaration CE Le produit est conforme aux normes de sécurité européennes EN60335 2 30 et aux normes européennes Compatibilité électromagnétique standard CEM EN55014 EN60555 2 et EN60555 3 elles couvrent les exigences essentielles des directives CEE 2014 35 EU et 2014 30 EU Appareil electric fire Op...

Страница 50: ...oir fig 1 7 Fixez le feu aux 4 supports voir fig 1 9 Retirez les blocs de transport entre le moteur et la boîte et centrez le moteur Voir fig 2 0 Faites un test de performance Consultez la section 5 et vérifiez tous les raccords d eau pour détecter les fuites Lorsqu aucun kit de décoration optionnel n est commandé placez le déflecteur et la plaque de fond fournis 11687196 Voir fig 2 3 et 2 4 Le re...

Страница 51: ...ansducteurs voir fig 3 6 8 Versez une petite quantité de liquide vaisselle dans le carter d eau et nettoyez le carter à l aide d une brosse douce Nettoyez également les transducteurs y compris les disques situés sous les cônes Retirez le cône en le tournant dans le sens des aiguilles d une montre voir fig 3 7 9 Une fois nettoyé rincez soigneusement le carter d eau avec de l eau propre pour élimine...

Страница 52: ...e prêt 32 W 35 W Piles à distance 2x 1 5 AA V Consommation d eau 0 3 L h Pression d eau d entrée 0 5 8 Bar Connexion d eau ou Inch Code Symptôme Cause Actes L effet de flamme ne commencera pas Pas d alimentation faible niveau d eau Les transducteurs ne sont pas connectés correctement Vérifiez si l alimentation est correctement branchée à la prise murale et Mettez l interrupteur principal en positi...

Страница 53: ...t trop élevé et il y a trop de fumée Le ventilateur d extraction ne fonctionne plus Vérifiez si le ventilateur monté en haut à droite dans le feu fonctionne La télécommande ne fonctionne pas Piles faibles La télécommande n est pas jumelée au récepteur La distance de tir est trop loin Placez de nouvelles piles voir le chapitre 5 du manuel d utilisation Associez la télécommande au récepteur voir le ...

Страница 54: ...Manuel d installation e BoX 1000 450 I ST 54 10 Dessins cotés e BoX 1000 450 I ...

Страница 55: ...Manuel d installation e BoX 1000 450 I ST 55 e BoX 1000 450 ST ...

Страница 56: ...www faberfires com contact faberfires com Saturnus 8 NL 8448 CC Heerenveen Postbus 219 NL 8440 AE Heerenveen ...

Отзывы: