Installation manual e-MatriX heat 800/500 I,II,III and e-MatriX heat 800/650 I,II,III
21 <
<
<
<
1
Dear user
Congratulations on your purchase of a Faber fire! A
quality product from which you will experience
warmth and atmosphere for many years. We
recommend that you read this manual carefully
before using the fireplace. If any problem arises
despite our strict quality control, you can always
contact your dealer or Glen Dimplex Benelux B.V.
For any warranty claims, it is essential you first
register your fireplace. During this registration,
you’ll find all information regarding our warranty.
Please note!
The details of your fireplace can be found in
the user manual.
You can register your fire at:
Glen Dimplex Benelux B.V.
Address: Saturnus 8
NL-8448 CC
Heerenveen
Tel:
+31 (0)513 656 500
Email: [email protected]
Info:
Introduction
Only have the fire installed by a qualified installer
according to the water and electric safety
Regulations. Read this installation manual properly.
Where the installation instructions are not clear,
national/local regulations must be followed.
Check
Check the fire for transport damage and
report any damage immediately to your
supplier.
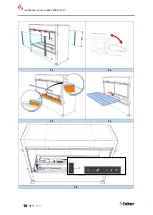
Check whether all of the parts below are
included:
o
Remote (incl. batteries), fig. 1.1;
o
Spare transducers (2x) fig 1.2;
o
Sponge, fig. 1.3;
o
Water connection set, fig. 1.4.
CE declaration
The product complies with the European Safety
Standards EN60335-2-30 and the European
Standard Electromagnetic Compatibility (EMC)
EN55014, EN60555-2 and EN60555-3 these cover
the essential requirements of EEC Directives
2014/35/EU and 2014/30/EU.
Product: electric fire Opti-myst
Model: e-BoX 1000/450 I,ST
This declaration will become null and void as soon
as the unit is in any way modified without written
authorization of Glen Dimplex Benelux B.V.
2
Safety instructions
Do not use outdoors.
Do not use in the immediate surroundings of a
bath, shower or swimming pool.
The fire must be installed according this
manual.
3
Installation requirements
Water supply
Install a water connection with an ½” or ¾”
external thread connection, placed at an
accessible location.
Install an EA backflow protection valve, this is
not included with the appliance.
Water pressure on the appliance between 0,5
and 8 Bar. Where required, use a pressure
reducing valve.
For an external pump connection, see the manual
of the external pump.
Power supply
Electric connection -230VAC/50Hz earthed and
placed at an accessible location.
4
Preparation and installation
instructions
Please note!
The fireplace has a warm air outflow on one
side, take this into account when the fireplace
is installed as a see-through.
Make sure the fireplace is not affected by airflow
caused by drafts, ceiling fans or other air movers.
Any form of air flow will strongly influence the fire
image.
The total weight of the e-BoX is +/- 73 kg.
Build-in structure
The built-in structure can be constructed of
combustible materials.
Construct a frame or platform that is strong
enough to support the fireplace
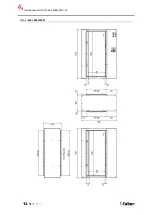
For the minimum dimensions, see the
dimensional drawing, Chapter 10
Содержание e-BoX 1000 I
Страница 2: ...2 ...
Страница 4: ...Installatievoorschrift e BoX 1000 450 I ST 4 1 1 1 2 1 3 1 4 1 5 1 6 1 7 1 8 1 9 2 0 ...
Страница 5: ...Installatievoorschrift e BoX 1000 450 I ST 5 2 1 2 2 2 3 2 4 3 0 ...
Страница 6: ...Installatievoorschrift e BoX 1000 450 I ST 6 3 1 3 2 3 3 3 4 3 5 3 6 3 7 3 8 ...
Страница 12: ...Installatievoorschrift e BoX 1000 450 I ST 12 10 Maattekeningen e BoX 1000 450 I ...
Страница 13: ...Installatievoorschrift e BoX 1000 450 I ST 13 e BoX 1000 450 ST ...
Страница 14: ...Installatievoorschrift e BoX 1000 450 I ST 14 ...
Страница 15: ...Installation manual e BoX 1000 450 I ST ENG 15 ...
Страница 16: ...Installation manual e BoX 1000 450 I ST 16 ...
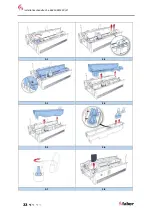
Страница 17: ...Installation manual e BoX 1000 450 I ST 17 1 1 1 2 1 3 1 4 1 5 1 6 1 7 1 8 1 9 2 0 ...
Страница 18: ...Installation manual e BoX 1000 450 I ST 18 2 1 2 2 2 3 2 4 3 0 ...
Страница 19: ...Installation manual e BoX 1000 450 I ST 19 3 1 3 2 3 3 3 4 3 5 3 6 3 7 3 8 ...
Страница 20: ...Installation manual e BoX 1000 450 I ST 20 ...
Страница 26: ...Installation manual e BoX 1000 450 I ST 26 10 Dimensional drawings e BoX 1000x450 I ...
Страница 27: ...Installation manual e BoX 1000 450 I ST 27 e BoX 1000x450 ST ...
Страница 28: ...Installation manual e BoX 1000 450 I ST 28 ...
Страница 29: ...Installationshandbuch e BoX 1000 450 I ST DE ...
Страница 30: ...Installationshandbuch e BoX 1000 450 I ST 30 ...
Страница 31: ...Installationshandbuch e BoX 1000 450 I ST 31 1 1 1 2 1 3 1 4 1 5 1 6 1 7 1 8 1 9 2 0 ...
Страница 32: ...Installationshandbuch e BoX 1000 450 I ST 32 2 1 2 2 2 3 2 4 3 0 ...
Страница 33: ...Installationshandbuch e BoX 1000 450 I ST 33 3 1 3 2 3 3 3 4 3 5 3 6 3 7 3 8 ...
Страница 34: ...Installationshandbuch e BoX 1000 450 I ST 34 ...
Страница 40: ...Installationshandbuch e BoX 1000 450 I ST 40 10 Maßzeichnungen e BoX 1000 450 I ...
Страница 41: ...Installationshandbuch e BoX 1000 450 I ST 41 e BoX 1000 450 ST ...
Страница 42: ...Installationshandbuch e BoX 1000 450 I ST 42 ...
Страница 43: ...Manuel d installation e BoX 1000 450 I ST FR 43 ...
Страница 44: ...Manuel d installation e BoX 1000 450 I ST 44 ...
Страница 45: ...Manuel d installation e BoX 1000 450 I ST 45 1 1 1 2 1 3 1 4 1 5 1 6 1 7 1 8 1 9 2 0 ...
Страница 46: ...Manuel d installation e BoX 1000 450 I ST 46 2 1 2 2 2 3 2 4 3 0 ...
Страница 47: ...Manuel d installation e BoX 1000 450 I ST 47 3 1 3 2 3 3 3 4 3 5 3 6 3 7 3 8 ...
Страница 48: ...Manuel d installation e BoX 1000 450 I ST 48 ...
Страница 54: ...Manuel d installation e BoX 1000 450 I ST 54 10 Dessins cotés e BoX 1000 450 I ...
Страница 55: ...Manuel d installation e BoX 1000 450 I ST 55 e BoX 1000 450 ST ...
Страница 56: ...www faberfires com contact faberfires com Saturnus 8 NL 8448 CC Heerenveen Postbus 219 NL 8440 AE Heerenveen ...

