background image

|   English

12

a detergent, the detergent intake circuit must be 

flushed out with clean water.

NOTE  

Detergent  must  only  be  delivered  in  the  low-pres

-

sure setting. 

1.  Prepare the solution of detergent at the con-

centration  most  suitable  for  the  type  of  dirt 

and the surface that is to be washed. 

2. 

Activate the detergent suction control on the 

lance (low pressure), operate the water cleaner 

and spray the surface to be washed, starting 

from the bottom and working upwards. 

3. 

Rinse the whole surface well from top to bot

-

tom with hot or cold water at high pressure.

4. 

After use with detergent, flush out the intake 

circuit by placing the detergent suction hose in 

a tank of clean water and letting the pump run 

for 1 minute with the dosing tap turned fully on 

and the lance in detergent delivery condition.

Stopping the machine 

1. 

Turn the burner off by rotating the pressure reg

-

ulator to the “0” position.

2.  Let the pressure washer run with cold water only 

for at least 30 seconds to cool down the boiler.

3. 

Stop  the  pressure  washer  by  turning  the  “On-

Off” switch to pos. "0".

4. 

Discharge the pressure from the high pressure 

hose by pressing the trigger on the gun.

5. 

Disconnect the machine from the mains electric

-

ity supply.

6. 

Turn off the water supply tap.

WARNING 

Dry use of the water cleaner causes serious damage 

to pump gaskets. If the pressure washer is left, even 

temporarily, turn it off by using the switch or by un

-

plugging the plug from the socket.

PRECAUTIONS AGAINST FROST

The cleaner must not be exposed to frost. If the 

machine is left in premises where it is exposed to 

frost, when work is over or for storage, antifreeze 

must  be  used  to  prevent  serious  damage  to  the 

hydraulic circuit:

1. 

Turn off the water supply, disconnect the hose 

and run the cleaner until it is completely empty.

2. 

Stop the machine with the “On-Off” switch in 

the “O” position.

3.  Prepare a container with the solution of anti-

freeze.

4. 

Immerse the tube in the container with the an

-

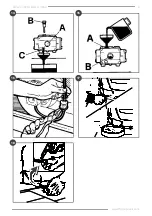
ti-freeze solution (Fig. 13).

5. 

Start the machine with the “On-Off” switch in 

the “I” position.

6. 

Let  it  run  until  antifreeze  comes  out  through 

the lance.

7. 

Suck  up  antifreeze  with  the  detergent  intake 

system too. 

8. 

Disconnect  the  machine  from  the  mains  elec

-

tricity supply.

NOTE 

For high pressure cleaners provided with water tank, 

the detergent solution prepared must be poured di

-

rectly into the water tank.

NOTE  

Anti-freeze  may  cause  environmental  pollution.  Al

-

ways follow the instructions given on the pack.

MAINTENANCE AND CLEANING

WARNING  

Disconnect  the  machine  from  the  mains  electricity 

supply and close the water supply tap before carry-

ing out any maintenance jobs. Once maintenance has 

been completed, ensure that the closing panels have 

been correctly reassembled and anchored with the 

screws  provided  before  reconnecting  the  machine 

to the mains.

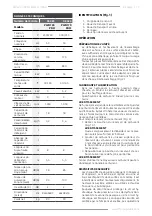
MAINTENANCE SCHEDULE

Items

B

ef

o

re e

ac

h u

se

Ev

er

y 5

0

hr

s o

f o

p

er

at

io

n

Ev

er

y 1

0

0

hr

s o

f o

p

er

at

io

n

Ev

er

y 2

0

0

hr

s o

f o

p

er

at

io

n

Ev

er

y 3

0

0

hr

s o

f o

p

er

at

io

n

Ev

er

y 5

0

0

hr

s o

f o

p

er

at

io

n

Complete 

unit

Visual 

Ispection

Control 
handles

Check

Power 
cables

Check

√*

Pipes

Check

√*

High 
pressure 
connec-
tions

Check

√*

Fuel fiter

Check-
Clean

√*

Water filter

Check-
Clean

Fuel tank

Clean

Boiler coil

Clean

√**

Descale

√**

Pump oil 

and seals

Change

√**

Fuel pump

Clean

√**

Fuel nozle

Change

√**

Electrodes

Regulate

√**

Change

√**

Safety 

devices

Check

Calibrate

√**

Lance 

nozzle

Change

*These items should be replaced if needed.  
**These components should be serviced and repaired only 
by authorized service center, that have the proper tools and 

expertise. 


Frequency

PWH 130 PRO | PWH 170 PRO

Содержание PWH 130 PRO

Страница 1: ...PWH 130 PRO PWH 170 PRO ORIGINAL INSTRUCTIONS ISTRUZIONI ORIGINALI IT ORIGINALNO UPUTSTVO ZA RAD SR INSTRUC IUNI DE FOLOSIRE ORIGINALE RO NOTICE ORIGINALE FR EL ORIGINALNE UPUTE ZA RAD HR...

Страница 2: ...NJE SIMBOLA EXPLICAREA SIMBOLURILOR 6 HOT WATER HIGH PRESSURE CLEANER 8 FR NETTOYANT HAUTE PRESSION EAU CHAUDE 14 IT DROPULITRICE AD ACQUA CALDA 21 EL 28 SR KOMPRESORSKI ISTA A NA VRELU VODU 36 HR VIS...

Страница 3: ...3 www ffgroup tools com B A C B A C D ie s e l D ie s e l 0 MAX 120 C 250 F 6 5 C 140 F 0 MAX 120 C 250 F 6 5 C 140 F A B 30 mA 2 4 6 3 5 7 PWH 130 PRO PWH 170 PRO...

Страница 4: ...4 Chemical Chemical 8 10 12 9 11 13 PWH 130 PRO PWH 170 PRO...

Страница 5: ...5 www ffgroup tools com 14 16 18 15 17 PWH 130 PRO PWH 170 PRO...

Страница 6: ...work without a system separator Conform ment aux r glements en vigueur cet appareil ne doit jamais tre accord au r seau de distribution d eau sans disconnecteur Non alimentare con acqua potabile Utili...

Страница 7: ...u uje bez razdvajanja sistema na mre u pija e vode Prema va e im propisima ure aj se bez odvajanja sustava ne smije priklju iti na vodovodnu mre u Conform normelor n vigoare scula electric nu poate fi...

Страница 8: ...dvisable install a flue gas extraction system and guarantee adequate ventilation The rating done by the manufacturer determines a production of exhaust gases with a CO content lower than 0 04 and a sm...

Страница 9: ...es anti vibration gloves and take breaks while working WORKING AREA HAZARDS Thoroughly inspect the whole work area and use a rake or yard brush to manually loosen debris and remove anything that could...

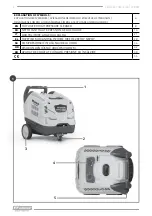
Страница 10: ...H cm 82x69x87 64x48x76 Net weight kg 80 90 IDENTIFICATION Fig 1 1 Transport handle 2 Front transport wheel 3 Rear transport wheel 4 Control panel 5 Fuel tank cap OPERATION PREPARING THE UNIT Unpacking...

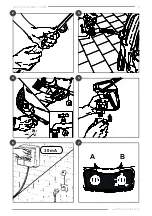
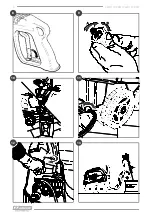
Страница 11: ...6 3 Start the machine by turning the On Off switch to position I Fig 7 A 4 Press the trigger on the gun and begin wash ing 5 To operate the pressure washer with hot water turn the temperature regulat...

Страница 12: ...to the hydraulic circuit 1 Turn off the water supply disconnect the hose and run the cleaner until it is completely empty 2 Stop the machine with the On Off switch in the O position 3 Prepare a contai...

Страница 13: ...ter only from time to time because the scale present in the water partially deposits inside the hydraulic circuit and the coil which with time be comes clogged CLEANING Use a small soft brush to clean...

Страница 14: ...d accessoires sur la machine qui n est pas pr vu ou approuv par le fabricant N essayez jamais de modifier le produit Les modifications ou accessoires non autoris s peuvent entra ner des bles sures gra...

Страница 15: ...en fLorsdurepositionnement dutransportoudel en treposage de la machine En cas de dysfonctionnement ou de blocage de la machine teignez imm diatement la machine et retirez la de la source d alimentatio...

Страница 16: ...ler sur un sol mouill et glissant ou en tout cas sur un terrain in gal ou escarp qui ne garantit pas la stabilit de l op rateur La machine doit toujours tre utilis e sur un sol ferme et plat En outre...

Страница 17: ...es comme expliqu dans les instructions fournies dans chaque kit d assemblage Fig 2 CARBURANT ET LUBRIFICATION Dans les nettoyeurs haute pression d eau chaude un br leur carburant diesel est utilis pou...

Страница 18: ...se pression avec de l eau chaude tournez le r gulateur de temp rature vers les valeurs de lavage recom mand es Fig 7 B NOTE Dans les laveuses sous pression avec le syst me To tal Stop le moteur d marr...

Страница 19: ...se PR CAUTIONS CONTRE LE GEL Le nettoyeur ne doit pas tre expos au gel Si la machine est laiss e dans des locaux o elle est expos e au gel lorsque le travail est termin ou pour le stockage l antigel d...

Страница 20: ...ez la un centre autoris de collecte d huile 4 Repositionner la vis de vidange 5 Remplir de nouvelle huile 15W40 Fig 15 A jusqu ce qu elle atteigne le niveau indiqu sur le verre vue Fig 15 B 6 Repositi...

Страница 21: ...empre il tuo buon senso per evitare tutte le situazioni considerate al di l del le tue capacit Non utilizzare il prodotto quando si stanchi o sotto l effetto di droghe alcol o altri farma ci Non utili...

Страница 22: ...ell apparecchio In caso di guasto e o di cattivo funzionamento dell idropulitrice spegnerla scollegandola dalla rete di alimentazione elettrica mediante l inter ruttore omnipolare o scollegando la spi...

Страница 23: ...orare solo alla luce del giorno o con una luce artificiale idonea in buone condizioni di visibilit Cerca di non causare disturbi da rumore usando l apparecchio solo in momenti ragionevoli della giorna...

Страница 24: ...lle istruzioni fornite in ogni kit di montaggio Fig 2 RIFORNIMENTO L idropulitrice ad acqua calda per il riscaldamento dell acqua utilizza un bruciatore alimentato a com bustibile per motori Diesel Sp...

Страница 25: ...OTA Per eliminare eventuali impurit o bolle d aria dal circuito idraulico effettuare il primo avviamento dell idropulitrice senza lancia lasciando uscire l ac qua per alcuni secondi Eventuali impurit...

Страница 26: ...di alimentazione e far funzi onare l idropulitrice fino al completo svuota mento 2 Arrestare l idropulitrice con l interruttore di ac censione in pos 0 3 Preparare un recipiente con la soluzione del p...

Страница 27: ...ere il tappo di scarico Fig 14 C 3 Lasciare che tutto l olio sgoccioli in un conten itore e consegnarlo ad un centro di raccolta dell olio autorizzato per lo smaltimento 4 Rimontare il tappo di scaric...

Страница 28: ...ativa ai rifiuti di apparecchiature elettriche ed elettroniche Questo prodotto deve essere smaltito in un punto di raccolta designato Ci pu verificarsi ad esempio consegnandolo in un punto di raccolta...

Страница 29: ...29 www ffgroup tools com CO 0 04 nr 2 Shell Bacharach f f f f IEC 60364 1 3kW PWH 130 PRO PWH 170 PRO...

Страница 30: ...30 IEC 60364 1 3mm 3 kW 30mA 30ms 25 250 bar 360 3600 PSI f f f f f f f f f f f f f VDE DIN PWH 130 PRO PWH 170 PRO...

Страница 31: ...0 415 Hz 50 50 Ph 1 3 bar 130 170 l h 600 840 kW 40 55 C 30 140 30 140 kW 3 5 2 No 4 4 rpm 1 400 1 400 l 18 18 kg h 3 2 4 6 l l m 8 8 m 5 5 5 5 LpA dB A 78 85 LwA dB A 94 100 K dB 2 2 Mx x cm 82x69x87...

Страница 32: ...32 4A 4B 200 800 kPa 50 C 4C 5 EN 12729 BA 11 1 On Off 7 A 2 7 B 1 2 6 3 On Off I 7 A 4 5 7 A Total Stop 12 95 C 203 F 32 bar 460 PSI 0 3 10 PWH 130 PRO PWH 170 PRO...

Страница 33: ...33 www ffgroup tools com f f 1 2 3 4 1 1 0 2 30 3 On Off 0 4 5 6 1 2 On Off O 3 4 13 5 On Off I 6 7 8 50 100 200 300 500 PWH 130 PRO PWH 170 PRO...

Страница 34: ...34 50 100 200 300 500 1 2 3 4 5 14 14 50 500 1 2 14 C 3 4 5 15W40 15 A 15 B 6 16 17 18 PWH 130 PRO PWH 170 PRO...

Страница 35: ...35 www ffgroup tools com 1 2 3 4 PWH 130 PRO PWH 170 PRO...

Страница 36: ...esvesticu ili smrt Ako e se aparat ko ristiti u zatvorenom prostoru nije preporu ljivo instalirajte sistem za va enje gasa od gripa i ga rantovajte adekvatnu ventilaciju Ocena koju je uradio proizvo a...

Страница 37: ...NOSTI U RADNOJ OBLASTI Detaljno pregledajte ceo radni prostor i koristite etkicu za grabulje ili dvori te kako biste ru no olabavili ostatke i uklonili sve to bi moglo da vam bude opasan izvor ili da...

Страница 38: ...a tabla 5 Kapa rezervoara za gorivo OPERACIJA PRIPREMA JEDINICE Raspakivanje i dovr avanje monta e treba uraditi na ravnoj i stabilnoj povr ini sa dovoljno prostora za preme tanje ma ine i njene ambal...

Страница 39: ...ra ture preporu enim vrednostima pranja Sl 7 B BELE KE U pera ima pritiska sa sistemom Total Stop motor se pokre e i zaustavlja kada se oslobodi ru ica na dr ci koplja BELE KE Da biste eliminisali bil...

Страница 40: ...a em On Off na poziciji O 3 Pripremite posudu sa rastvorom antifriza 4 Uronite cev u posudu sa rastvorom protiv zam rzavanja Sl 13 5 Pokrenite ma inu sa prekida em On Off na poziciji I 6 Pustite ga da...

Страница 41: ...ente ista i doma instava koji sadr e aromati na ulja kao to su bor i limun i rastvara i kao to je kerozin mogu da o tete plasti na ku i te ili dr ku Obri ite svaku vlagu mekom krpom Uklonite pra inu...

Страница 42: ...u zatvorenom prostoru nije preporu ljivo insta lirajte sustav za odvo enje dimnih plinova i zajam ite odgovaraju u ventilaciju Procjena koju je proizveo proizvo a odre uje proizvodnju ispu nih plinova...

Страница 43: ...dr ite podalje od zapa ljivih materijala Provjerite nema li posmatra a ivotinja ili predmeta koji bi mogli biti o te eni u krugu djelovanja stroja Nemojte koristiti visoko tla ni ista kada su osobe il...

Страница 44: ...CE Raspakiranje i dovr avanje sklopa treba obaviti na ravnoj i stabilnoj povr ini s dovoljno prostora za pomicanje stroja i njegove ambala e uvijek kori ste i prikladnu opremu Sve temeljne dijelove i...

Страница 45: ...ranje toplom vodom okre ite regulator temperature na preporu e ne vrijednosti pranja Sl 7 B BILJE KA U ure ajima za pranje pod pritiskom sa sustavom Total Stop motor se pokre e i zaustavlja kad se ot...

Страница 46: ...te ista dok se potpuno ne isprazni 2 Zaustavite stroj prekida em On Off u polo aju O 3 Pripremite posudu s otopinom antifriza 4 Uronite epruvetu u posudu s otopinom protiv smrzavanja Sl 13 5 Pokrenite...

Страница 47: ...anj ske strane jedinice Ne koristite jake deterd ente Sredstva za i enje u doma instvu koja sadr e aro mati na ulja poput bora i limuna te otapala poput kerozina mogu o tetiti plasti no ku i te ili dr...

Страница 48: ...rece arz torul diesel eva cueaz monoxid de carbon otr vitor un gaz ino dor i incolor Inhalarea monoxidului de carbon va provoca grea le in sau moarte Dac aparatul trebuie utilizat ntr un spa iu nchis...

Страница 49: ...DE ZGOMOT I VIBRA II Inspecta i cu aten ie ntreaga zon de lucru i folosi i o perie de grebl sau curte pentru a sl bi manual resturile i a ndep rta orice poate fi o surs periculoas pentru dvs sau poat...

Страница 50: ...um de combustibil kg h 3 2 4 6 Capacitatea rezervorului de detergent l DATE TEHNICE Numarul articolului 46 425 46 426 Model PWH130 PRO PWH170 PRO Dezv luirea capacit ii rezervorului l Lungimea furtunu...

Страница 51: ...iti vul de cur are Fig 4C i la lance Fig 5 AVERTIZARE Cur torul trebuie s func ioneze cu ap curat Apa murdar sau nisipoas substan ele chimice corozive i solven ii sau inflamabili pot provoca daune gra...

Страница 52: ...de sp lat cu presiune s func io neze cu ap rece numai timp de cel pu in 30 de secunde pentru a r ci cazanul 3 Opri i ma ina de sp lat cu presiune rotind comu tatorul On Off n pozi ia 0 4 Desc rca i p...

Страница 53: ...aspect l ptos suna i imediat la centrul de service tehnic Schimba i uleiul dup primele 50 de ore de munc i ulterior la fiecare 500 de ore sau o dat pe an Pentru a schimba uleiul 1 Scoate i dipstick 2...

Страница 54: ...electronice Acest produs trebuie eliminat la un punct de colectare desemnat Acest lucru se poate nt mpla de exemplu prin predarea la un punct de colectare autorizat pentru reciclarea de eurilor de ech...

Страница 55: ...i da su u skladu sa slede im standardima KOMPRESORSKI ISTA A NA VRELU VODU Broj predmeta HR EU IZJAVA O SUKLADNOSTI Pod punom odgovorno u izjavljujemo da navedeni proizvodi odgovaraju svim relevantni...

Страница 56: ...www ffgroup tools com info ffgroup toolindustries com 30 210 55 98 400 19300 Athens Greece 9 5 Km Attiki Odos Aspropyrgos FF GROUP TOOL INDUSTRIES...

Отзывы: