


3.
In the
Open
dialog box, browse to and select the desired file:
•
Background images must be in
.png
file format.
•
Font files must be in
.ttf
or
.otf
file format.
4.
Click
Open
. The dialog box closes. The file name is in the
Destination
Name:
field.
5.
If desired, edit the text in the
Destination
Name:
field. The destination name is the
file name and extension, not a directory path.
6.
Perform one of the following:
•
Enter the name of the directory folder in which the file will be stored into the
Destination
Directory:
field.
•
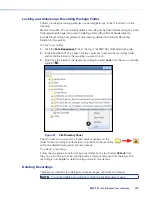
Click on the desired folder in the
File
Directory
panel. The directory (folder)
name appears in the
Destination
Directory:
field.
NOTE:
For fonts, select
fonts
as the destination directory.
7.
Click
Upload
. The file is copied into the designated folder.
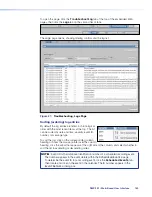
Delete a File or Folder
Once a file folder or a file, such as a background image or font, is stored in the SMP, you
can remove it as follows:
NOTE:
Folders and files in the /recordings/ folder are read-only and cannot be deleted
from the File Management page. Recordings must be deleted via the Scheduled
Events page.
1.
In the
File
Directory
panel, click the
+
adjacent to a folder to expand it and locate
the desired file or folder.
2.
Right-click the file or folder and select
Delete
. The
Permanently
Delete
Confirmation
dialog box opens.
3.
Click
Delete
to permanently remove the file or folder.
SMP 351 • Web-Based User Interface
132