background image

14

SMX System MultiMatrix Switcher • Front Panel Operation

Adjusting the Output Audio Volume

The audio output level of each output can be displayed and adjusted 
through a range of 64 steps (1 dB per step, 0% to 100%). The audio 
level can be adjusted from the front panel, RS-232, RS-422, or through 
Ethernet. Adjustment is attenuation only.

NOTES:


Refer to the 

SMX User Guide

 for other adjustment 

methods.

• 

Front panel adjustment and viewing are only available 
when the unit is in Lock mode 0.

1. 

Press the Esc button to clear any pending changes. The button 
flashes green once.

2. 

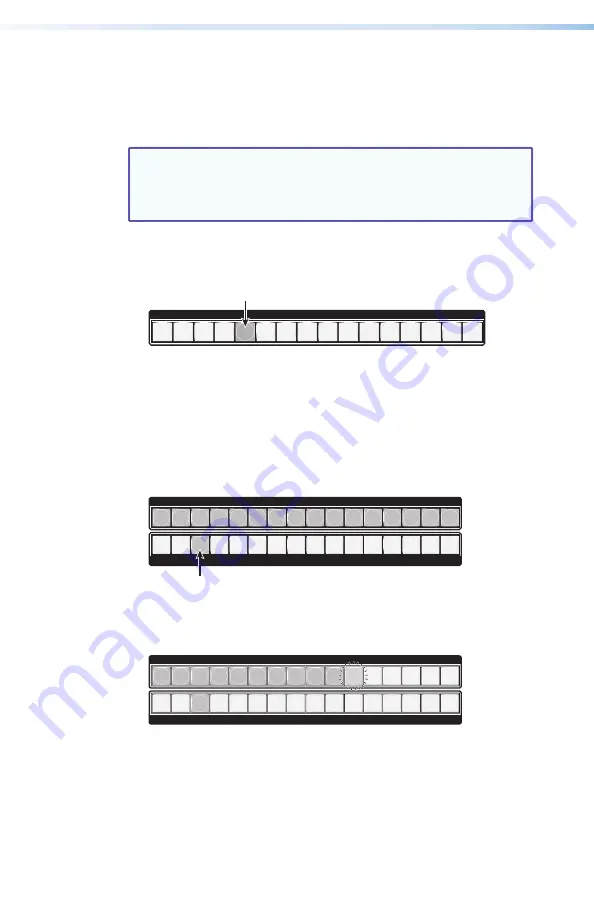
Press the desired audio I/O Plane button to be adjusted. The plane 
button and Input 1 light.

I/O PLANE SELECT

1 2 3 4 5 6 7 8 9 10 11 12 13 14 15

0

Figure 20. 

Plane 4 Selected 

 an Example

3. 

Press and 

hold

 any Ouput button until the I/O Plane button 

flashes. I/O buttons turn off.

4. 

Press the button for the output that needs the audio volume 
adjusted. The selected output button lights green. The current 
audio volume is indicated by the lit and flashing Input buttons 
(see the 

Output Audio Volume Table

 on page 15 for lighting and 

volume levels).

INPUTS

1 2 3 4 5 6 7 8 9 10 11 12 13 14 15 16

OUTPUTS

1 2 3 4 5 6 7 8 9 10 11 12 13 14 15 16

Figure 21. 

Output 3 Set to 100% Audio Volume 

 an Example

5. 

Press and 

hold

 the 

View

 button to decrease or the 

Esc

 button 

to increase audio level. The selected output button remains lit. 
Inputs light, flash, or go out as the volume changes.

INPUTS

1 2 3 4 5 6 7 8 9 10 11 12 13 14 15 16

OUTPUTS

1 2 3 4 5 6 7 8 9 10 11 12 13 14 15 16

Figure 22. 

Output 3 Set to 67.0% Audio Volume 

 an Example

6. 

Press the Enter button to leave the output audio volume 
adjustment mode. All button lights turn off.

Содержание MultiMatrix SMX System

Страница 1: ...Setup Guide 68 1452 50 Rev B 10 11 SMX System MultiMatrix Switcher Matrix Switcher ...

Страница 2: ...araufaufmerksammachen daß im Inneren des Gehäuses dieses Produktes gefährliche Spannungen dienichtisoliertsindunddieeinenelektrischen Schock verursachen können herrschen Achtung Lesen der Anleitungen Bevor Sie das Gerät zum ersten Mal verwenden sollten Sie alle Sicherheits und Bedienungsanleitungen genau durchlesen und verstehen Aufbewahren der Anleitungen Die Hinweise zur elektrischen Sicherheit ...

Страница 3: ...in a commercial environment This equipment generates uses and can radiate radio frequency energy and if not installed and used in accordance with the instruction manual may cause harmful interference to radio communications Operation of this equipment in a residential area is likely to cause harmful interference in which case the user will be required to correct the interference at his own expense...

Страница 4: ...examples of computer or device responses mentioned in this guide the character 0 is used for the number zero and O represents the capital letter o Computer responses and directory paths that do not have variables are written in the font shown here Reply from 208 132 180 48 bytes 32 times 2ms TTL 32 C Program Files Extron Variables are written in slanted form as shown here ping xxx xxx xxx xxx t SO...

Страница 5: ...vel 12 Adjusting the Output Audio Volume 14 Using Reset Levels 16 Reset Mode Uses 16 Setting the Front Panel Locks Executive Modes 18 Selecting Lock Mode 2 18 Selecting Lock Mode 1 18 SIS Programming Guide 19 SIS Overview 19 Network Ethernet Connections 19 Verbose Mode 20 Host to switcher Instructions 20 Error Messages 20 EDID 21 SIS Command Tables 22 Configuration and Control 32 Installing and St...

Страница 6: ...vi SMX System MultiMatrix Switcher Contents ...

Страница 7: ...r operating the SMX through the front panel controls SIS Programming Guide on page 19 for selected SIS commands Configuration and Control on page 32 for installing the SMX Control Program or Using the Web Pages to configure the SMX on page 35 for accessing the built in HTML pages About the SMX System MultiMatrix Switcher The SMX is a rack mountable modular configurable multi format card cage syste...

Страница 8: ...KE CUT PIP TITLE WIPE DISSOLVE LOGO 2 BLACK LOGO 1 BLACK 1 2 3 4 5 6 1 2 3 4 5 6 LOGO 2 BLACK LOGO 1 BLACK FREEZE FREEZE Video Recorders Main Projection Display Extron SMX System MultiMatrix Switcher Extron ISS 506 Sound Systems DVI Equipped PCs HDTV Monitors Compact HDTV Camera Systems Video Monitors PCs DVD VCR Combo DVD Player Digital Monitors Video Monitors Data Monitors HD SDI Camera Extron F...

Страница 9: ...SS L 1 R L 2 R L 3 R L 4 R L 5 R L 6 R L 7 R L 8 R L 1 R L 2 R L 3 R L 4 R L 5 R L 6 R L 7 R L 8 R 12 PLANE ADRESS OUT IN 1 OUT IN 2 OUT IN 3 OUT IN 4 FIBER OPTIC OUT IN 1 OUT IN 2 OUT IN 3 OUT IN 4 FIBER OPTIC OUT IN 1 OUT IN 2 OUT IN 3 OUT IN 4 FIBER OPTIC 6 13 Figure 2 An Example of a 5U SMX Rear Panel a AC power connector d Remote serial port b LAN Ethernet port e l I O boards optional c Reset...

Страница 10: ...ls Connecting Power Plug in a standard IEC power cord from a 100 to 240 VAC 50 60 Hz power source into the rear panel Setting Plane Addresses Set the plane address 0 15 of each I O board with the 16 position 0 F rotary encoder Each board can be set to any plane address including multiple boards to the same address Installing Additional I O Boards The I O boards used in any installation will vary a...

Страница 11: ...See the SMX User Guide for details about setting up the audio Tip Sleeve Sleeve Ring Tip RCA Connector 3 5 mm Stereo Plug Connector balanced Figure 4 Audio Connectors Audio output connectors Connect audio output devices to the 3 5 mm 5 pole captive screw connectors up to two groups of eight sets possible The connectors output unamplified line level audio see figure 5 for wiring details Balanced Au...

Страница 12: ...13 14 15 0 ENTER PRESET VIEW ESC 1 2 3 4 5 6 7 8 9 10 11 12 13 14 15 16 MAIN I O CARDS CONFIG P O W E R 2 1 3 4 5 6 Figure 6 Front Panel Features a I O Plane address selection buttons Select I O planes 0 15 and buttons 0 and 1 select RS 232 or RS 422 communication b Input selection buttons Select inputs create and remove ties sets background illumination press and hold inputs 0 and 1 or indicate o...

Страница 13: ...f the desired I O board The Plane button along with Input 1 and any of its tied Output buttons light I O PLANE SELECT 1 2 3 4 5 6 7 8 9 10 11 12 13 14 15 0 Figure 7 Plane 0 Selected an Example 3 Press the Input button that corresponds to the desired input source The selected button lights along with any currently tied outputs INPUTS 1 2 3 4 5 6 7 8 9 10 11 12 13 14 15 16 OUTPUTS 1 2 3 4 5 6 7 8 9 ...

Страница 14: ...press either the desired Input button or an unlit Output button I O PLANE SELECT 1 2 3 4 5 6 7 8 9 10 11 12 13 14 15 0 INPUTS 1 2 3 4 5 6 7 8 9 10 11 12 13 14 15 16 OUTPUTS 1 2 3 4 5 6 7 8 9 10 11 12 13 14 15 16 Figure 11 Plane 3 Showing Tied Outputs 10 through 12 and 16 on Input 3 an Example 5 Press the Esc button All button lights turn off Muting or Unmuting Outputs NOTE When the front panel is ...

Страница 15: ...hts turn off Removing Ties 1 Press the Esc button to clear any pending changes The button flashes once 2 Press the I O Plane button that corresponds to the plane address of the desired I O board The Plane button along with Input 1 and any of its tied Output buttons light 3 Press the Input button that corresponds to the desired input source Only the last selected Input button lights along with any ...

Страница 16: ...ts 1 2 3 4 5 6 7 8 9 10 11 12 13 14 15 16 INPUTS 1 2 3 4 5 6 7 8 9 10 11 12 13 14 15 16 OUTPUTS GLOBAL PLANE GLOBAL Preset 1 Preset 5 Preset 6 Preset 10 Preset 7 Preset 13 Preset 14 Preset 15 Preset 2 Preset 8 Preset 9 Preset 3 Preset 4 Preset 11 Preset 12 Preset 16 Preset 1 Preset 5 Preset 6 Preset 10 Preset 7 Preset 2 Preset 8 Preset 9 Preset 3 Preset 4 Preset 17 Preset 21 Preset 22 Preset 26 Pr...

Страница 17: ...orm one of the following a To save a plane preset press and hold the Preset button for 2 seconds The Preset button flashes red b To recall a plane preset press and release the Preset button The Preset button lights red 3 Press the desired plane button The button lights and any saved plane presets light red 4 Pick a plane preset number see figure 14 and perform one of the following To save a plane ...

Страница 18: ... audio level adjusted The selected input button lights green and the View button lights red The current audio level dB is indicated by the lit and flashing output buttons see Input Audio Level Table on page 13 INPUTS 1 2 3 4 5 6 7 8 9 10 11 12 13 14 15 16 OUTPUTS 1 2 3 4 5 6 7 8 9 10 11 12 13 14 15 16 Figure 19 Input 8 Set to 09 dB an Example 5 Press and hold the View button to decrease or the Esc...

Страница 19: ...8 flash 10 red 5 flash 14 green 7 11 red 6 flash 13 green 7 flash 12 red 6 flash 12 green 6 13 red 7 flash 11 green 6 flash 14 red 7 flash 10 green 5 15 red 8 flash 09 green 5 flash 16 red 8 flash 08 green 4 17 red 9 flash 07 green 4 flash 18 red 9 06 green 3 Esc View 05 green 3 flash 04 green 2 03 green 2 flash 02 green 1 01 green 1 flash 00 Not lit NOTES There is only one audio level setting per...

Страница 20: ...an Example 3 Press and hold any Ouput button until the I O Plane button flashes I O buttons turn off 4 Press the button for the output that needs the audio volume adjusted The selected output button lights green The current audio volume is indicated by the lit and flashing Input buttons see the Output Audio Volume Table on page 15 for lighting and volume levels INPUTS 1 2 3 4 5 6 7 8 9 10 11 12 13...

Страница 21: ...8 5 41 6 23 85 0 10 slow 54 37 0 42 slow 22 83 5 11 slow 53 35 5 43 slow 21 82 0 12 13 52 34 0 44 5 20 80 5 13 13 51 32 5 45 5 19 79 0 14 slow 50 31 0 46 slow 18 77 5 15 slow 49 29 5 47 slow 17 76 0 16 12 48 28 0 48 4 16 74 5 17 12 47 26 5 49 4 15 73 0 18 slow 46 25 0 50 slow 14 71 5 19 slow 45 23 5 51 slow 13 70 0 20 11 44 22 0 52 3 12 68 5 21 11 43 20 5 53 3 11 67 0 22 slow 42 19 0 54 slow 10 65...

Страница 22: ... I O lights flash every 3 seconds as the next reset level is reached corresponding to modes 3 4 and 5 Reset Mode Uses Use mode 1 to revert to the factory default firmware version if compatibility issues arise with user loaded firmware see notes on page 17 Use mode 3 to restart the communication and control events Use mode 4 to reset most IP protocols to their default settings Use mode 5 to restore...

Страница 23: ...ession confirming the Reset 5 Hold down the Reset button for 9 seconds until the Reset LED blinks three times once at 3 seconds again at 6 seconds and then again at 9 seconds Then press Reset momentarily 1 second within 1 second Mode 5 performs a complete reset to factory defaults with the exception of the firmware Does everything mode 4 does Resets almost all real time adjustments clears all ties...

Страница 24: ... audio output mutes setting audio output volume setting RGB delay VGA RGBHV boards and setting the rear panel remote port protocol and baud rate see the SMX User Guide to adjust many of these features Selecting Lock Mode 2 or Toggling Between Mode 2 and Mode 0 Press and hold the Preset View and Esc buttons at the same time for 2 seconds to switch between lock mode 0 and 2 The Preset View and Esc b...

Страница 25: ...dress is 192 168 254 254 The SMX responds with a copyright message including the date the name of the product firmware version part number and the current date and time 2 If the SMX is not password protected the device is now ready to accept SIS commands If the SMX is password protected enter the appropriate password If accepted the SMX responds with Login User or Login Administrator If the passwo...

Страница 26: ...racters per command field and do not require any special characters to begin or end the sequence SMX responses to an SIS command ends with a carriage return and a line feed which signals the end of the character string a string is one or more characters CR LF carriage return line feed Carriage return no line feed Space character NOTES Commands can be entered back to back in a string with no spaces...

Страница 27: ...utput 3 23 1365x768 60 4 Output 4 24 1365x768 75 5 Output 5 25 1366x768 60 6 Output 6 26 1366x768 75 7 Output 7 27 1400x1050 60 8 Output 8 28 1600x1200 60 9 640x480 60 29 480p 60 480p 2 ch audio 60 10 640x480 75 30 576p 50 576p 2 ch audio 60 11 800x600 60 31 720p 50 720p 2 ch audio 50 12 800x600 75 32 720p default DVI Pro HDMI 60 720p default 2 ch audio 60 13 852x480 60 33 1080i 50 1080p Multi ch ...

Страница 28: ...X to output X on plane X2 for audio signals Tie input to an output all X2 X X X2 Out X In X All Tie input X to output X on plane X2 for all signals NOTES The tie command for RGB and the tie command for video can be used interchangeably The read tie command for RGB and the read tie command for video can be used interchangeably Tie input to all RGBHV X2 X X2 In X RGB Tie input X to all outputs on pl...

Страница 29: ...Verbose mode 2 or 3 View RGBHV output tie X2 X X Tie input X to all outputs on plane X2 for video signals View audio output tie X2 X X X2 Out X In X Aud View audio input tied to output X on plane X2 Verbose mode 2 or 3 RGB Video Mute by Plane RGB video mute X2 X 1B X2 Vmt X 1 Mute RGB video output X RGB video unmute X2 X 0B X2 Vmt X 0 Unmute RGB video for X Read RGB mute X2 X B X Read RGB video ou...

Страница 30: ...r 3 Global Presets All Planes Save current ties as a global preset X1 Spr X1 Save the current set of ties as global preset X1 The command character is a comma Example 9 Spr09 Save current tie set as preset 9 Recall a global preset X1 Rpr X1 Recall global preset X1 and becomes the current configuration Command character is a period Example 5 Rpr05 Recall preset 5 as current configuration NOTE If yo...

Страница 31: ... X2 n Write virtual plane addresses Read virtual plane address E X2 MP X2 1 X2 2 X2 n Read virtual plane address Front Panel Lockout Executive Mode Lock front panel advanced functions 2X Exe2 Enable advanced executive mode Lock front panel advanced and basic functions 1X Exe1 Enable executive mode Unlock front panel 0X Exe0 Disable executive mode View front panel lock status X X X status of execut...

Страница 32: ...actual and 10 virtual plus board configuration I V X 0 X X 0 A X 0 X X 0 V X 15 X X 15 A X 15 X X 15 V X 25 X X 25 A X 25 X X 25 V16x16A16x16 V X A X V X A X V X A X V X A X NOTE The I response gives 26 parameters the first 16 V_x_A_x_ are plane information planes 0 15 and the next are virtual planes 1 10 90 99 Query plane address per slot E STAT X2 slot 1 X2 slot 2 X2 slot 6 8 10 Stat X2 slot 1 X...

Страница 33: ...ves the X value Lower table gives the YZ value n 1 Slot 1 L04 DVI board L 4x4 configuration 04 1 slot board n 2 Slot 2 J07 HD SDI board J 8x8 configuration 07 1 slot board n 3 Slot 3 G00 Slot 3 is covered by VGA board G no board 0 n 4 Slot 4 G00 Slot 4 is covered by VGA board G no board 0 n 5 Slot 5 G00 Slot 5 is covered by VGA board G no board 0 n 6 Slot 6 G15 VGA board G 1616 configuration 15 4 ...

Страница 34: ... View EDID data assignment E A X3 X EDID X3 X3 EdidA X X3 Verbose mode 2 or 3 Export EDID file data E E X3 X3 EDID X6 X3 EdidE X3 X6 Verbose mode 2 or 3 Import EDID file data to user file location E I X3 X3 EDID X6 X3 EdidI X3 Applies only where X3 37 to 40 NOTE For the EDID table see page 21 or refer to the online SMX User Guide NOTES X Input number 01 maximum number of inputs X3 Slot address 01 ...

Страница 35: ...sbcE X 1 X 2 X n Verbose mode 2 or 3 Signal Status View input signal status E I X3 X USBC X1 X3 UsbcI X X1 Verbose mode 2 or 3 View all input signal status E I X3 USBC X1 1 X1 2 X1 3 X1 n X3 UsbcI X1 1 X1 2 X1 3 X1 n Verbose mode 2 or 3 View output signal status E O X3 X USBC X2 X3 UsbcO X X2 Verbose mode 2 or 3 View all output signal status E O X3 USBC X2 1 X2 2 X2 3 X2 n X3 UsbcO X2 1 X2 2 X2 3 ...

Страница 36: ... format Leading zeros in all the four fields are optional View gateway IP address E CG X3 Set E mail events for recipient EX4 X4 X3 X4 X4 EM X3 Ipe X4 X4 X4 X4 View E mail events for recipient EX4 X4 X3 X4 EM X4 X4 X4 X4 NOTES X1 Subnet mask X3 Slot address 00 for F and P of X4 01 up to 10 for I of X4 X3 IP address X3 Gateway address X4 Email account 65 to 72 X4 Notification selection 1 I inputs F...

Страница 37: ... traffic on the network If you want to use verbose mode with a switcher connected via Ethernet you must set this mode to On each time you reconnect to the SMX View verbose mode E CV X3 Show verbose mode or tagged response status X3 Reset Commands Reset switcher E ZXXX Zpx Clears all ties and presets audio gain and volume and resets unit to factory default NOTE Excludes IP settings such as IP addre...

Страница 38: ...d via the Windows based SMX Control Program This program is contained on the Extron Software Products DVD included with the SMX Install and run this program on a PC running Windows and connected to either of the SMX serial ports or the Ethernet port See b and d on page 3 for connection information It cannot be run from the DVD drive NOTE For full details on operating the program refer to the SMX U...

Страница 39: ... SMX Control pgm Starting the Program 1 Click Start Programs Extron Electronics SMX Control Program SMX Control Pgm The Comm Port Selection window appears Figure 24 Comm Port Selection Window 2 Choose the comm serial port connected to the SMX or IP LAN NOTE For a comm port check the baud rate displayed in the Comm Port Selection window To change the baud rate click the Baud button select the desir...

Страница 40: ...er see b on page 3 for connection information TIP If your Ethernet connection to the SMX is unstable try turning off the proxy server in your web browser In Microsoft Internet Explorer click Tools Internet Options Connections LAN Settings Uncheck the User a proxy server box and click OK NOTE For full details on configuring and controlling the SMX via HTML pages refer to the SMX User Guide 1 Start ...

Страница 41: ...e default IP address is 192 168 254 254 Check with the administrator if the IP address has been changed 3 The browser opens the SMX default web page see figure 26 at the System Status page Figure 26 SMX Default Web Page System Status There are three other pages the Configuration page the File Management page and the Control page Any of these pages can be accessed by clicking on the applicable tab ...

Страница 42: ...trol section allows for each plane the input to output ties to be set and viewed the input audio gain and attenuation to be adjusted and output audio volume settings to be changed Audio and video signals can be muted or unmuted per output from this section as well In addition where DVI boards are installed EDID configurations can be set from this page Figure 27 SMX Control Web Page User Control Fr...

Страница 43: ...tch or a crossover cable see figure 29 Crossover cable Connection between the computer and the SMX Patch Straight Cable Connection of the SMX to an Ethernet LAN Straight through Cable for connection to a switch hub or router End 1 End 2 Pin Wire Color Pin Wire Color 1 white orange 1 white orange 2 orange 2 orange 3 white green 3 white green 4 blue 4 blue 5 white blue 5 white blue 6 green 6 green 7...

Страница 44: ...ee Setting Plane Addresses on page 4 RESET RS 232 RS 422 RE MO TE LAN ACT LINK 50 60 Hz 100 2 40V 1 3A MAX US LISTE D 17TT AUDIO VIDE O APPA RATU S 1 5 tx rx tx 3 tx rx 7 tx 2 6 tx rx tx 4 tx rx 8 tx PLAN E ADR ESS DIGIT AL VIDE O SD I HD SD I OU TPU TS 8 7 1 4 5 6 3 2 SD I HD SD I INP UTS 8 7 1 4 5 6 3 2 PLAN E ADR ESS INP UTS 1 2 3 4 OU TPU TS 1 2 3 4 PLAN E ADR ESS CO MP UTE R IN 5 6 7 8 1 2 3 ...

Страница 45: ...39 SMX System MultiMatrix Switcher Reference Material Notes ...

Страница 46: ...40 SMX System MultiMatrix Switcher Reference Material ...

Страница 47: ... United Arab Emirates Dubai This Limited Warranty does not apply if the fault has been caused by misuse improper handling care electrical or mechanical abuse abnormal operating conditions or if modifications were made to the product that were not authorized by Extron NOTE If a product is defective please call Extron and ask for an application engineer to receive an RA return authorization number T...

Страница 48: ... Inside USA Canada Only 1 919 863 1794 1 919 863 1797 FAX Extron Europe 800 3987 6673 Inside Europe Only 31 33 453 4040 31 33 453 4050 FAX Extron Asia 800 7339 8766 Inside Asia Only 65 6383 4400 65 6383 4664 FAX Extron Japan 81 3 3511 7655 81 3 3511 7656 FAX Extron China 400 883 1568 Inside China Only 86 21 3760 1568 86 21 3760 1566 FAX Extron Middle East 971 4 2991800 971 4 2991880 FAX ...

Отзывы: