background image

VIR50-EU-EN v2.3   5/14 

Operation 


Power ON and OFF 

1.  The instrument is powered by one (1) rechargeable battery (3.7V). The battery is housed in the 

compartment in the meter’s handle. 

2.  The supplied battery charger connects to the USB port on the instrument (in the compartment 

above the measurement trigger). 

3.  Once the battery is charged, Press and Hold the 

 button for 5 seconds to switch the 

instrument ON. 

4.  Press and Hold the 

 button to switch the unit OFF. 

5.  In the event that the instrument freezes operation (no reaction when pressing any button), insert 

a paper clip into the Reset opening to trigger the RESET function. 

6.  For accurate readings, wait 30 seconds after powering on to allow the meter to stabilize. 
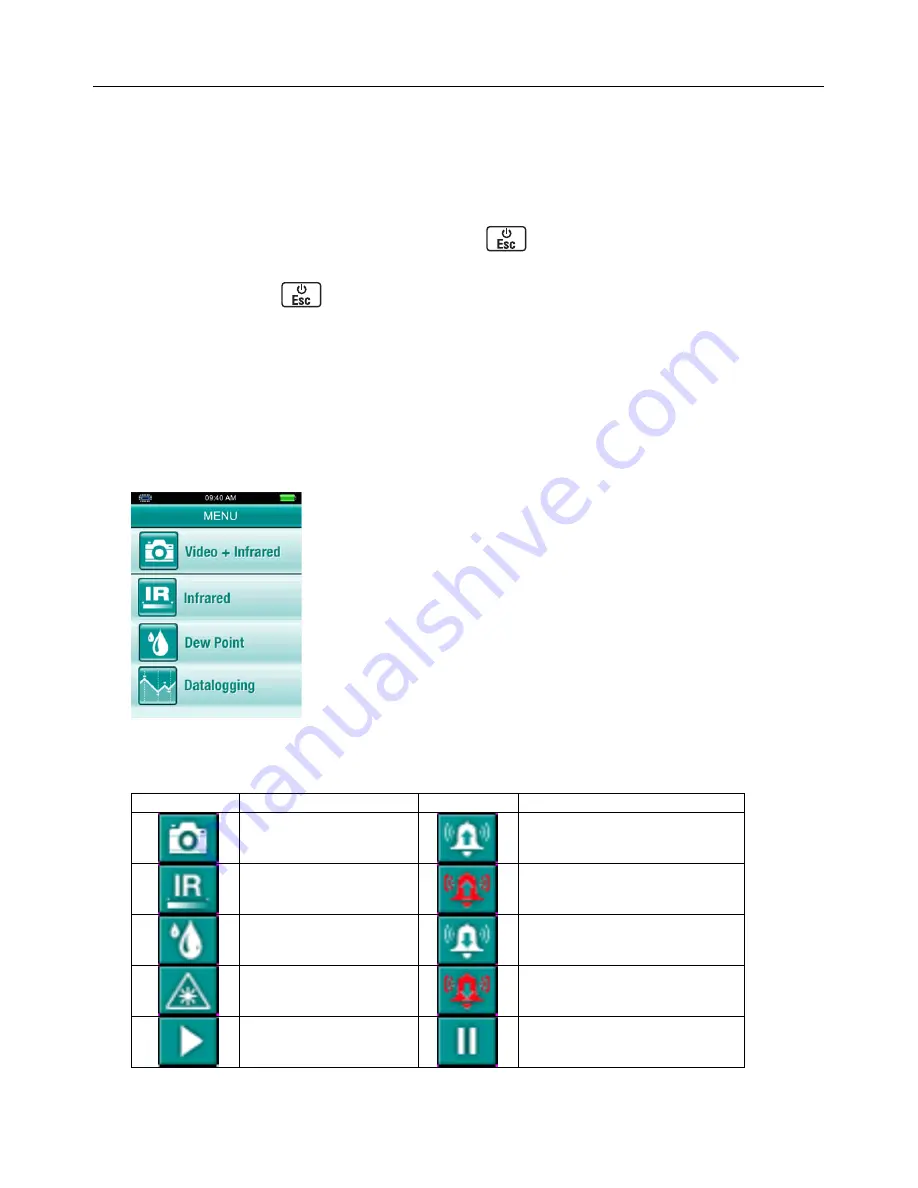
Measurement Modes 

The meter has four (4) measurement modes: Video + Infrared, Infrared-only, Dew Point, and 
Datalogging mode. When the meter is switched ON, the first screen that appears is the mode 
selection screen. Use the 

/

 buttons to highlight the desired mode and then press the ENTER 

button to access the mode. 

Video + Infrared mode: the meter functions as an IR meter with the 
camera capabilities;  

Infrared-only mode: the meter functions as an IR meter only; 

Dew Point mode: the meter shows the Dew Point temperature value;  

Datalogging mode: the meter functions as a measurement 
storage/retrieval device. 


Display Symbols 


Symbol Description 

Symbol Description 


Video + IR mode 

High alarm 


IR-only mode


High alarm triggering 


Dew Point mode 

Low alarm 


Laser 

Low alarm triggering 


Scan 

Hold 


Содержание VIR50

Страница 1: ...User s Manual Dual Laser Video IR Video Thermometer MODEL VIR50...

Страница 2: ...ergonomic operation This meter is shipped fully tested and calibrated and with proper use will provide years of reliable service Features 2 2 TFT LCD display 640 x 480 pixels Digital Camera Micro SD...

Страница 3: ...ack USB jack Reset button 7 Handle Grip and cover for Micro SD memory card slot and Rechargeable Battery Rear Panel 1 Display 2 and Camera button 3 Power and ESC button 4 ENTER button 5 and Video butt...

Страница 4: ...gs wait 30 seconds after powering on to allow the meter to stabilize Measurement Modes The meter has four 4 measurement modes Video Infrared Infrared only Dew Point and Datalogging mode When the meter...

Страница 5: ...ature can also be displayed Press and hold trigger to measure the temperature Capturing Still Images Photographs In the Video IR mode press the button to take a photograph Press the button again to sa...

Страница 6: ...ial DIF Temperature and the IR Average AVG Temperature can also be displayed Press and hold trigger to measure the temperature Dew Point Temperature Mode In the Dew Point mode the meter displays the D...

Страница 7: ...e Datalogger screen shown above use the arrow keys to select the HIGH or the LOW alarm value parameter and then press the ENTER button Use the and buttons to adjust the alarm value then press the ENTE...

Страница 8: ...ess ENTER to access to the System Tools setting menu Use the and buttons to select an item and then press the ENTER button to access it Item Description Languages Set the language Date Format Set the...

Страница 9: ...t the desired format for the date and press the ENTER button to confirm Once the format has been chosen use the and buttons to select the day month and year Setting the Time Use the and buttons to sel...

Страница 10: ...desired unit of measure press the ESC button to exit and save Memory Use the and buttons to select either FLASH or SD CARD and press the ENTER button to confirm Then select either WORKING SPACE or FO...

Страница 11: ...and press the ENTER button to confirm Setting the Auto Power off time Use the and buttons to disable or select an auto power off time press the ESC button to exit and save Setting the Screen Timeout U...

Страница 12: ...d then there will be two icons a chip blank and a blue SD card icon with the letters SD on it meaning that the SD card is being used to store memory System Default Setting Use the and buttons to selec...

Страница 13: ...s shown below Item Description Emissivity set Set the emissivity Alarm High Set the high alarm ON OFF and set the alarm limit Alarm Low Set the low alarm ON OFF and set the alarm limit Laser Enable or...

Страница 14: ...ete glass etc or select 0 94 to set the emissivity manually using the arrow buttons Press the ESC button to exit and save Alarm High Use the and buttons enable or disable the alarm If the high alarm i...

Страница 15: ...Auto Mode Measure Lock Press the ENTER button to enable or disable auto mode Max Min Press the ENTER button to set the MAX MIN mode ON or OFF The MAX MIN mode displays the highest MAX and lowest MIN I...

Страница 16: ...rom the Video IR IR only or Dew Point modes press the ENTER button to access the soft key screen The Memory Settings mode is represented by the icon on the right Use the arrow buttons to scroll over t...

Страница 17: ...VIR50 EU EN v2 3 5 14 17 Item Description Picture Display saved images Video Playback saved videos Logs Display datalogger data...

Страница 18: ...ty or close to empty recharge the Lithium ion 3 7V 1400mAh rechargeable battery Connect the supplied USB battery cable to the mini USB jack in the compartment above the measurement trigger and then co...

Страница 19: ...ot be accurate 5 Steam dust smoke etc can obscure measurements 6 The meter automatically compensates for deviations in ambient temperature However it can take up to 30 minutes for the meter to adjust...

Страница 20: ...50 the emissivity is adjustable from 0 1 to 1 00 see the Measurement Settings section earlier in this User Guide Most organic materials and painted or oxidized surfaces have an emissivity factor of 0...

Страница 21: ...Field of View D S Approx 50 1 ratio D distance S spot Laser power Less than 1mW Class II Spectral response 8 to 14 m wavelength Response time 150ms Type K Thermometer Specifications Range Resolution 5...

Страница 22: ...midity Max 90 RH non condensing Power Supply 3 7V Lithium ion rechargeable battery Battery life 4 hours continuous approx Battery charge time 2 hours with AC adaptor or USB connection Automatic Power...

Отзывы: