Excalibur AL-1850-EDPB Скачать руководство пользователя страница 13

13

1) 

Press the “P” button for 5 seconds to access the controller features. The controller 

will beep twice

2)

 Press and release the “P“ button once to select the clock (hour digits will flash).

3)

 Press the “TRUnK“ button to scroll up or the “     “ button to scroll down 

4)

 Press the “P” button to switch to the minute digits

5)

 Press the “TRUnK“ button to scroll up or the “     “ button to scroll down

6)

 Wait 15 seconds or press the “P” button to exit programming The controller will 

beep once

SETTinG ThE CLOCK

  The controller has 5 different melodies to choose from for remote start ON and 5 

melodies for remote start OFF confirmation.

1) 

Press the “P” button for 5 seconds to access the controller features. The controller 

will beep twice

2)

 Press and release the “P“ button 3 times to select the melody settings The clock 

will change to “S  1” indicating “start melody #1” for the remote start ON melody.

3)

 Press the “TRUnK“ button or the “     “ button to scroll through the melodies 

4)

 Press the “P” button to switch to the remote start OFF melody selection

5)

 Press the TRUnK button or the “     “ button to scroll through the melodies

6)

 Wait 15 seconds or press the “P” button to exit programming The controller will 

beep once

ChAnGinG REmOTE START mELODiES

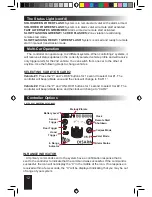
Controller Options (cont’d)

SELECTinG mELODy & ViBRATE mODES

  Whenever 2-way alerts are received from the system, the controller can alert you 

with a melody, vibration, or both. By default, the controller is set for melody only. 

Press the “P” and “TRUnK“ buttons simultaneously for 1 second to change the 

setting.

 The melody & vibrate icons on the status screen will turn on & off indicating 

your selection


The controller has 2 convenient timer functions. The PARKING TIMER tells you 

how long you’ve been parked in case you are at a parking meter or other parking 

areas with time restrictions The REMOTE START TIMER tells you how long your 

engine has been running in remote start mode 

PARKinG TimER:

 Press LOCK twice within 5 seconds When the controller receives 

both LOCK confirmations, it will start the timer.

REmOTE START TimER:

 This turns on every time you remote start

note: Pressing the “P” during either timer mode will switch between the timer 

and clock.

PARKinG TimER & REmOTE START TimER

*

*

*

*


You can lock the buttons on the controller to prevent accidental button presses To 

lock the buttons, press “TRUNK” and “    “ simultaneously for 1 second. Repeat this to 

unlock the buttons

BUTTOn LOCK

*

Содержание AL-1850-EDPB

Страница 1: ...AL 1850 EDPB Deluxe 2 way Alarm Remote Start July 12 2012 Operation Guide Temporary cover Color cover is in a separate file...

Страница 2: ...When The System Triggers 9 Using The Valet Switch 9 Emergency Override 9 Valet Modes 10 SecureCode 10 The Status Light 11 Multi Car Operation 12 Selecting CAR 1 or CAR 2 12 Controller Options 12 LCD S...

Страница 3: ...148 03 Call your dealer or visit www caralarm com to order replacement transmitters Transmitter battery replacement Remove the small screw from the lower back case and separate the transmitter halves...

Страница 4: ...and release the button twice within 5 seconds see user feature 17 for additional options the parking lights will flash once and the status light will flash rapid green the system will turn on the igni...

Страница 5: ...mer will restart at 0 00 NOTE This can only be used once per remote start cycle The controller will also give you run time expiration warning 2 chirps 1 minute before the remote start cycle ends If yo...

Страница 6: ...he but ton twice in 5 seconds x2 SENSOR BYPASS Press and release the TRUNK button within 5 seconds of locking arming the alarm system the system will give one chirp to indicate the sensor is bypassed...

Страница 7: ...e the button within 5 sec onds of unlocking disarming the alarm system the system will enter alarm valet mode see page 10 for more info on valet modeS 1 way transmitter press and release the START but...

Страница 8: ...and installer feature 5 must be turned on Also a setup procedure that ensures the transmission was left in neutral must be performed each time you leave your vehicle and intend to use remote start lat...

Страница 9: ...triggering situation due to violent weather ZONE VIOLATION RECALL The system is capable of telling you which zones were triggered last The system s status light will flash to indicate which zone was...

Страница 10: ...a second chirp STEP 3 Immediately release the valet switch The status light will alternate between RED and GREEN every second EXITING VALET MODES is as simple as just pressing and releasing the valet...

Страница 11: ...store the last 2 violated circuits and continually repeat the flash pattern until the system is disarmed and the vehicle s ignition key is turned ON 2 FLASHES Hood trigger 3 FLASHES Door trigger 4 FLA...

Страница 12: ...to change vehicles Selecting CAR 1 or CAR 2 Vehicle 1 Press the P and LOCK buttons for 1 second to select Car 1 The controller will beep vibrate once and the clock will change to CAR 1 Vehicle 2 Pres...

Страница 13: ...it 15 seconds or press the P button to exit programming The controller will beep once Changing remote start melodies Controller Options cont d Selecting Melody Vibrate modes Whenever 2 way alerts are...

Страница 14: ...nition be turned off in the meantime the stater interrupt will engage Once the system enters the alarm condi tion it will not respond to the transmitter nor will the system reset automatically after 6...

Страница 15: ...alet switch 5 times to access user features 10 times to access installer features The siren horn will sound and the status light will turn on Step 3 Within 10 seconds of step 2 press the valet switch...

Страница 16: ...s instead of a single 1 press which would be required in order to perform an Emergency Override If any of the three anti car jacking features are utilized a customized SecureCode would also be require...

Страница 17: ...program This feature removes the system s arming and disarming confirmation chirps for particular functions The On Demand setting allows you to lock and unlock the doors without chirps Similar to OEM...

Страница 18: ...to program 30 Seconds press trunk button to program 45 Seconds press start button to program This determines how long the alarm waits to monitor trigger inputs after arming the system Longer duration...

Страница 19: ...gram Accessory Output press start button to program The system has two built in relays which can be programmed to perform several different func tions The primary function of this relay is to operate...

Страница 20: ...ion Mode Off press unlock button to program DEFAULT On press lock button to program This feature changes the parameters of the system s remote start operation to be suitable for manual transmission eq...

Страница 21: ...ed by the controller or transmitter These outputs are in addition to the 2nd channel and 3rd channel outputs As shown in the programming assignment the arm disarm channel 4 and channel 5 are programma...

Страница 22: ...switches to the ADS protocol Feature 14 Lock On Prewarn On press lock button to program DEFAULT Off press unlock button to program By default if the prewarn zone is triggered the system will automati...

Страница 23: ...ng Upon Arm On Off 17 Remote Start Activation Start x 2 Start x 1 Lock Unlock 18 Remote Start Run Time 5 min 10 min 15 min 20 min Installer Feature Programming Ignition on off press valet 10 times 1 D...

Страница 24: ...Back Cover Color cover is in a separate file...

Отзывы: