EMV800 HD / EMV1200 HD Mobile DVR
18
2.5
Basic Connection
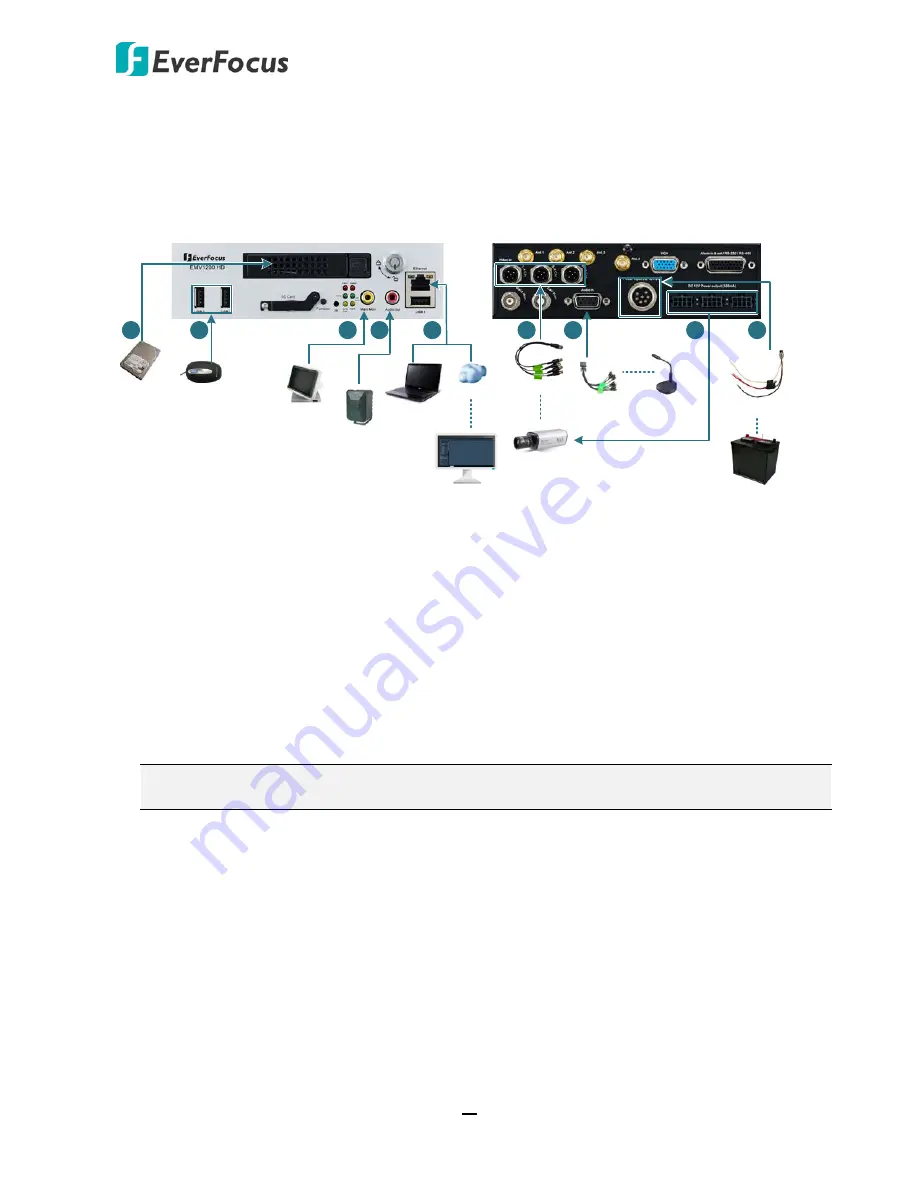
After installing the mobile DVR in the vehicle, you can start connecting the mobile DVR to the
external devices. The instructions below describe the basic connection to the mobile DVRs. For
details on cable connections, please refer to the following sections.
Front View
Rear View
Mouse
2.5" HDD
1
2
Main Monitor
3
4
Speaker
WAN
CMS (Client PC)
5
9
Power Supply
Power Harness Cable
Analog SD/HD
Camera
Video Cable
6
8
Audio Cable Audio Input
7
NB / PC
1.
To record videos, insert a 2.5” HDD to the HDD tray. Remember to lock the HDD Key Lock
after inserting the HDD or the recording will not start (see
2.2 Hard Disk Installation
).
2.
To control the system, connect a mouse to the mobile DVR or use the supplied IR Remote
Control.
3.
To view videos, connect a monitor to the RCA port using the RCA cable supplied by the
monitor manufacturer. You can also connect other video out ports, please refer to
2.5
Monitor Connection
.
4.
To listen to audio of video source, connect a speaker to the Audio-out RCA socket. Note that
the speaker with a (built-in) amplifier and external power is required.
5.
To manage the mobile DVR over network, use a standard RJ-45 cable to connect the mobile
DVR to the network.
Note:
The mobile DVRs feature Wi-Fi/3G/4G function. You can optionally connect
Wi-Fi/3G/4G module and antenna to the mobile DVR for networking.
6.
Connect the cameras to the mobile DVR using the supplied Video Cable. Please refer to
2.4.2
Video Cable / Power-Out Cable.
(Note HD-TVI/HD-CVI/HD-SDI cameras are not supported.)
7.
To power on the cameras, connect the power inputs of the cameras to the 12VDC power
outputs of the mobile DVR using the supplied Power-Out Cable, please refer to
2.4.2 Video
Cable / Power-Out Cable.
8.
Connect the audio input devices to the mobile DVR using the supplied Audio Cable. Please
refer to
2.4.3 Audio Cable
.
9.
Connect the supplied Power Harness Cable to the power supply in the vehicle for powering
the mobile DVR. For details on vehicle connection, please refer to
2.3 Vehicle Connection
.


