For
ward-facing
38
buckle
storage
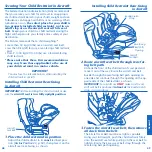
5. Connect and tighten
tether strap.
Connect the tether hook
to the vehicle tether an-
chor behind the vehicle
seat, as shown. (Please
IMPORTANT:
If your tether strap is too short to reach
from your child restraint to your vehicle tether anchor,
you will need a Tether Extender. Please call ParentLink (see
back cover).
buckle
storage
Forward-facing Installation with Lower
Anchor Connectors
Notice
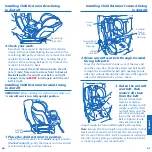
Your child restraint is equipped with one of two types of
tether adjusters: standard (shown above) or the TruTeth-
er™ (shown below). If your child restraint is equipped with
the TruTether adjuster, refer to page 54 for information
about proper tightening.
TruTether Adjuster
Tightness Indicator
Display
buckle
storage
OWNER’S MANUAL
Keep for future use.
Symphony
™
Child Restraint System
Forward-facing Installation with Seat Belt
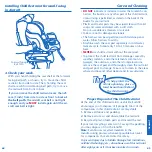
1. Disconnect tether
hook from the back
of the child
restraint.
IMPORTANT:
•
If you are using lower anchor connectors to secure the
child restraint,
DO NOT
use the vehicle seat belt.
•
Before installing this child restraint
forward-facing with
the vehicle seat belt
, you
MUST
move the LATCH as-
sembly to the
rear-facing belt path
so that it does not
interfere with the vehicle seat belt. Refer to page 20 to 22
for instructions on moving the SureLatch connectors or
Quick Connectors to the rear-facing belt path.
•
Make sure the SureLatch or Quick Connectors are at-
tached to the storage D-rings on the seat pad
.
2. Place the child
restraint in position.
Make sure child restraint
is in
Recline Position #2 or
#3 (p. 53).
Set child restraint on the
vehicle seat in the
for-
ward-facing
position,
as shown. Lay the tether
strap over the back of the
vehicle seat.
Tether Strap
IMPORTANT:
NEVER
use
Recline Position #1
for forward-
facing, AND
NEVER
use
Recline Position #2
with children
who weigh more than 18 kg (40 lbs).
39
consult your vehicle owner’s manual, as tether anchor
locations may vary.) Pull the strap and tighten the tether
securely.


