For
ward-facing
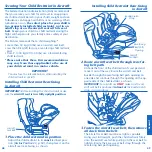
1. Remove lower an-
chor connectors
from the rear-facing
belt path.
2. Place each lower
anchor connector
in the forward-fac-
ing belt path.
Pull the harness strap out
of the way and insert a
lower anchor connector,
behind
the straps, into
the forward-facing belt
path opening, as shown.
Repeat on the other side.
Note:
Do not forget to install the seat pad before installing
the child restraint in your vehicle.
Moving Lower Anchor Connector
Assembly to Forward-facing Belt Path
34
35
OWNER’S MANUAL
Keep for future use.
Symphony
™
Child Restraint System
IMPORTANT:
• If you are using the vehicle seat belt to secure the child
restraint,
DO NOT
use lower anchor connectors.
•
DO NOT
use the lower anchors of the child restraint
anchorage system (LATCH system) to attach this child re-
straint when restraining a child weighing more than 18 kg
(40 lbs) with the internal harnesses of the child restraint.
• Install this child restraint with the vehicle seat belt
(
NOT
lower anchor connectors) if the child weighs
more
than 18 kg (40 lbs).
• Some vehicle manufacturers have lower maximum weight
ratings for vehicle lower anchor bars. Consult your ve-
hicle owner’s manual, or call the vehicle manufacturer, to
confirm the limits on your vehicle’s lower anchor bars.
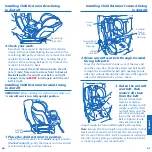
1. Disconnect the
tether hook from
the back of the
child restraint.
buckle
storag
e
2. Place the child
restraint in position.
Make sure child restraint
is in
Recline Position #2
or #3 (p. 53).
Set child
restraint on vehicle seat in
the
forward-facing
posi-
tion, as shown. Lay the
tether strap over the back
of the vehicle seat.
Tether Strap
Forward-facing Installation with Lower
Anchor Connectors
IMPORTANT:
NEVER
use
Recline Position #1
for forward
facing, AND
NEVER
use
Recline Position #2
with children
who weigh more than 18 kg (40 lbs).
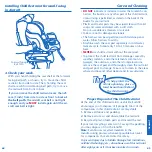
IMPORTANT:
Make sure
the lower anchor connector
assembly does not interfere
with the internal harness
straps.


