buckle
storag
e
Access
Flap
For
ward-facing
40
Forward-facing Installation with Seat Belt
3. Route seat belt through forward-facing
belt path.
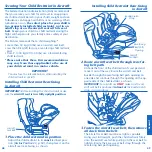
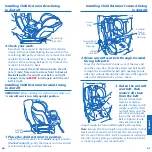
Move the harness out of the way and raise the
access flap. Route the seat belt buckle through the
forward-facing belt path, as shown.
buckle
sto
rag
e
4. Buckle seat belt, then remove all slack
from the seat belt.
Using your full weight, push the child restraint firmly
into the vehicle seat while tightening seat belt to re-
move
excess slack
.
Forward-facing
Belt Path
Shoulder
Belt
41
Forward-facing Installation with Seat Belt
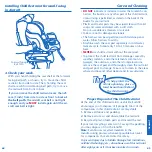
5. Install locking clip,
if necessary.
You
MUST
use a locking
clip if your vehicle has:
A lap/shoulder seat belt
combination that has a
buckle tongue that slides
freely
along the belt
without
locking
into
place;
OR
Seat belts equipped with
an emergency locking
retractor (ELR).
Locking Clip
installed properly
Some ELR vehicle belts can be switched so that they lock
when tightened.
It may not be necessary to use a locking
clip in these situations.
Consult your vehicle owner’s manual before in-
stalling the locking clip.
To see an example of seat belt types and to properly
install a locking clip, go to p. 55.
13 mm
(0.5 inch)
buckle
storage
Forward-facing
Belt Path
6. Ensure child restraint is secure.
With your hand holding the seat shell at the forward-
facing belt path, as shown, try to move the child
restraint from side to side. Then, holding the seat
shell at each forward-facing belt path, try to move
the restraint from front to back.
For the child restraint to be properly secured, it
MUST NOT
move more than 25 mm (1 inch) from
side to side or front to back
at the belt path
.
If
you cannot tightly secure the child restraint, try
again or move it to another location.


