background image

Hub van Doorneweg 8 • 2171 KZ Sassenheim – NL • 

T

 +31(0)252 228850 • 

F

 +31(0)252 228235 • 

E

 [email protected] • 

I

 euronormdrives.com

24

25

NEURN030000_220_A

NEURN030000_220_A

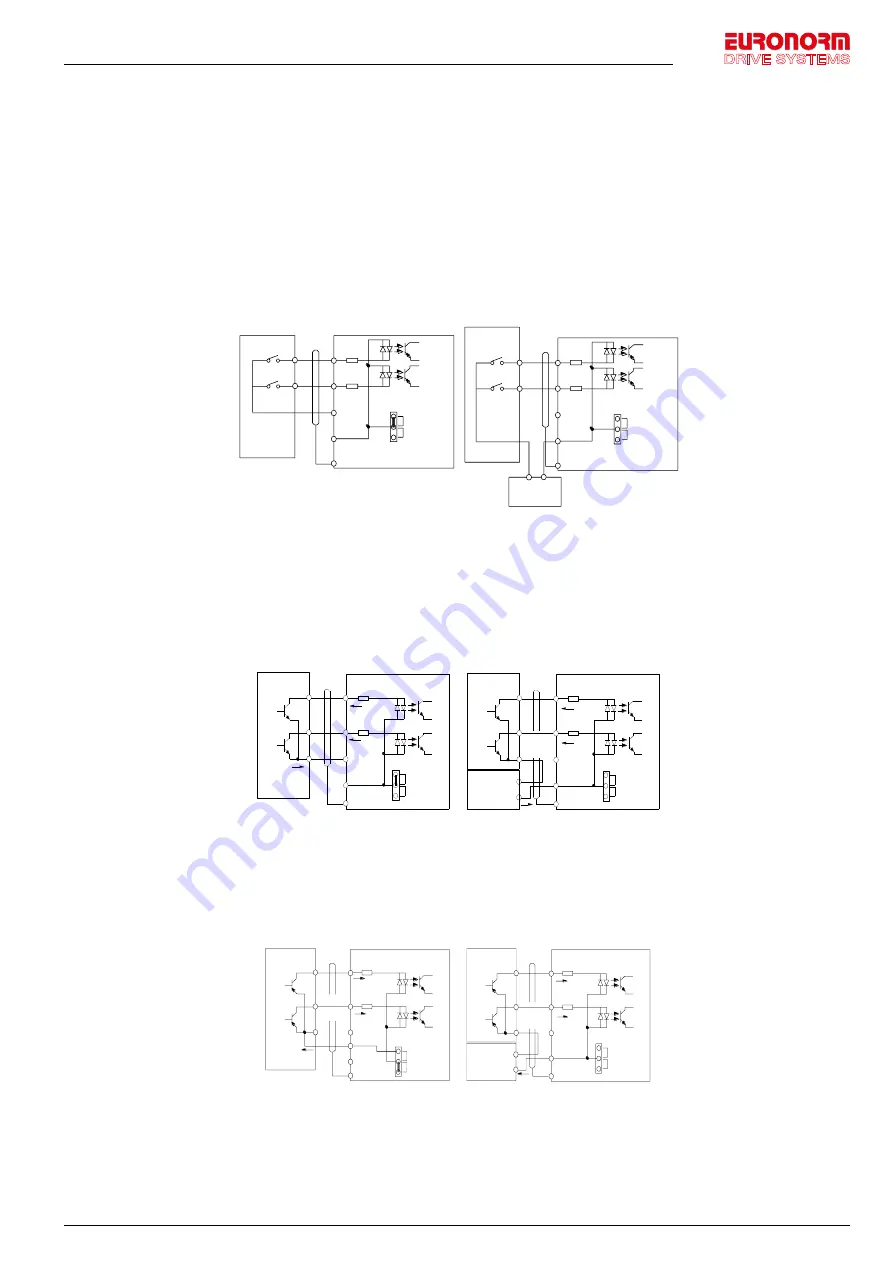
6.4.3  Signal input terminal circuit

Switch input and output signal transmission, generally use the shielded cable and wiring short distance as far as possible, 
good grounding and shielding layer on the inverter side, try not to over 20 m transmission distance. Drive in active way, 
elected to the power of crosstalk necessary filtering measures are taken, generally recommend that choose dry contact 
control mode.
Wiring control cable should be kept with the main circuit and high voltage lines (Such as the power cord, motor 
connecting line, relay or contactor) more than 20 cm distance, and to avoid high voltage lines parallel to and can’t be 
avoided and the high voltage lines cross, the proposal USES vertical wiring way, in order to prevent the misoperation 
caused by disturbance frequency converter
Dry contact mode:

                      Chapter 4  Installation and commissioning 

47 


Cha

pt

er 4


+24V

COM

PLC

(Default)

DI1

DI8

COM

PLC

PE

Shielded

cable

External

contactor

Inverter

Inner power supply with main connect

+24V

COM

PLC

(Default)

DI1

DI8

COM

PLC

PE

Shielded

cable

External

contactor

Inverter

External power supply

with main connection

External power

supply

+

-


Figure 4-19

Signal input terminal circuit- dry contact mode 

Note: using an external power supply, PLC and 24 v jumper cap must be removed, otherwise it 
will damage the product. 

Open collector NPN connect wire: 

When the input signal from the NPN transistor, according to the use of power supply, please


according to the  24 v and PLC jumper cap. 

+24V

COM

PLC

(Default)

DI1

DI8

COM

PLC

PE

Shielded

cable

Inverter

Inner power NPN connect mode

External

contactor

+24V

COM

PLC

(Default)

DI1

DI8

COM

PLC

PE

Shielded

cable

Inverter

External power supply NPN connect mode

External

contactor

External

power supply

+

-


Figure 4-20

Signal input terminal wiring diagram, open collector NPN connection mode 

Note: using an external power supply, PLC and 24 v jumper cap must be removed, otherwise 

it will damage the product. 

Open collector PNP connection mode: 

Signal input terminal circuit- dry contact mode

Note: 

using an external power supply, PLC and 24 v jumper cap must be removed, otherwise it will damage the product.

Open collector NPN connect wire:
When the input signal from the NPN transistor, according to the use of power supply, please


according to the 24 v 

and PLC jumper cap.

                      Chapter 4  Installation and commissioning 

47 


Cha

pt

er 4


+24V

COM

PLC

(Default)

DI1

DI8

COM

PLC

PE

Shielded

cable

External

contactor

Inverter

Inner power supply with main connect

+24V

COM

PLC

(Default)

DI1

DI8

COM

PLC

PE

Shielded

cable

External

contactor

Inverter

External power supply

with main connection

External power

supply

+

-


Figure 4-19

Signal input terminal circuit- dry contact mode 

Note: using an external power supply, PLC and 24 v jumper cap must be removed, otherwise it 
will damage the product. 

Open collector NPN connect wire: 

When the input signal from the NPN transistor, according to the use of power supply, please


according to the  24 v and PLC jumper cap. 

+24V

COM

PLC

(Default)

DI1

DI8

COM

PLC

PE

Shielded

cable

Inverter

Inner power NPN connect mode

External

contactor

+24V

COM

PLC

(Default)

DI1

DI8

COM

PLC

PE

Shielded

cable

Inverter

External power supply NPN connect mode

External

contactor

External

power supply

+

-


Figure 4-20

Signal input terminal wiring diagram, open collector NPN connection mode 

Note: using an external power supply, PLC and 24 v jumper cap must be removed, otherwise 

it will damage the product. 

Open collector PNP connection mode: 

Signal input terminal wiring diagram, open collector NPN connection mode

Note:

 using an external power supply, PLC and 24 v jumper cap must be removed, otherwise it will damage the product.

Open collector PNP connection mode:

                      Chapter 4  Installation and commissioning 

48 


Cha

pt

er 4


+24V

COM

PLC

(Default)

DI1

DI8

COM

PLC
PE

Inverter

Inner power PNP connect mode

External

contactor

+24V

COM

PLC

(Default)

DI1

DI8

COM

PLC

PE

Shielded

cable

Inverter

External power supply PNP

connect mode

External

contactor

External

power supply

+

-

+24V


Figure 4-21

Signal input terminal wiring diagram, open collector PNP connection mode 

Note: using an external power supply, PLC and 24 v jumper cap must be removed, otherwise 

it will damage the product. 

4-5.

Wiring Precautions 

Danger 

Make sure that the power switch is in the OFF state before wiring operation, or electrical 

shock may occur! 

Wiring must be performed by a professional trained personnel, or this may cause damage to 

the equipment and personal injury! 

Must be grounded firmly, otherwise there is a danger of electric shock or fire hazard ! 

Note 

Make sure that the input power is consistent with the rated value of inverter, otherwise which  

may cause damage to the inverter! 

Make sure that the motor matches the inverter, otherwise which  may cause damage to the 

motor or activate the inverter protection! 

Do not connect power supply to U, V, W terminals, otherwise which may cause damage to the 

inverter! 

Do not directly connect braking resistor to DC bus (P), (+) terminals, otherwise which may 

cause a fire! 

The U,V,W output end of inverter can not install phase advancing capacitor or RC 

absorbing device. The inverter input power must be cut off when replacing the motor 

Do not let metal chips or wire ends into inside the inverter when wiring, otherwise which 

may cause malfunction to the inverter. 

Disconnect motor or switch power-frequency power supply only when the inverter stops 

output 

In order to minimize the effects of electromagnetic interference, it is recommended that 

a surge absorption device shall be installed additionally when electromagnetic contactor and 

relay is closer from the inverter. 

Signal input terminal wiring diagram, open collector PNP connection mode

Note:

 using an external power supply, PLC and 24 v jumper cap must be removed, otherwise it will damage the product.

Содержание JI500

Страница 1: ...www euronormdrives com info euronorm nl 31 0 252 228850 Frequency Drive JI500 Manual...

Страница 2: ...CAN bus communication card use description 85 III 1 Overview 85 III 2 Mechanical installation and terminal functions 85 Appendix IV Instruction of Profitbus DP communication card 86 IV 1 Outline 86 IV...

Страница 3: ...y questions please get in touch with our company or our agent in time we will offer dedicated service to you 2 Instructions on nameplate 3 1 1 F Fo or re ew wo or rd d Thank you for choosing JI500 ser...

Страница 4: ...er directly connect braking resistor to the DC bus P and P terminals Otherwise it may cause a fire Encoder must use the shielded wire and the shielding layer must ensure the single ended grounded Afte...

Страница 5: ...r 10 Lightning surge protection The series inverter is equipped with lightning overcurrent protection device so it has the ability of self protection to lightning induction For the area where lightnin...

Страница 6: ...lectric shock explosion and other accidents If the inverter is used in such equipment e g Equipment for lifting persons aviation systems safety equipment etc and its malfunction may result in personal...

Страница 7: ...76 45 0 JI500 055G2 55 0 214 210 55 0 JI500 075G2 75 307 304 75 JI500 093G2 93 383 380 93 JI500 110G2 110 428 426 110 JI500 132G2 132 467 465 132 JI500 160G2 160 522 520 160 AC 3PH 380V 15 440V 10 JI5...

Страница 8: ...55 101 9 100 55 JI500 075F4 75 137 4 130 75 JI500 075G4 75 137 4 130 75 JI500 093F4 93 151 8 147 93 JI500 093G4 110F4 93 110 151 8 185 3 147 180 93 110 JI500 110G4 132F4 110 132 185 3 220 7 180 216 11...

Страница 9: ...ge frequency converter is equipped with small motor it is necessary to input motor parameters accurately to avoid motor overload and damage 4 2 Special customized product specifications Model Rated ou...

Страница 10: ...01Hz Start torque G type 0 5Hz 150 Vector control W O PG F type 0 5Hz 100 Vector control W O PG Speed range 1 100 Vector control W O PG 1 1000 Vector control W PG Steady speed precision Vector control...

Страница 11: ...100 kHz square wave 3 analog input terminals for voltage or current input Output terminals 2 digital output terminals one of them can be for high speed pulse output 0 100kHz square wave one relay outp...

Страница 12: ...nt temperature in 40 50 please derating use Storage temperature 20 65 Environment humidity Less than 90 R H no condensation Vibration Below 5 9m s 0 6g Application sites Indoor where no sunlight or co...

Страница 13: ...t That is the indicator for keyboard operation terminal operation and remote operation Communication control ON Terminal control working status OFF Keyboard control working status Flashing Remote cont...

Страница 14: ...ncoder In query status function parameter increasing or decreasing In modified status the function parameter or modified position increasing or decreasing In monitoring status frequency setting increa...

Страница 15: ...level 3 operation status The differences between the two keys ENTER will be back to the level 2 menu and save parameter setting before back and transfer to the next function code automatically PRG wi...

Страница 16: ...t from function code modified status Press PRG key again will display One must input the correct password to go to regular menu otherwise inaccessible To cancel the password protection function firstl...

Страница 17: ...nsion requirement 0 75 11kW A 100mm B 10mm 15 22kW A 200mm B 10mm 30 75kW A 200mm B 50mm 93 400kW A 300mm B 50mm Fig 6 2 JI500 Series Each power level installation space requirement JI500 Series frequ...

Страница 18: ...erly connect frequency inverter in accordance with the wiring connection diagram showing below 6 2 1 Wiring diagram Main circuit Control circuit Fig 4 3 Wiring diagram 6 3 Main circuit terminal 6 3 1...

Страница 19: ...l 30kW G3 F3 main circuit terminal 5 37kW G3 F3 main circuit terminal Chapter 4 Installation and commissioning Chapter 4 5 37kW G3 F3 main circuit terminal Figure 4 8 37kW G3 F3 main circuit terminal...

Страница 20: ...rmdrives com 20 NEURN030000_220_A 7 55 75kW G3B main circuit terminal 55 75kW G3B main circuit terminal 8 55 75kW G3 main circuit terminal 55 75kW G3 main circuit terminal 9 93 160kW G3 main circuit t...

Страница 21: ...3 main circuit terminal 160 220kW G3 main circuit terminal 12 250 400kW G3 main circuit terminal 250 400kW G3 main circuit terminal 13 450 630kW G3 main circuit terminal 450 630kW G3 main circuit term...

Страница 22: ...nt circuit breaker if leakage protection occurs during starting the safety capacitor EMC ground switch can be disconnected as shown in the figure below Varistor switch Safety regulation capacitor swit...

Страница 23: ...generally it is used as power supply of digital input and output terminals and external sensor Maximum output current 200mA PLC External power input terminal The use of external signal when driving P...

Страница 24: ...tion bipolar open collector output Output voltage range 0 24V output current range 0 50mA SPB COM Digital output 2 SPB COM High speed pulse output Subject to function code F2 00 SPB terminal output mo...

Страница 25: ...sing an external power supply PLC and 24 v jumper cap must be removed otherwise it will damage the product Open collector NPN connect wire When the input signal from the NPN transistor according to th...

Страница 26: ...earthed firmly Grounding impedance should be less than 10 ohms otherwise the leakage current will occur The specifications on wires used by the main circuit wiring shall comply with the relevant prov...

Страница 27: ...F0 00 Set b0 00 b0 05 b0 28 etc Set b0 00 b0 05 Select appropriate ac deceleration time Set F0 13 F0 14 Select appropriate ac deceleration time Set F0 13 F0 14 Set b0 27 Motor parameter self learning...

Страница 28: ...unction group Monitoring frequency current etc F0 Basic function group Frequency setting control mode acceleration and deceleration time F1 Input terminals group Analog and digital input functions F2...

Страница 29: ...ontrol 0 1Min d0 21 Linear speed Show the line speed of DI5 high speed pulse sampling according to the actual sample pulse number per minute and E0 07 calculate the line speed value 1m Min d0 22 Curre...

Страница 30: ...equency source superimposed selection Units digit Frequency source selection Tens digit Arithmetic relationship of master and auxiliary for frequency source 00 F0 08 Frequency source offset frequency...

Страница 31: ...I6 terminal function selection 13 F1 06 DI7 terminal function selection 0 F1 07 DI8 terminal function selection 0 F1 08 Undefined F1 09 Undefined The function of digital multifunction input terminal D...

Страница 32: ...ntrol and keyboard control 21 Ac deceleration prohibited Ensure the inverter is free from external signals affect Except for shutdown command maintain current output frequency 22 PID pause PID is temp...

Страница 33: ...time the deceleration time is fixed for deceleration time 4 49 Deceleration DC braking If the terminal is valid firstly the inverter decelerates to the initial frequency of stop DC braking and then sw...

Страница 34: ...Hundreds digit DI8 Thousands digit DI9 Ten thousands digit DI10 00000 F1 37 DI1 delay time 0 0s 3600 0s 0 0s F1 38 DI2 delay time 0 0s 3600 0s 0 0s F1 39 DI3 delay time 0 0s 3600 0s 0 0s F1 40 Define...

Страница 35: ...ifies the count value reaches 9 Specifies the count value reaches When the count reaches the set value of E0 09 output ON signal Counting Function Reference E0 group 10 Length arrival When the actual...

Страница 36: ...e process to continue to run mode the inverter alarm output 39 Motor overtemperature pre warning When the motor temperature reaches F8 35 Motor overheat pre alarm threshold the output ON signal Motor...

Страница 37: ...0 00Hz 0 00Hz F3 04 Hold time for start frequency 0 0s 100 0s 0 0s F3 05 DC beforehand field current 0 100 0 F3 06 DC excitation time beforehand 0 0s 100 0s 0 0s F3 07 Stop mode 0 Deceleration parking...

Страница 38: ...termined by power 1 Changed manually 0 F4 19 V F automatic torque lifting adjustment 0 200 100 F4 20 AVR automatic voltage regulation 0 Enable 1 Not enable 0 5 1 7 F5 Group Vector control parameters C...

Страница 39: ...r Control board software version F6 13 Communication read write data selection Bit CRC error response selection 0 CRC error response selection 1 CRC error response selection Ten broadcast message scre...

Страница 40: ...han lower limit frequency mode 0 Running at lower limit frequency 1 Stop 2 zero speed running 0 F7 19 Droop control 0 00Hz 10 00Hz 0 00Hz F7 20 Setting cumulative power on arrival time 0h 36000h 0h F7...

Страница 41: ...ter jogging Hundred bits 0 Recover to the previous deceleration time after jogging 1 Keep the deceleration time the same after jogging 002 5 1 10 F8 Group Fault and protection Code Parameter name Sett...

Страница 42: ...it Reserved Ten thousands digit PID feedback loss when running Err 31 Same as F8 17 units digit 00000 F8 20 Fault protection action selection 4 Units digit Too large speed deviation Err 42 Same as F8...

Страница 43: ...0 Keyboard setting FA 02 1 Analog AI1 setting 2 Analog AI2 setting 3 Panel potentiometer setting 4 High speed pulse setting 5 Communications reference 6 MIN AI1 AI2 7 MAX AI1 AI2 8 High speed pulse se...

Страница 44: ...tting range Factory setting Change E1 00 0 stage speed setting 0X 100 0 100 0 0 0 E1 01 1 stage speed setting 1X 100 0 100 0 0 0 E1 02 2 stage speed setting 2X 100 0 100 0 0 0 E1 03 3 stage speed sett...

Страница 45: ...selection 0 3 0 E1 36 9 stage running time T9 0 0s h 6500 0s h 0 0s h E1 37 9 stage ac deceleration time selection 0 3 0 E1 38 10 stage running time T10 0 0s h 6500 0s h 0 0s h E1 39 10 stage ac decel...

Страница 46: ...s E2 11 PID feedback loss detection value 0 0 Not judged feedback loss 0 1 100 0 0 0 E2 12 PID feedback loss detection time 0 0s 20 0s 0 0s E2 13 Proportional gain KP1 0 0 200 0 80 0 E2 14 Integration...

Страница 47: ...terminal as a function selection of DI 0 50 0 E3 08 AI2 terminal as a function selection of DI 0 50 0 E3 09 Panel potentiometer as a function selection of DI 0 50 E3 10 AI as DI effective mode selecti...

Страница 48: ...35mH Inverter power 55kW 0 001mH 65 535mH Inverter power 55kW Motor parameters b0 09 Asynchronous motor mutUal inductance 0 1mH 6553 5mH Inverter power 55kW 0 01mH 655 35mH Inverter power 55kW Motor...

Страница 49: ...Download the parameters from keyboard storage 1 area to the storage system 3 22 Download the parameters from keyboard storage 2 area to the storage system 3 0 y0 01 User password 0 65535 0 y0 02 Func...

Страница 50: ...Custom fault 1 28 Custom fault 2 29 Power on time arrival 30 Load drop 31 PID feedback loss when running 40 Fast current limiting timeout 41 Switch motor when running 42 Too large speed deviation 43 M...

Страница 51: ...I euronormdrives com 51 NEURN030000_220_A y1 24 Current of the first fault y1 25 Bus voltage of the first fault y1 26 Input terminal status of the first fault y1 27 Output terminal status of the first...

Страница 52: ...3 Err 03 Deceleration overcurrent 1 The short circuit or earthing of inverter output happens 2 The control mode is vector and without identification of parameters 3 The deceleration time is too short...

Страница 53: ...ating 1 The air duct is blocked 2 The fan is damaged 3 The ambient temperature is too high 4 The module thermistor is damaged 5 The inverter module is damaged 1 Clean up the air duct 2 Replace the fan...

Страница 54: ...the terminal when the inverter is running Switch motor after the inverter stops 42 Err 42 Too large speed deviation fault 1 The setting for Too Large Speed Deviation parameters F8 15 F8 16 is unreason...

Страница 55: ...equivalent to the Chinese national standards GB T12668 3 EC EN61800 3 assesses the inverter in terms of electromagnetic interference and anti electronic interference Electromagnetic interference main...

Страница 56: ...at the input end of the inverter please refer to Section 6 3 6 for the specific operations 3 The lead cables of the control signal cable of the inverter and the detection line shall use the shielded...

Страница 57: ...ctors of producing leakage current between the cables and its solutions There is the distributed capacitance between the output cables of the inverter If the current passing lines has higher harmonic...

Страница 58: ...Dimension 9 1 1 Product outside drawing installation size Nameplate Cooling fan operation panel Upper cove plate Upper cover plate retaining screw Cable inlet Air duct inlet Fig 9 1 30kW F3 above Pro...

Страница 59: ...g 8 2171 KZ Sassenheim NL T 31 0 252 228850 F 31 0 252 228235 E sales euronorm nl I euronormdrives com 59 NEURN030000_220_A A B H1 H W D D1 d Fig 9 3 5 5 11kW G3 Dimension D1 H A W D B d Fig 9 4 15 22...

Страница 60: ...ut power kW Dimension mm Installation mm Guide rail installation position Weight kg H H1 W D D1 A B d E JI500 0R4G2 0 4 163 185 90 146 154 65 174 5 72 5 1 6 JI500 0R7G2 0 75 JI500 1R5G2 1 5 JI500 2R2G...

Страница 61: ...ion position Weight kg H H1 W D D1 A B d E JI500 0R7G4 0 75 163 185 90 146 154 65 174 5 72 5 1 6 JI500 1R5G4 1 5 JI500 2R2G4 2 2 JI500 004G4 4 163 185 90 166 174 65 174 5 72 5 1 8 JI500 5R5G4 5 5 238...

Страница 62: ...370 800 11 108 JI500 110G2 110 JI500 132G2 132 940 980 705 410 418 550 945 13 190 JI500 160G2 160 3 Three phase 380V AC outline dimension drawing and installation dimension Model Output power kW Dimen...

Страница 63: ...0 560 410 418 415 945 13 153 JI500 250G4 280F4 250 280 JI500 280G4 280 JI500 315F4 315 940 980 705 410 418 550 945 13 190 JI500 315G4 355F4 315 355 JI500 355G4 400F4 355 400 JI500 400G4 400 5 Outline...

Страница 64: ...180 385 7 14 JI500 037G3B 37 JI500 045G3B 45 JI500 055F3B 55 JI500 055F3N 55 JI500 055G3B 55 500 520 340 275 283 220 500 10 47 JI500 075G3B 75 2 Outline dimension drawing and installation dimension of...

Страница 65: ...3 18 115 JI500 132G4R 160F4R JI500 160G3R 187F3R 160 187 1230 1260 480 390 398 400 200 13 153 JI500 187G3R 200F3R 187 200 JI500 200G3R 220F3R 200 220 JI500 220G3R 220 JI500 160G4R 187F4R 160 187 JI500...

Страница 66: ...power kW Dimension mm Installation mm Weight kg H W D D1 A B d JI500 450F3R 450 1200 600 612 680 550 17 JI500 450G3R 500F3R 450 500 JI500 500G3R 560F3R 500 560 JI500 560G3R 630F3R 560 630 JI500 630G3R...

Страница 67: ...Keyboard size chart Size Mm JI500 keyboard installation opening size Opening size of external mounting panel T 1 0 1 5mm 126 5 0 2 Mounting panel Opening panel126 5 82 82 0 2 Fig 9 12 Keyboard install...

Страница 68: ...disassemble or shake the device gratuitously during check and never unplug the connectors otherwise the system will not run or will enter into fault state and lead to component failure or even damage...

Страница 69: ...ectifier so al l the DC bus capacitor will be charged at the same time You should make sure the voltage 380v of high voltage frequency inverter because when the capacitor being charged it almost doesn...

Страница 70: ...the motor cable but also can reduce the electromagnetic radiation PE conductor shield conductor Jacket Insulation shield PE Sym m et ri cal shi el ded m ot or cabl es Four core cabl e PE conductor co...

Страница 71: ...side of inverter can reduce inductive interference and radio interference Inductive interference The electromagnetic induction makes the signal line noise when upload signal and then cause the control...

Страница 72: ...sion to alteration or repair caused by product failure 2 3 Users beyond the standard specifications require the use of the inverter caused by product failure 2 4 Users to buy and then fell loss or dam...

Страница 73: ...communication the data is sent out frame by frame in the form of message 2 Topological structure Single master and multi slave system The setting range of slave address is 0 to 247 and 0 refers to bro...

Страница 74: ...air PE PE PE Frequency inverter Frequency inverter Figure I 4 The two longest distance inverter from the device shall short the terminal resistor on the control board to be active As shown in Figure I...

Страница 75: ...ress field is received each device decodes it to find out if it is sent to their own Following the last transmitted character a silent interval of at least 3 5 characters marks the end of the message...

Страница 76: ...F002H low order 01H Data F003H high order 00H Data F003H low order 01H CRC CHK low order CRC CHK values are to be calculated CRC CHK high order Command Code 06H write a word For example Write 5000 13...

Страница 77: ...racter is valid to the CRC the start bit and stop bit and parity bit are invalid During generation of the CRC each eight bit character is exclusive OR XOR with the register contents separately the res...

Страница 78: ...F500 F50F E3 00 E3 21 A300 A315 F6 00 F6 21 F600 F615 b0 00 b0 35 B000 B023 F7 00 F7 54 F700 F736 y0 00 y0 04 C000 C004 F8 00 F8 35 F800 F823 y1 00 y1 30 C100 C11e F9 00 F9 07 F900 F907 Some parameter...

Страница 79: ...equency display 1010 PID setting Note There is two ways to modify the settings frequencies through communication mode The first Set F0 03 Main frequency source setting as 0 1 Keyboard set frequency an...

Страница 80: ...o fault 0001 Inverter unit protection 0002 Acceleration overcurrent 0003 Deceleration overcurrent 0004 Constant speed overcurrent 0005 Acceleration overvoltage 0006 Deceleration overvoltage 0007 Const...

Страница 81: ...the faster communication speed F9 01 Data format Default 0 Setting range 0 No parity Data format 8 N 2 1 Even parity Data format 8 E 1 2 Odd parity Data format 8 O 1 3 No parity Data format 8 N 1 Not...

Страница 82: ...communication time exceeds the communication time Usually they are set to invalid If you are in a continuous communication system set the secondary parameters you can monitor the status of the commun...

Страница 83: ...ing JI500_PG4 Rotational transformer PG card Terminal wiring JI500_PG5 ABZ incremental encoder OC input PG card with 1 1 frequency dividing output 5V 12V 24V voltage is optional please provide voltage...

Страница 84: ...gative Rotational transformer PG card JI500_ PG4 JI500_PG4 specifications User interface Terminal block Swappable NO Wire gauge 22AWG 0 3247mm Resolution 12 bit Excitation frequency 10kHz VRMS 7V VP P...

Страница 85: ...Protocol details please refer to CAN bus communication protocol document III 2 Mechanical installation and terminal functions III 2 1 Mechanical installation modes Figure IV 1 CAN bus communication ca...

Страница 86: ...tive 2 RTS Request to send signal 5 5V 5Vpower 3 TR Cable negative 6 E The grounding end Table V 2 External communication terminal function 2 Upper machine communication interface SW1 8PIN Terminal No...

Страница 87: ...status after PID stop PID stop with computing 1 F7 46 Awakens frequency If the inverter is in hibernation mode and the current running command is valid when the setting frequency is greater than or eq...

Страница 88: ...ameter name Setting range F0 11 Command source selection Keyboard control LED on 1 F1 00 DI1 terminal function selection Forward running FWD 1 F1 01 DI2 terminal function selection Reverse running REV...

Страница 89: ...range F2 08 DA2 output function selection Output current 2 F2 18 DA2 zero bias coefficient 100 0 100 0 20 0 F2 19 DA2 gain 10 00 10 00 0 80 Note The DA2 jumper cap on the control board of the inverte...

Страница 90: ...etting range F0 03 Frequency source master setting Multi speed operation setting 6 F0 11 Command source selection Terminal block control LED on 1 F0 13 Acceleration time 1 0 0s 6500s 2 0s F0 14 Decele...

Страница 91: ...onding maximum frequency counterclockwise twisted to the minimum corresponding 0Hz V 6 3 Parameter setting No Code Parameter name Setting range F0 03 Frequency source master setting Analog AI1 setting...

Страница 92: ...8 3 Parameter setting No Code Parameter name Setting range F0 11 Command source selection Terminal block control LED on 1 F0 03 Frequency source master setting UP DOWN can be modified power down with...

Страница 93: ...n speed regulation External 0 10V voltage signal given 0 10V Analog signal V 9 2 Connection The terminal of the external analog signal is connected to the AI1 terminal and the other terminal of the si...

Страница 94: ...og signal V 10 2 Connection Connect the end of the external reference signal to the AI2 terminal the end of the signal to the GND terminal of the inverter and the AI2 jumper cap to the I terminal V 10...

Страница 95: ...tting No Code Parameter name Setting range F0 03 Frequency source master setting PID control setting 8 F0 11 Command source selection Terminal block control LED on 1 F0 13 Acceleration time 1 0 0s 650...

Страница 96: ...ter keyboard encoder switching V 12 2 Parameter setting No Code Parameter name Setting range F0 03 Frequency source master setting Panel potentiometer setting 4 F0 04 Frequency source auxiliary settin...

Страница 97: ...om the control board according to the demand of most customers in the market 3 Add the technical specification and dimension description of G315 22kw plastic shell products V4 1 5 2021 10 1 The multi...

Страница 98: ...Hub van Doorneweg 8 2171 KZ Sassenheim NL T 31 0 252 228850 F 31 0 252 228235 E sales euronorm nl I euronormdrives com 98 NEURN030000_220_A...

Страница 99: ...99 NEURN030000_220_A...

Страница 100: ......

Страница 101: ...www euronormdrives com Hub van Doorneweg 8 Sassenheim...

Отзывы: