ETS REJUVASUN 332 Скачать руководство пользователя страница 5

28940-01A

iv

Renseignements sur la Sécurité

Rayonnement ultraviolet. Veuillez suivre les instructions. Évitez une exposition excessive.  Tout comme pour les
rayons du soleil, une exposition excessive peut causer des blessures aux yeux et à la peau et provoquer des réac-

tions allergiques. Une exposition répétée peut causer le vieillissement prématuré de la peau et provoquer le cancer de la peau. PORTEZ
DES LUNETTES PROTECTRICES:  LE NON-RESPECT DE CETTE CONSIGNE DE SÉCURITÉ PEUT ENTRAÎNER DE GRAVES
BRÛLURES OU DES LÉSIONS OCULAIRES À LONG TERME. Les médicaments ou les produits cosmétiques peuvent augmenter votre
sensibilité au rayonnement ultraviolet. Consultez un médecin avant d’utiliser la lampe solaire si vous prenez des médicaments, si vous
souffrez d’une maladie cutanée ou si vous croyez être particulièrement sensible aux rayons du soleil. Si vous ne bronzez pas au soleil, il
est peu probable que vous bronzerez sous une lampe solaire. Les enfants, les personnes âgées et les personnes qui ont une peau claire
qui brûle facilement, ne bronze jamais ou alors très peu, ne devraient pas utiliser cette lampe.

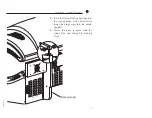
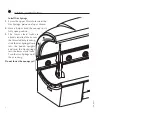
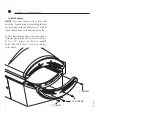
Étendez-vous sous la partie supérieure, puis abaissez celle-ci aussi bas que possible. La distance minimale d’usage de l’appareil de
bronzage pour le visage est de 4 pouces (10.2 centimètres), afin d’éviter une exposition excessive.  Les autres parties du corps peu-
vent toucher les panneaux de plastique transparents. N’utilisez pas la lampe sans les panneaux de plastique transparents. La première
semaine de bronzage, les personnes qui n’ont pas un hâle initial ne doivent pas se faire bronzer tous les jours. Ne vous faites jamais
bronzer plus d’une fois par jour. Le bronzage commence normalement à apparaître après les premières séances :  il atteint son apogée
au bout d’environ quatre semaines. Les personnes qui ont déjà un teint hâlé peuvent commencer à des niveaux plus élevés, selon l’im-
portance de leur hâle initial.

Les lampes neuves émettent approximativement 10 % de plus de rayons ultraviolets au cours des 50 premières heures de fonction-
nement. Le temps de bronzage doit donc êatre réduit d’environ 10 % pendant cette période.

AVERTISSEMENT :

• Lisez le livret d’instructions avant d’utiliser cette lampe solaire. • Les autres personnes présentes dans la pièce

doivent aussi porter des lunettes protectrices lorsque les lampes sont allumées. Coquilles de protection pour les yeux recommandées:  Ultra
SunGlobes®, 

special-eyez, ou l’équivalent, tel que le stipule le document 21 CFR 1040.20. Les autres types de lunettes protectrices peu-

vent ne pas assurer une protection adéquate. Utilisé sans lunettes protectrices, ce produit peut causer des brûlures ou lésions oculaires
graves. Si vous souffrez d’un malaise, arrêtez l’utilisation et consultez un médecin.

SEULES LES LAMPES SUIVANTES ONT ÉTÉ HOMOLOGUÉES POUR CET ÉQUIPEMENT :

Velocity® Wolff® Modèle VEL71-T12 / 100W PREHEAT-BIPIN

(banc seulement)

Velocity® PLUS Wolff® Modèle VLP71-T12-100W Bi-Pin

(partie supérieure seulement)

Heraeus E400 HPT

-ou- 

Philips Modèle HPA 400/30s

-ou- 

CosmoTech Modèle 23045

(unité faciale)

Cet équipement doit être mis à la terre.
Ce produit est conforme aux normes de rendement pour les lampes solaires dans le documents 21 CFR, partie
1040.20 ,  ANSI/UL 482 , CAN/CSA C22.2 N° 224.

DANGER

88465

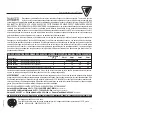
TEMPS D’EXPOSITION RECOMMANDÉ EN MINUTES LE TEMPS D’EXPOSITION MAXIMAL EST DE 20 MINUTES

Élevé 1/Semaine 1

Élevé 2

Élevé 3

Élevé 4

Élevé 5

Type de peau:

1

ere

-3

e

I

Peau sensible

(brûle facilement et ne bronze pas)

NON RECOMMANDÉ

II

Peau claire

(brûle facilement et bronze très peu)

4

8

12

16

20

III

Peau normale

(brûle et bronze de façon modérée)

6

10

15

20

20

IV

Peau foncée

(brûle très peu, bronze plus facilement que la moyenne)

8

12

16

20

20

Débrancher l’alimentation électrique avant de nettoyer l’appareil , d’en faire l’entretien ou de changer les lampes.

Содержание REJUVASUN 332

Страница 1: ...28940 01A...

Страница 2: ...by this warranty Warranty coverage does not include cosmetic abnormalities such as scratch es nicks dents or other cosmetic changes that do not materially interfere with the function of the tanning un...

Страница 3: ...nstalling and using the unit Always be sure to observe all safety precautions ontents Safety Information iii Installation 1 Unpacking and Inspection 1 Pre Installation Planning 2 Hardware Inventory 3...

Страница 4: ...uld therefore be reduced by approximately 10 during that period WARNING Read the instructions booklet before using this sunlamp product All persons in the room should wear protective eyewear when lamp...

Страница 5: ...ines Les personnes qui ont d j un teint h l peuvent commencer des niveaux plus lev s selon l im portance de leur h le initial Les lampes neuves mettent approximativement 10 de plus de rayons ultraviol...

Страница 6: ...the ballast drawer with a Phillips screwdriver Note The cartons are reusable You may wish to save them for future use After unpacking the unit check to make sure you have received the following Canopy...

Страница 7: ...CAUTION Use of a voltage source above 230V AC may prevent proper operation of the sunbed and could cause damage and void the warranty CAUTION Proper assembly of your sunbed requires three people Plan...

Страница 8: ...2 Retaining Ring Quantity 2 Phillips Screw 10 x 1 2 Quantity 8 Phillips Screw 10 x 1 Quantity 8 Hardware Inventory Open the hardware bag Remove the hardware In addition to a phone type RJ 11 cable and...

Страница 9: ...ar shift it to the left or right and then pull it from the bed After the bed is assembled reinstall the bar to keep the tray from damaging the access panel if the bed is moved Stand Assembly 1 Place t...

Страница 10: ...protect the units and place the canopy on the bench with the canopy hinge arms toward the back Once again do not use the canopy plastic endcaps to lift the unit CAUTION DO NOT lift the canopy using th...

Страница 11: ...embly Procedures 2 Insert the Nylon Floating Bearings into the canopy hinge arms and carefully lower the hinge arms into the bench uprights 3 Secure the arms in place with the Hinge Pins and Hinge Pin...

Страница 12: ...up as shown 2 Have a helper hold the canopy in its fully open position 3 The lower clevis forks are already installed Make sure the threaded hole faces up slide the Gas Springs down into the bench upr...

Страница 13: ...s Forks Pay special attention when lowering the canopy that the clevis forks do not damage the bronze bushings Bronze is excel lent for smooth pivoting applica tions such as this but tends to be soft...

Страница 14: ...ructions for installing the fan are included with the body fan kit Follow those instructions to install the body fan Put the head end endcap the one without slots on top in place and secure with two 1...

Страница 15: ...the RJ 11 phone type cable between the canopy and rear jack on the ballast drawer The three jacks on the front of the drawer are for remote connections Connect main power cord as described in Pre Ins...

Страница 16: ...p of the ballast drawer It simply sits on the drawer over the air slots and is held in place by airflow when the unit is running The arrow on the filter should point down Reinstall the Ballast Tray St...

Страница 17: ...e of the RJ 22 remote control ports Your sunbed will not operate without the Remote Control Bypass plug or a remote system connected ATTENTION Although the Remote Control Bypass plug provided with you...

Страница 18: ...auto addressing feature of the Manager and the following parameters 5 6 7 8 9 10 15 and 23 See your T Max manual for descriptions of these parameters and how they function Special Note on T Max The R...

Страница 19: ...allations the T Max 3W can offer the same control as the T Max Manager Pro eliminating the need for a Manager The remote control bypass plug must not be used in this configuration The 3W may be used a...

Страница 20: ...ro and one G2 to each wireless ready tanning bed The rest of the salon may be daisy chained together and connected to the Manager Pro After you have set the T Max 3W s address to 0 refer to your T Max...

Страница 21: ...f you are using a T Max 3W as a master remote the id of the sunbed must be set to 1 If you are using a T Max Manager Pro each sunbed must be assigned a different id To set the id press the timer butto...

Страница 22: ...ver tan more than once a day Tanning normally appears after the first few sessions and maximizes after approxi mately four weeks Tan once or twice per week thereafter to maintain appearance Persons al...

Страница 23: ...an control Controls the speed of the body fan during use D Body fan speed indicator Indicates speed of fan OFF LOW MED HIGH E Timer display Displays remaining time F Stop button Interrupts tanning ses...

Страница 24: ...c shield The cooling fans run for a period of time after the lamps shut off to aid in cooling the sunbed The timer will indicate as a reminder to clean the sunbed After the sunbed is cleaned press the...

Страница 25: ...ent Step 2 With a soft cloth wipe the entire length of each lamp to remove any film buildup Step 3 Clean both sides of the acrylic shields with a non ammonia dis infectant cleaner Step 4 Wipe the refl...

Страница 26: ...ning Replacing Acrylic Shields The acrylic shields are secured in place by turn latches along the front edge Use a flat bladed screwdriver to turn the latches a quarter turn to open the acrylic The ac...

Страница 27: ...ps is a viola tion of Federal regulations and will void your warranty These lamps have an aver age life of 700 1000 hours of effective tanning use Lamps used longer than that begin to lose their effec...

Страница 28: ...new lamp using a clean cloth or paper towel Ensure that the lamp is firmly seated in the lamp holders Note Never take hold of the lamp such that your fingers are in contact with the lamp glass Finger...

Страница 29: ...does not replace old lamp NOTE Gas springs are manufactured to hold the canopy in its fully open position as well as allow it to rest fully closed If left open for an extended period of time some cre...

Страница 30: ...Contact servicer Current sensor indicating unit is on when it should be off Contact servicer Requested session time exceeds maximum time allowed 1 Bypass plug is not installed see Electrical Connecti...

Страница 31: ...ce has not been set 2 The sunbed has not been connected to the remote system see Remote Connections 1 Delay time of T Max Manager has not been set 2 Delay time has expired and session has begun Auto s...

Страница 32: ...28940 01A T 332 3F LUX...

Страница 33: ...28940 01A Ballast Tray...

Страница 34: ...apacitor 75 F Contactor Contactor for Face Tanner Cover Canopy Current Sensor Endcap Endcap Canopy Head End Endcap with Body Fan Cut outs Face Tanner Assembly Outer Fan Body Fan Cooling Fan Grill Plas...

Страница 35: ...terior E Check Clean Fans F Change Lamps H Check Fasteners nuts bolts etc I Check Power Cords J Change Filter See Care and Maintenance See Lamp and Acrylic Replacement Fans are located on top of the c...

Страница 36: ...ardwire Main Lamps bench Velocity Main Lamps canopy Velocity PLUS Ballasts 100W Face Tanner SolarMax IFT FT Ballasts 400W Body Cooling System Full side fan panel plus 230cfm Turbo Timer System Digital...

Отзывы: