Cordless Telephone
EB_T-11-SF_R / EB_T-12-SF_R /
EB_T-13-SF_R
QUICK START-UP GUIDE
Full instructions available at www.boulanger.com
Thank you for purchasing this Essential b product.
We pay particular attention to the
DESIGN
,
RELIABILITY
and
EASE
OF USE
of our products.
We hope that you will be entirely satisfied with this cordless
telephone.
ENGLSIH
This packaging includes an RJ11 telephone cable for installations
equipped with internet router:
- If you have an internet router, please connect the telephone cable
directly to it.
- If you do not have an internet router, please use the telephone
socket provided.
FIRST INSTALLATION
Installing your telephone:
- Make the various connections on the base. Connect the telephone
line cable to the telephone wall socket using the T socket or to the
box, and plug the power cable into a mains socket.
- Insert the batteries into the handset.
Before you start using your phone, charge the batteries for 15 hours.
Use only the AC adapter and rechargeable batteries supplied with
your phone.
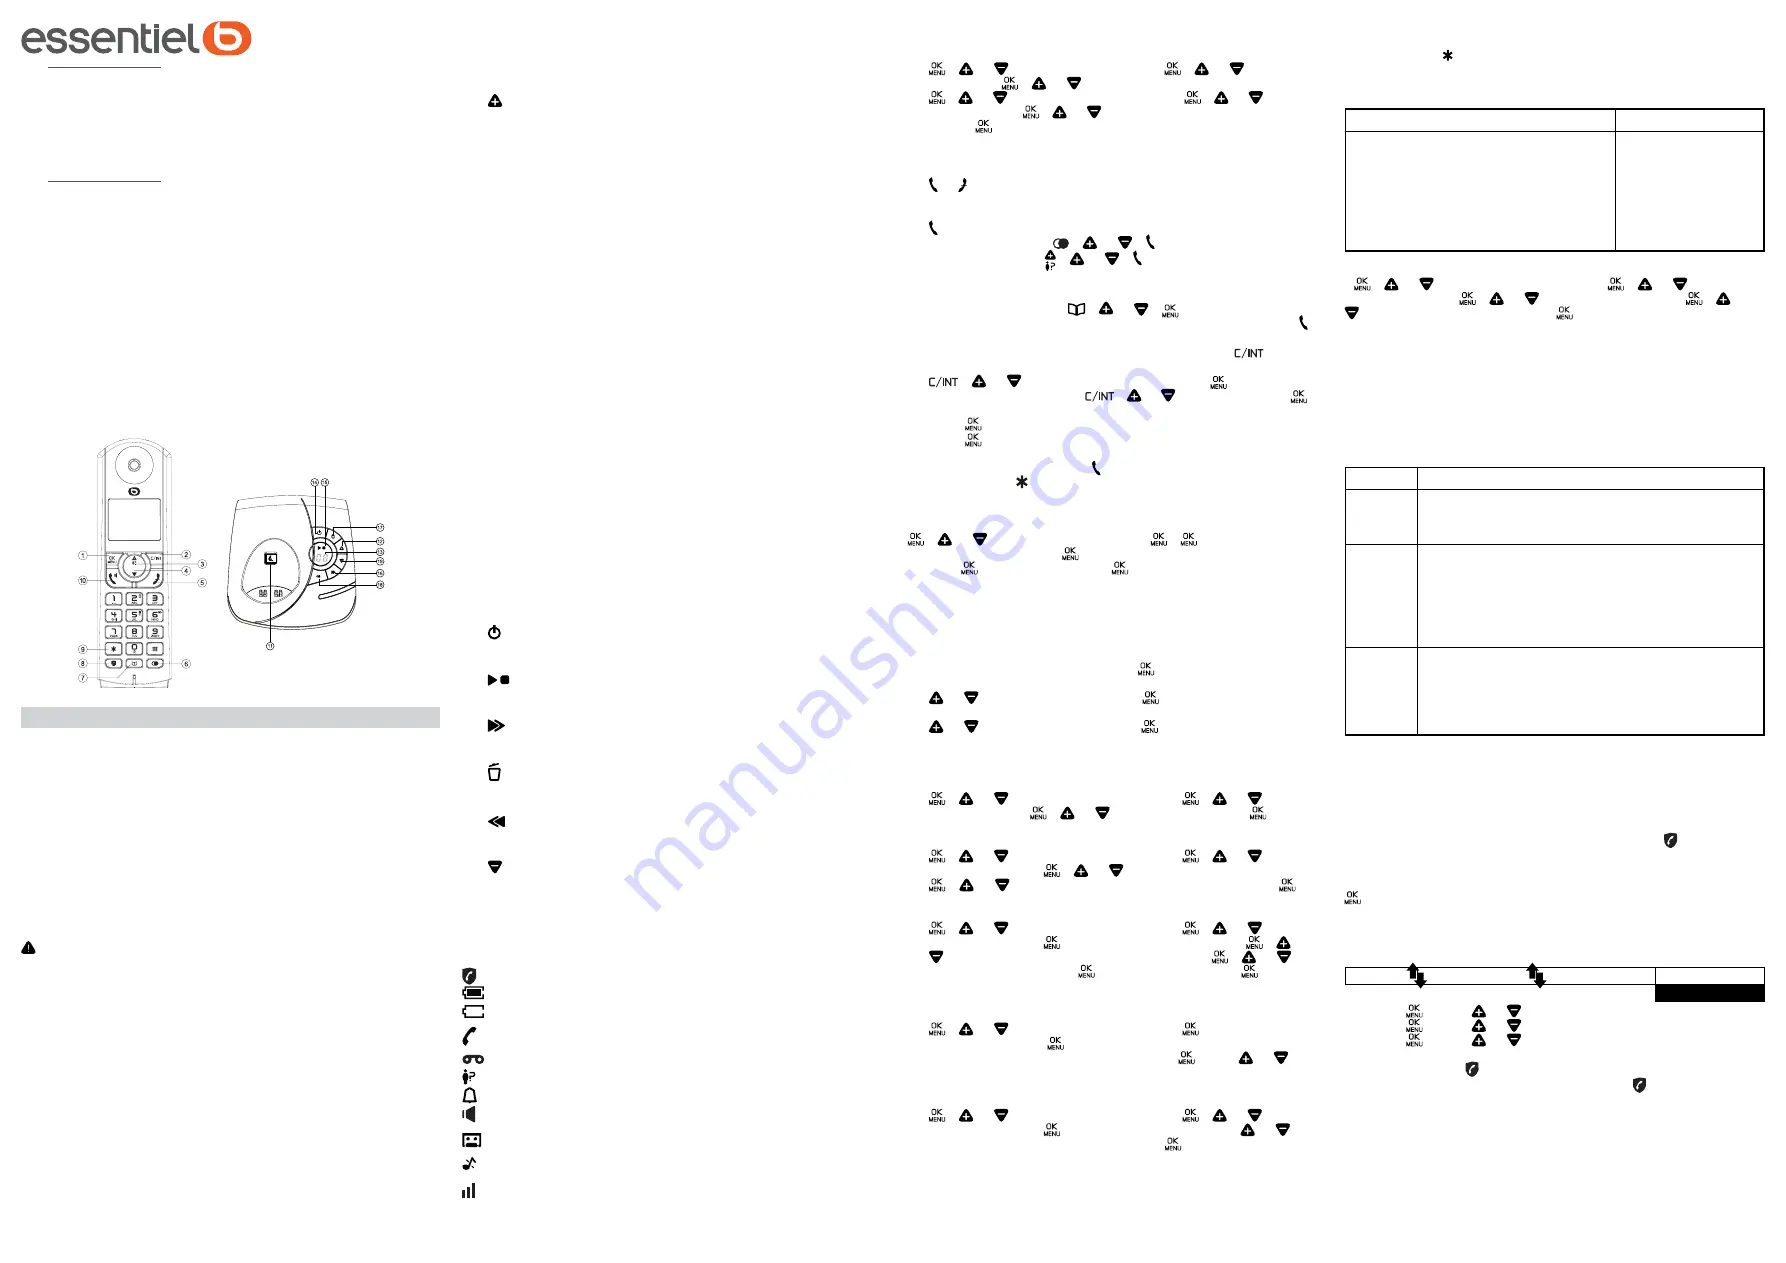
Handset and base keys
1.
OK/Menu Key
2.
Return / Intercom Key
3 & 4.
Navigation Key
5.
Hang up/Exit Key
6.
Redial Key
7.
Phone book Key
8.
Call blocking key*
- *To block calls, you have to subscribe to
the Caller ID service. Contact your land line operator.
In standby mode: Direct access to the Call blocking menu.
9.
Star key
- To switch between an internal call and an external call/
# key
- press and hold the key to activate/deactivate the ringer.
10.
Talk/Hands-free Key
11.
Handset search/pairing key
- To locate the handset/to
start the pairing procedure. For multi-handset models, all supplied
handsets are already paired with the base. Pairing is therefore
only necessary for additional handsets you purchase and for
defective handsets you need to replace.
12.
Increase the volume of the loudspeaker (+) during message
playback.
13.
SCREEN
0F->--
The answering machine function is deactivated (OFF)
0n-> XX The answering machine function is activated (ON) and XX
messages have been recorded on the answering machine
00
On steady: the answering machine contains no messages
XX
Flashing: XX new messages have been recorded on the
answering machine
ZZ
On steady: the answering machine contains ZZ messages
that have already been heard (and no new messages)
XX/FF
XX flashes alternately with FF: XX new messages have
been recorded and the answering machine memory is full
FF
Flashing: the answering machine memory is full with
messages that have already been heard; no new message
has been received
--/XX
XX flashes alternately with - -: the time has not been set
and XX new messages have been recorded
- -
- - flashes: the time has not been set, no new message
has been received
XX
On steady: playback of the old message XX already
received Flashing: playback
of new message XX received
A1/A2
On steady: outgoing message playback, with A1
corresponding to the outgoing message for Answering
machine/Recorder mode and A2 corresponding to the
outgoing message for Answering machine only mode
XX/An
XX flashes alternately with An: a new message XX is
currently recorded
An means that message recording is in progress
rA
Flashing: remote access is in progress
LX
On steady: indicates the current sound level, with X
between 1 and 8
14.
Press to activate the answering machine function
Press again to deactivate the answering machine function
15.
Press to listen to the message
Press again to stop message playback
16.
Press to stop playback of the current message and skip to the
next message
17.
Press once to delete the message being played back
Press and hold to delete all old messages
18.
Press to play back the current message from the start
Press twice to stop playback and skip back to the previous message
19.
Decrease the volume of the loudspeaker (-) during message
playback
*Subject to subscription and availability of the service from the land
line operator.
Screen icons
Indicates that the call blocking function is activated.
Indicates that the batteries are fully charged.
Indicates that the batteries are completely discharged.
Indicates that an external call is in progress or has been put on
hold. The icon flashes when you receive a call.
Indicates that you have received a voice message*.
Indicates new unanswered calls* in the call log.
Appears on the screen when the alarm clock function is activated.
Appears on the screen when you switch to hands-free mode.
On steady: indicates that the answering machine is active.
Flashing: when the answering machine has recorded new messages.
Appears on the screen when you turn off the ringer.
Indicates that the handset is paired with the base and that it is
within range of the base. The icon disappears when the handset
is out of range or searching for the base.
Choose the language and the flashing time for your phone
to operate correctly on the network. By default, the flashing
time is MEDIUM
-
/ or to select
REGL. COMB
/ / or to select
LANGUE
/ / or to select the language you want.
-
/ or to select
BASE SETTINGS
/ / or to select
FLASH TIME
/ / or to select
/
SHORT
/
MEDIUM
or
LONG
/ .
Using your telephone
Receive and end a call
-
or
Make a call
-
before or after dialling a number.
- From the redial list: / or / .
- from the call log*: / or / .
Comment: You must subscribe to the Caller ID service for the number
or name of the caller to appear in the call log.
- From the phone book:
/ or / .
- During a call: press to activate/deactivate hands-free mode: .
To call an internal handset:
- If you only have 2 handsets paired with the base:
.
- If you have more than 2 handsets registered with the base:
/ or / select the handset number / .
- To call all of the handsets:
/ or /select
CALL ALL
/ .
During the call:
- Press until you select the
INTERCOM
option.
- Press and select the handset with which you want to make
the 3-way conference.
- The internal caller presses to accept the internal call.
- Press and hold on the calling handset to establish the conference.
Phone book: 50 entries
Save a contact in the phone book
/ or to select
PHONE BOOK
/ / /select
ADD
/ type
the name of the contact / / type the telephone number of the
contact / / select the melody / .
Fr the Duo and Trio models, the phone book, the call log and the
last number saved for callback are common to all the handsets.
Settings
You can customise this phone according to your preferences.
To access the different options, press:
.
- To personalise a handset (name, melody, language, etc.):
or to select
HS SETTINGS
/ .
- To modify the PIN code, associate a handset, reset it:
or to select
BS SETTINGS
/ .
Answering machine settings
Settings from the handset
Switching the answering machine on and off
-
/ or to select
ANS. MACHINE
/ / or to select
TAM ON/OFF
/ / or to select
ON
or
OFF
/ .
Set the answering machine mode
-
/ or to select
ANS. MACHINE
/ / or to select
TAM SETTINGS
/ / or to select
ANSWER MODE
/
/ or to select
ANSWER ONLY
or
ANS & REC
/ .
Record a personalised outgoing message
-
/ or to select
ANS. MACHINE
/ / or to select
TAM SETTINGS
/ / to select
OGM SETTINGS
/ / or
to select
ANSWER ONLY
or
ANS & REC
/ / or to
select
RECORD MESS
/ to start the recording / to end
the recording.
Message playback and delete
-
/ or to select
ANS. MACHINE
/ / to select
MSG PLAYBACK
/ to start playback.
- During message playback you can select , then or to
select the option to delete the message in playback.
Change the number of rings
-
/ or to select
ANS. MACHINE
/ / or to select
TAM SETTINGS
/ to select
ANSWER DELAY
/ or to
select
2 - 8 RINGS
or
TIME SAVER
/ .
Access your answering machine remotely
Dial your telephone number / while playing the personalised outgoing
message, press and dial your remote access code (master PIN
code 0000).
Remote access enables the following actions:
Action
Key
Replay messages
Replay the current message from the
start
Erase the message
Skip the message
Switch on the answering machine
Switch off the answering machine
5
4
2 (during playback)
6
7
9
Setting the answering machine language
- / or to select
ANS. MACHINE
/ / or to select
TAM SETTINGS
/ / or to select
LANGUAGE
/ / or
to choose the desired language .
This telephone is built-in with Basic Call Block feature*. This feature
will help you avoid nuisance calls by only allowing some numbers
to make your phone ring. Default setting of Basic Call Block in this
telephone is
OFF
but you can enable it via your phone settings, as
explained in the following paragraphs.
*This feature requires a subscription of Caller Line Identification service from
your telephone service provider.
CALL BLOCK OVERVIEW
Setting Explanations
OFF
Call Block function (Block all call with numbers)
is Disabled.
This is the default mode.
ON
Call Block function is set to On. Numbers regis-
tered in the black list will not go through and the
phone will ring silently.
Numbers can be added to the list while the
phone is ringing and / or after a call (to enable,
see part 1).
ANONYM This extra feature allows you to block call that
do not have a number attached to them (ie pri-
vate calls, international calls, etc).
This option can be enabled on top of any of the
previous four (to enable, see part 2)
1. Manual call block mode
Manual call block is the easiest option when starting out. When you
chose
ON
in the call block settings, all calling numbers registered
in your blacklist will be blocked. You can add/remove numbers from
that list at any time.
How to block an incoming call:
When the phone is ringing and before answering, press will terminate
the call and offer you the option to register the number to the blacklist
in one click.
Then to confirm the registration of this number in the blacklist, press
.
IMPORTANT : if you don’t confirm, the number will not be added to
the blacklist and the next call will go through normally.
1.1.
Enable MANUAL mode
MENU
CALL BLOCKB
LOCK SET.
OFF
ON*
1. Press , press or to select
CALL BLOCK
.
2. Press , press or to select
BLOCK SET
.
3. Press , press or to select
ON
.
OR
In idle mode, press to access
BLOCK SET.
directly.
After you enable this option, the call block icon will be displayed
on the LCD.


