197
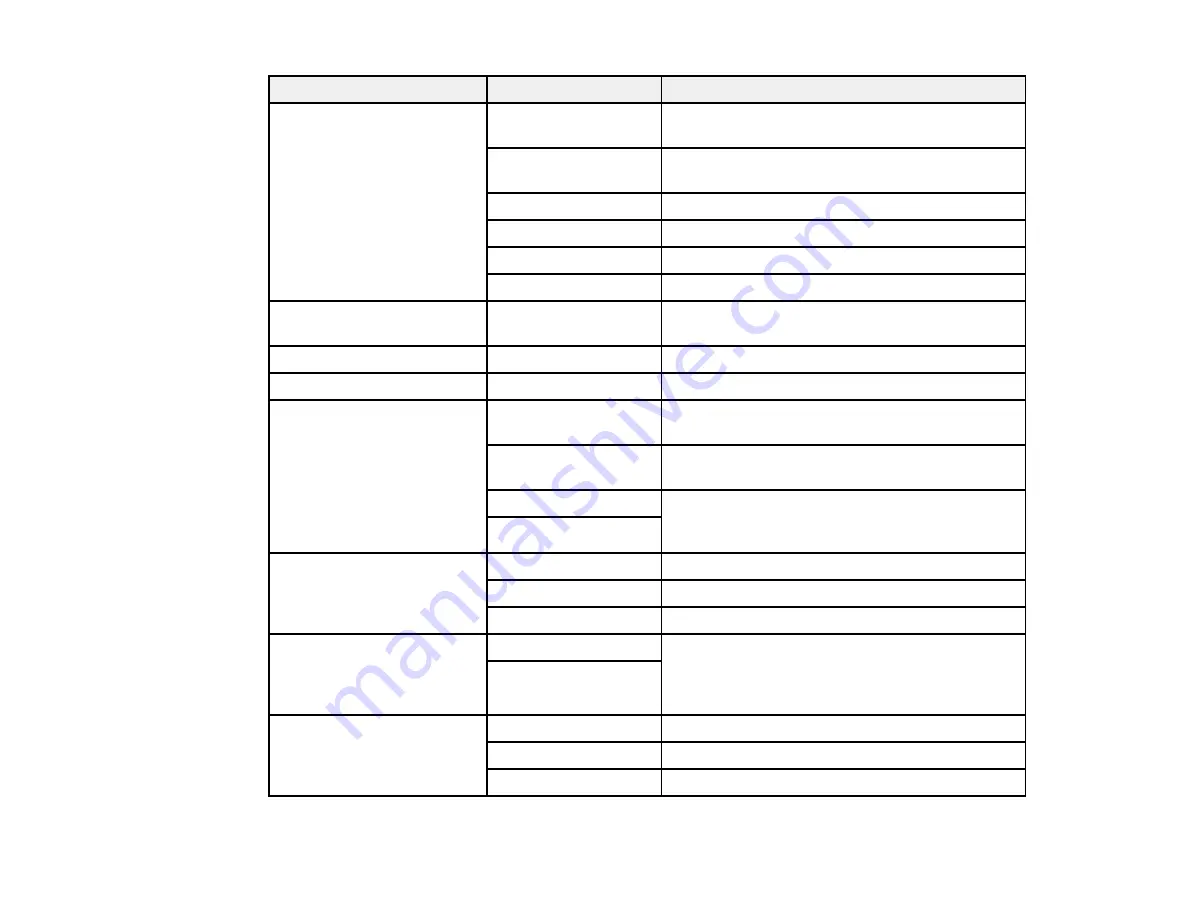
Scan Settings
Available options
Description
Edit Location
Communication
Mode
Select
Network Folder (SMB)
or
FTP
Location
Enter a folder path in which to save scanned
images
User Name
Enter a user name for the selected folder path
Password
Enter a password for the selected folder path
Connection Mode
Select the connection mode
Port Number
Enter a port number
Recipient
—
Select an email address or folder path to send or
save scanned images
B&W
—
Select to scan images in black and white
Color
—
Select to scan images in color
File Format
JPEG
Select for photos. You can also select the
Compression Ratio
.
Select for documents. You can also select the
Compression Ratio
and
PDF Settings
.
TIFF (Single Page)
Select for scanned files that you can print from a
device. Multi Page TIFF documents are scanned
in black and white.
TIFF (Multi Page)
Resolution
200dpi
Select for documents
300dpi
Select for photos
600dpi
Select for highest quality printing
2-Sided
1-Sided
Lets you scan 2-sided originals placed in the
ADF. If you select
On
, you can also select the
Orientation (Original)
and the
Binding
(Original)
.
2-Sided
Scan Area
Auto Detect
Select to automatically adjust the scan area
Various sizes
Select the page size for documents
Max Area
Select for most photos
Содержание WF-C20590 Series
Страница 1: ...WF C20590 User s Guide ...
Страница 2: ......
Страница 14: ......
Страница 28: ...28 You see the Basic Settings screen 4 Select Date Time Settings ...
Страница 80: ...80 You see a screen like this 5 Select PDL Print Configuration ...
Страница 89: ...89 You see this screen 2 Select Load Paper under the How To options ...
Страница 90: ...90 You see this screen 3 Select one of the options ...
Страница 91: ...91 You see this screen 4 Select How To ...
Страница 99: ...99 You see a screen like this 2 Select the paper source you want to select settings for ...
Страница 110: ...110 Parent topic Placing Originals on the Product Related topics Copying Scanning Faxing ...
Страница 123: ...123 You see this window 3 Select the double sided printing options you want to use 4 Click OK to return to the Main tab ...
Страница 170: ...170 You see this window 3 Click Network printer search 4 When you see the search results select Add found printers ...
Страница 191: ...191 You see a screen like this 4 Select Email ...
Страница 200: ...200 You see an Epson Scan 2 window like this ...
Страница 202: ...202 You see an Epson Scan 2 window like this ...
Страница 207: ...207 You see this window ...
Страница 223: ...223 DSL connection 1 Telephone wall jack 2 DSL filter 3 DSL modem ...
Страница 224: ...224 ISDN connection 1 ISDN wall jack 2 Terminal adapter or ISDN router ...
Страница 246: ...246 You see a screen like this 3 Select the Recipient tab ...
Страница 251: ...251 You see a screen like this 3 Select the Recipient tab 4 Select Add New 5 Select Add Group ...
Страница 311: ...311 You see a screen like this 6 Select Print Head Nozzle Check ...
Страница 312: ...312 You see a screen like this 7 Select the paper cassette you want and select OK The nozzle pattern prints ...
Страница 318: ...318 5 Open the interior of the document cover ...


