156
Setting
Options
Description
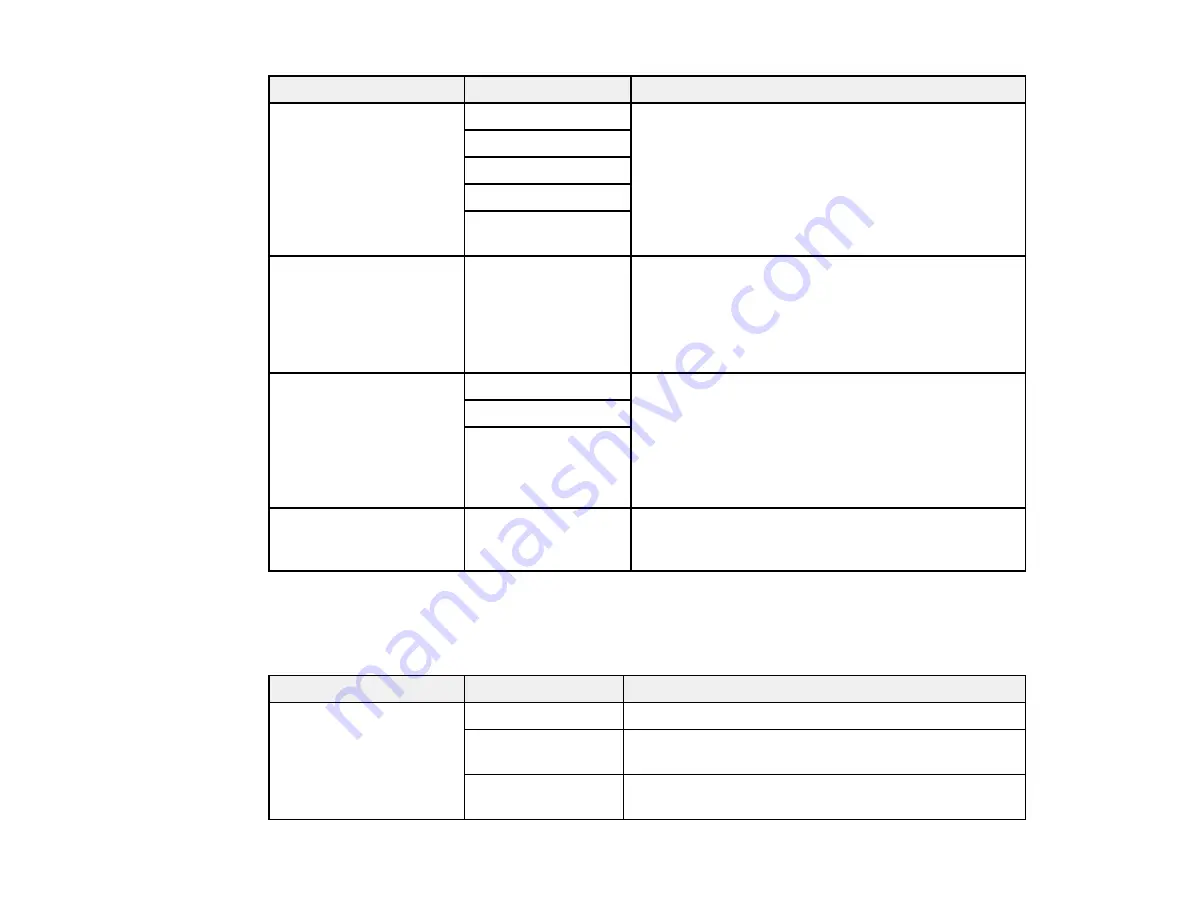
Distinctive Ring
All
If you are using a Distinctive Ring Service on your
phone line, your telephone company can assign two
or more phone numbers to the same line and assign
different ring patterns to each. If you use this service,
select the number of rings for your fax number so
your product can receive faxes on the correct
number of rings. Select
All
for phones lines that do
not use this service.
Single
Double
Triple
Double&Triple
Rings to Answer
1 to 9
Sets the number of rings before your product
receives a fax. If Receive Mode is set to
Auto
and an
answering machine is connected to the product,
make sure this setting is set higher than the number
of rings your answering machine is set to answer a
call.
Remote Receive
Off
Lets you start receiving faxes using your phone
instead of operating the product (if Receive Mode is
set to
Auto
). When you select
On
, you must also set
a
Start Code
. If you are using a cordless handset
with its base connected to the product, you can start
receiving the fax by entering the code using the
handset.
On
Start Code
Rejection Fax
Various
Lets you automatically reject faxes received from
blocked numbers, unrecognized contacts, or with
blank headers.
Parent topic:
Selecting Advanced Fax Settings
Security Settings - Fax
Set the security options you want to use for fax data.
Setting
Options
Description
Direct Dialing
Restrictions
Off
Does not restrict dialed fax numbers.
On
Allows faxing only to numbers stored in the contacts
list or history.
Enter Twice
Requires you to enter fax numbers twice to prevent
errors.
Содержание ST-4000
Страница 1: ...ST 4000 User s Guide ...
Страница 2: ......
Страница 12: ......
Страница 13: ...13 ST 4000 User s Guide Welcome to the ST 4000 User s Guide For a printable PDF copy of this guide click here ...
Страница 18: ...18 3 Select General Settings 4 Select Basic Settings 5 Select Date Time Settings ...
Страница 26: ...26 Product Parts Inside 1 Document cover 2 Scanner glass 3 Control panel ...
Страница 60: ...60 2 Pull out the paper cassette until it stops 3 Slide the edge guides outward ...
Страница 108: ...108 10 Select the Layout tab 11 Select the orientation of your document as the Orientation setting ...
Страница 203: ...203 3 Open the ink tank cover then open the cap for the ink tank you are going to fill ...
Страница 231: ...231 4 Slide out the paper cassette and remove the paper 5 Make sure the ink tank caps are securely closed ...
Страница 235: ...235 7 Make sure the ink tank caps are securely closed and close the ink tank cover 8 Lower the scanner unit ...


