background image

Epson PowerLite 737c Projector

12

 -

 Epson PowerLite 737c Projector

2/05

6. Select the appropriate settings for your mode:

7. When done making settings, highlight the 

OK

 button at the 

top of the screen. Then press 

Enter

. Highlight the 

OK


button again and press 

Enter

 to return to the main EasyMP 

Network Screen.

Configuring the Network Settings for Windows

Before connecting to the projector wirelessly, make sure your 
computer is configured correctly. Also, make sure that the 
Internet Connection Firewall is disabled. (See your Windows 
online help system for details.)

Note:

Depending on your computer’s wireless network adapter card, 
the dialog boxes you see may be different than those shown in 
this section.

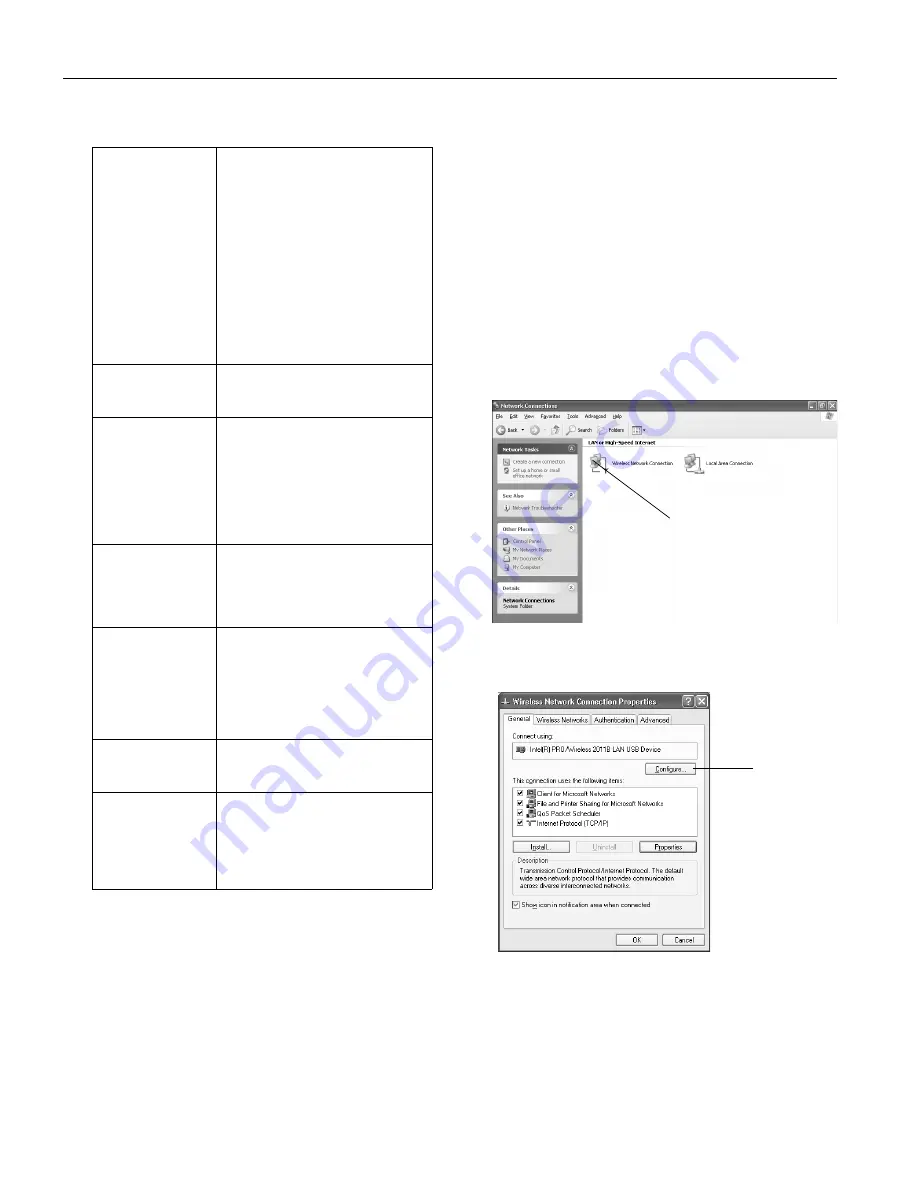
1. Access your wireless network Properties window. For 

example, in Windows XP click 

Start > Control Panel > 

Network and Internet Connections

. Then double-click 

the 

Network Connections

 icon. You see a screen similar to 

this:

2. Right-click the 

Wireless Network Connection

 icon and 

select 

Properties

. You see a screen like this:

ESSID

Ad hoc:

 Enter an ESSID in the ESSID 

textbox.

Access point:

 Enter an ESSID, which 

is the SSID name of your access point 
or the name of your AirPort network. 
(The name of your AirPort network 
may be different from that of your 
AirPort base station; select your base 
station in the AirPort Admin utility and 
click 

Configure

 to check the name of 

your network.) 

Note that the ESSID is case-sensitive.

Password for WEB 
control

If you want to create a password for 
an internal web page, you can enter 
up to 8 alphanumeric characters.

Projector keyword

Turn this option on if you want to set 
up a security keyword so that only 
people in the same room as the 
projector can access it. When you 
connect to the projector wirelessly, it 
displays a four-digit randomized 
keyword on the screen that you need 
to enter when prompted.

DHCP (access point 
mode only)

If your access point assigns IP 
addresses automatically, turn this 
option on. Otherwise, turn it off and 
assign an IP address, subnet mask, 
and gateway address manually.

IP address (access 
point mode only)

Enter the IP address you want to 
assign the projector. It must be 
formatted like other addresses on the 
network; usually the first three 
sections match the access point’s IP 
address. The last section should be 
unique.

Subnet mask. 
(access point mode 
only)

Enter a subnet mask formatted like 
other subnet masks on your network.

Gateway address 
(access point mode 
only)

Enter the IP address that was 
assigned to your access point or 
AirPort base station when it was set 
up. If you don’t know the address, see 
“Checking the Gateway (Access 
Point’s) IP Address” on page 14.

Right-click and select Properties

Click here

Содержание PowerLite 737c

Страница 1: ...jection Lamp Type UHE Ultra High Efficiency Power 170 W consumption Lamp life High Brightness mode about 2000 hours Low Brightness Mode about 3000 hours Part number V13H010L32 Remote Control Range 20 feet 6 meters Batteries 2 Alkaline AAA Dimensions Height 2 7 inches 70 mm feet retracted Width 10 9 inches 276 mm Depth 7 6 inches 193 mm Weight 3 9 lb 1 8 kg Electrical Rated frequency 50 60 Hz AC Po...

Страница 2: ... for details The image is resized using Epson s SizeWise Technology Mode Refresh Rate Hz NTSC NTSC 4 43 PAL N PAL M PAL PAL 60 SECAM 60 60 50 50 60 60 50 HDTV 720p HDTV 720p HDTV 1080i HDTV 1080i SDTV 480p SDTV 480p TV480i TV480i 60 50 60 50 60 50 60 50 Mode Refresh Rate Hz Resolution VGA EGA VGA 60 VESA 72 VESA 75 VESA 85 70 60 72 75 85 640 350 640 480 640 480 640 480 640 480 SVGA 56 SVGA 60 SVGA...

Страница 3: ...tion distance Wide inches Projection distance inches 0 0254 0 02171 0 033696 Tele inches Projection distance inches 0 0254 0 02252 0 040453 If you place the projector below the level of the screen you ll have to tilt it up by extending the front adjustable foot as shown Tilting the projector upward causes the image to lose its rectangular shape but you can correct the distortion by pressing the Sy...

Страница 4: ...cover is off Press the Source Search button on the projector or the Search button on the remote control repeatedly until you see the image you want to project See page 5 for more information about selecting the image source If you re using a Windows computer Hold down the Fn key and press the function key that lets you display on an external monitor It may have an icon such as or it may be labelle...

Страница 5: ...size by moving the projector closer to or farther away from the screen You can use the E Zoom buttons on the remote control to zoom in on a portion of the image See Zooming Your Image on page 7 for instructions Adjusting the Height of Your Image If the image is too low you can raise it by extending the projector s front adjustable foot 1 Stand behind the projector Press up on the blue foot release...

Страница 6: ...in the Image menu Select Low or High for the Brightness Control option in the Setting menu Low Brightness mode extends the life of the lamp and decreases the fan noise Adjusting the Color Mode You may want to adjust the color mode to select a setting that is appropriate for the image you re projecting and the environment in which you re projecting it The following table lists the available color m...

Страница 7: ...to retract the front adjustable foot as shown 5 Replace the lens cap and unplug the power cord Caution To avoid damaging the projector or lamp never unplug the power cord when the P Power light is green or flashing orange Using the Remote Control Before using the remote control insert the two AAA alkaline batteries as described on page 8 When using the remote control stand within 20 feet of the pr...

Страница 8: ...on the screen aim the remote at the screen and use the pointer button To click or left click press the Enter button To right click press the Esc button To double click press the Enter button twice To click and drag press and hold the Enter button and use the pointer button to move the pointer then release the Enter button Replacing the Batteries Caution When replacing batteries take the following ...

Страница 9: ...as After you enter the last digit a confirmation screen appears Enter the password again 7 After you finish setting the password press the Esc button to return to the Password Protect menu 8 Press the Num button to deactivate the numeric keypad Make a note of the password and keep it in a safe place Turning On the Password and User s Logo To enable the password and User s Logo follow these steps 1...

Страница 10: ...act an authorized Epson servicer to unlock it Disabling the Projector s Buttons When you enable the Operation Lock function all the projector s buttons are disabled except the P Power button This is useful for example if you want to prevent students in a classroom from playing with the projector 1 Press the Menu button 2 Select the Setting menu and press Enter 3 Select Operation Lock and press Ent...

Страница 11: ...cards or adapters 1 Switch the projector to EasyMP mode and insert the Epson 802 11 b g card 2 When you see the EasyMP screen press the Enter button on the remote control to select Config 3 Use the pointer button to highlight Basic under Wireless LAN the press Enter 4 Select either Easy connect mode for ad hoc or Access point mode You see one of these screens 5 Make sure the projector has a unique...

Страница 12: ... that of your AirPort base station select your base station in the AirPort Admin utility and click Configure to check the name of your network Note that the ESSID is case sensitive Password for WEB control If you want to create a password for an internal web page you can enter up to 8 alphanumeric characters Projector keyword Turn this option on if you want to set up a security keyword so that onl...

Страница 13: ...Then go to Projecting Wirelessly on page 15 Access point mode On the General tab select Internet Protocol then click the Properties button You see this screen 9 If your access point uses DHCP select Obtain IP address automatically Otherwise select Use the following IP address and enter the required information IP address Type in the IP address you want to assign to the computer It must be formatte...

Страница 14: ...re is automatically configured to allow your Macintosh to detect both computer to computer ad hoc and access point networks Typically you only need to select your projector s ESSID ad hoc or your AirPort network name access point on the Macintosh menu bar If you re having problems connecting to the projector follow these steps 1 From the Apple pull down menu select System Preferences 2 Click the N...

Страница 15: ...tus icon next to each projector s name indicates its status Gray the projector is not connected Orange the projector is connected to another computer Green the projector is connected to your computer 3 If you don t see your projector check the following Make sure your wireless signal is strong enough to establish a connection If you have a Macintosh check the AirPort icon on the Macintosh menu bar...

Страница 16: ...ct on the control bar Connecting in IP Connect Mode Even if your projector and computer are on different subnets access point mode only or connecting over different routers you can establish a connection manually using IP Connect Mode 1 Start NS Connection on the computer to which you want to connect You see this screen 2 Click the Extension button You see this screen Provides help for NS Connecti...

Страница 17: ... Connect button If more than one projector is listed you can select additional projectors and connect to them at the same time 7 If you are prompted for a keyword enter the four digit number displayed on the EasyMP Network screen and click OK Removing the Wireless 802 11 b g Card Follow these steps to remove the card from your projector 1 If you re running NS Connection click Disconnect on the con...

Страница 18: ... Monitor To start EMP Monitor click Start Programs or All Programs EPSON Projector EMP Monitor If you ve added the program to the Startup programs folder it may already be open If so click the icon in the system tray on the lower right corner of your screen to display the EMP Monitor window To close EMP Monitor right click the program icon shown above then select Exit Registering Projectors in EMP...

Страница 19: ...rojector s Extended menu For detailed status information select the projector and click View details The following tables explain the status video source and error icons Additional unsupported icons also appear Status icon Video Source icon Error icon Status icons green Projecting no problems dark Turned off no problems green Projecting problems detected dark Turned off problems detected Network e...

Страница 20: ...ovided using EMP NetworkManager The message includes the heading Epson Projector in the subject line The body of the message contains the name of the projector the projector s IP address and a description of the problem The problem descriptions are similar to the errors reported by EMP Monitor listed on page 19 If a plus sign appears before the description it indicates that a problem has occurred ...

Страница 21: ...ne use a very soft brush such as an artist s brush If dirt is difficult to remove or the filter is torn replace it Contact your dealer or call Epson at 800 873 7766 to obtain a new set part number V13H134A08 In Canada please call 800 463 7766 to locate a dealer Note When you get a replacement lamp for your projector a new air filter is included Replace the filter when you replace the lamp Red Flas...

Страница 22: ...t number V13H010L32 In Canada please call 800 463 7766 to locate a dealer Follow these steps to replace the lamp 1 Press the P Power button twice to turn off the projector When the P Power light stops flashing unplug the power cord 2 If the projector has been on allow it to cool down for at least an hour or until the lamp is cool Warning Let the lamp cool before replacing it If the lamp breaks han...

Страница 23: ...d to find the nearest authorized reseller please call 800 GO EPSON 800 463 7766 or browse our catalog of products at www epson com select the product you are interested in and click Where to Buy To purchase online please visit the Epson Store at www epsonstore com U S sales only In Canada please call 800 463 7766 for a reseller referral Related Documentation CPD 19399 PowerLite 737c 745c User s Gu...

Отзывы: