background image

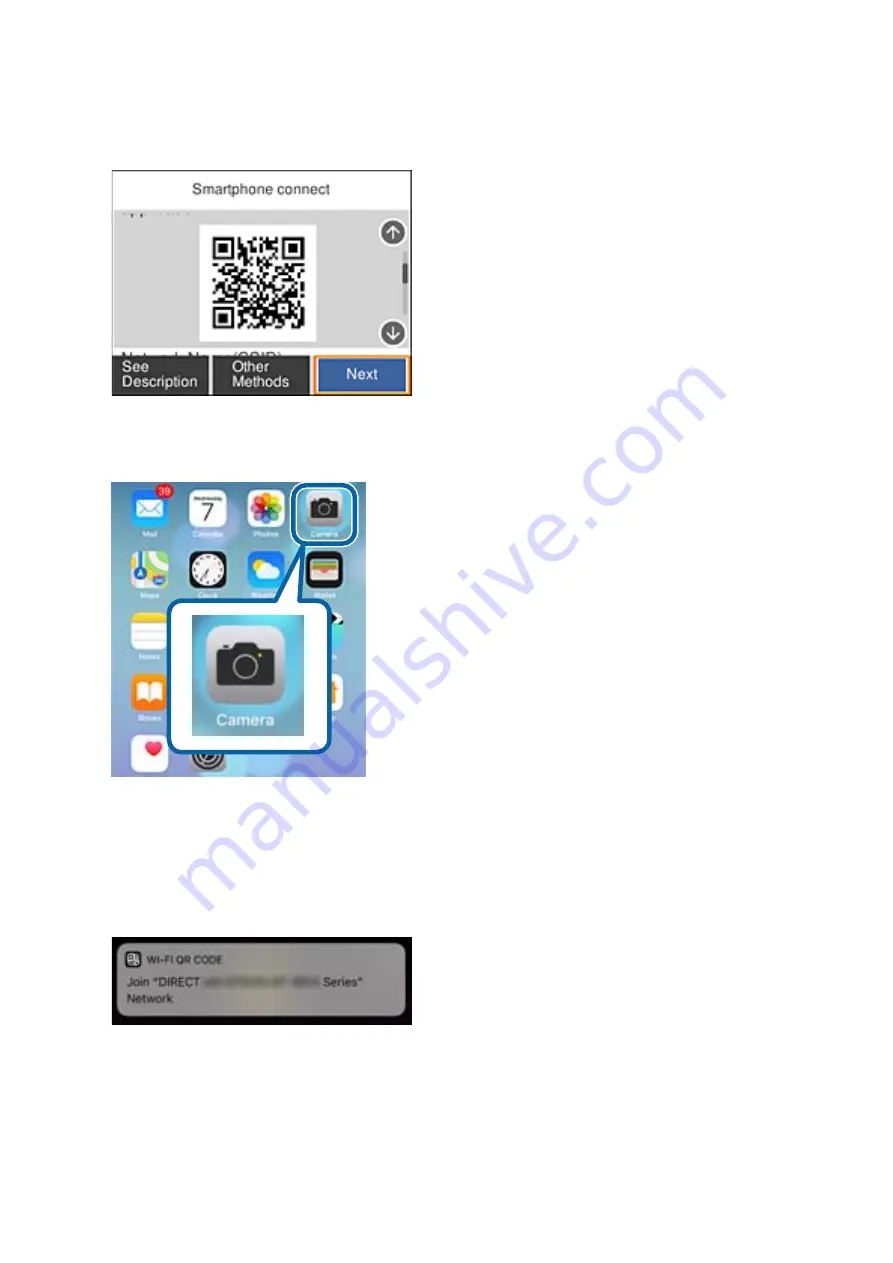
The QR code is displayed on the printer's control panel.

4.

On your iPhone or iPad, start the standard Camera app, and then scan the QR code displayed on the printer's
control panel.

Use the Camera app for iOS 11 or later. You cannot connect to the printer using the Camera app for iOS 10 or
earlier. Also, you cannot connect using an app for scanning QR codes. If you cannot connect, scroll the screen
on the printer's control panel, and then select 

Other OS Devices

. See the related information link below for

details on connecting.

5.

Tap the message displayed on the smart device's screen.

User's Guide

Network Settings

30

Содержание Expression Premium XP-6105

Страница 1: ...User s Guide NPD5955 01 EN ...

Страница 2: ...penses incurred by the purchaser or third parties as a result of accident misuse or abuse of this product or unauthorized modifications repairs or alterations to this product or excluding the U S failure to strictly comply with Seiko Epson Corporation s operating and maintenance instructions Seiko Epson Corporation and its affiliates shall not be liable for any damages or problems arising from the...

Страница 3: ... OR OTHERWISE INCLUDING WITHOUT LIMITATION ANY WARRANTY OF MERCHANTABILITY OR FITNESS FOR A PARTICULAR PURPOSE IN NO EVENT SHALL SAM LEFFLER OR SILICON GRAPHICS BE LIABLE FOR ANY SPECIAL INCIDENTAL INDIRECT OR CONSEQUENTIAL DAMAGES OF ANY KIND OR ANY DAMAGES WHATSOEVER RESULTING FROM LOSS OF USE DATA OR PROFITS WHETHER OR NOT ADVISED OF THE POSSIBILITY OF DAMAGE AND ON ANY THEORY OF LIABILITY ARIS...

Страница 4: ...eral Notice Other product names used herein are for identification purposes only and may be trademarks of their respective owners Epson disclaims any and all rights in those marks User s Guide Trademarks 4 ...

Страница 5: ...irect 32 Connecting to Devices other than iOS and Android Using Wi Fi Direct 34 Making Wi Fi Settings from the Printer 37 Making Wi Fi Settings by Entering the SSID and Password 38 Making Wi Fi Settings by Push Button Setup WPS 39 Making Wi Fi Settings by PIN Code Setup WPS 41 Making Wi Fi Direct Simple AP Connection Settings 42 Making Advanced Network Settings 43 Checking the Network Connection S...

Страница 6: ...ows Only 111 Printing Using Advanced Features 117 Printing Photos Using Epson Easy Photo Print 119 Printing a CD DVD Label with Epson Print CD 120 Printing from Smart Devices 120 Using Epson iPrint 120 Using Epson Print Enabler 122 Using AirPrint 122 Printing from a Digital Camera 123 Printing from a Digital Camera Connected by USB Cable 123 Printing from a Digital Camera Connected Wirelessly 124 ...

Страница 7: ...ttings 182 Menu Options for Network Settings 182 Menu Options for Web Service Settings 183 Menu Options for File Sharing Setup 184 Menu Options for Camera Print Settings 184 Menu Options for Guide Functions 184 Paper Mismatch 184 Auto Selection Mode 184 All settings 185 Clear All Settings 185 Menu Options for Firmware Update 185 Update 185 Notification 185 Menu Options for Restore Default Settings...

Страница 8: ... at Intervals of Approximately 2 5 cm 221 Blurry Prints Vertical Banding or Misalignment 221 Print Quality is Poor 222 Paper Is Smeared or Scuffed 223 Paper is Smeared During Automatic 2 Sided Printing 224 Printed Photos are Sticky 224 Images or Photos are Printed in Unexpected Colors 224 Colors Differ from What You See on the Display 225 Cannot Print Without Margins 225 Edges of the Image are Cro...

Страница 9: ...inter Specifications 237 Scanner Specifications 238 Interface Specifications 239 Network Function List 239 Wi Fi Specifications 240 Security Protocol 240 Supported Third Party Services 240 External Storage Device Specifications 240 Supported Data Specifications 241 Dimensions 242 Electrical Specifications 242 Environmental Specifications 243 System Requirements 243 Regulatory Information 244 Stand...

Страница 10: ...t or the Epson worldwide support website at http support epson net Digital manual Start EPSON Software Updater on your computer EPSON Software Updater checks for available updates of Epson software applications and the digital manuals and allows you to download the latest ones Related Information Software Update Tools EPSON Software Updater on page 198 Using the Manual to Search for Information Th...

Страница 11: ...ages you need Click Print in the File menu and then specify the pages you want to print in Pages in Pages to Print To specify a series of pages enter a hyphen between the start page and the end page Example 20 25 To specify pages that are not in series divide the pages with commas Example 5 10 15 Marks and Symbols Caution Instructions that must be followed carefully to avoid bodily injury cImporta...

Страница 12: ...cated app Operating System References Windows In this manual terms such as Windows 10 Windows 8 1 Windows 8 Windows 7 Windows Vista and Windows XP refer to the following operating systems Additionally Windows is used to refer to all versions Microsoft Windows 10 operating system Microsoft Windows 8 1 operating system Microsoft Windows 8 operating system Microsoft Windows 7 operating system Microso...

Страница 13: ...let where the plug can be easily unplugged Do not place or store the printer outdoors near excessive dirt or dust water heat sources or in locations subject to shocks vibrations high temperature or humidity Take care not to spill liquid on the printer and not to handle the printer with wet hands Keep the printer at least 22 cm away from cardiac pacemakers Radio waves from this printer may adversel...

Страница 14: ... a 10 or 16 amp circuit breaker to provide adequate short circuit protection and over current protection for the printer When connecting the printer to a computer or other device with a cable ensure the correct orientation of the connectors Each connector has only one correct orientation Inserting a connector in the wrong orientation may damage both devices connected by the cable Place the printer...

Страница 15: ...es Advisories and Warnings for Using Memory Cards Do not remove a memory card or turn off the printer while the memory card light is flashing The methods for using memory cards vary according to card type Be sure to refer to the manual packaged with your memory card for details Use only memory cards compatible with the printer Related Information Supported Memory Card Specifications on page 240 Ad...

Страница 16: ...C Paper cassette 1 Loads paper When printing using Epson iPrint make sure that the number printed on the right side of the paper cassette matches the paper source setting in Epson iPrint D Paper cassette 2 E Edge guide Feeds the paper straight into the printer Slide to the edges of the paper F paper guide extension Slide out to load legal size paper User s Guide Printer Basics 16 ...

Страница 17: ...m of the printer without placing a CD DVD A Scanner unit Scans placed originals Open to replace the ink cartridges or to remove jammed paper This unit should usually be kept closed B Ink cartridge holder Install the ink cartridges Ink is ejected from the print head nozzles underneath C Maintenance box cover Remove when replacing the maintenance box The maintenance box is a container that collects ...

Страница 18: ...ight Turns the printer on or off Unplug the power cord after checking that the power light is off A Document cover Blocks external light while scanning B Scanner glass Place the originals C SD card slot Insert a memory card D External interface USB port Connects an external storage device or a PictBridge capable device User s Guide Printer Basics 18 ...

Страница 19: ... panel to select or to make settings D Selects the number of pages to print E Stops the current operation F Returns to the previous screen G Use the u d l r buttons to move the focus to the target and then press the OK button to open the selected menu or to make settings H Applies to a variety of functions depending on the situation I Starts an operation such as printing or copying Icons displayed...

Страница 20: ...ength of the connection The more bars there are the stronger the connection The printer is not connected to a wireless Wi Fi network in Wi Fi Direct Simple AP mode The printer is connected to a wireless Wi Fi network in Wi Fi Direct Simple AP mode Select to display the Network Connection Settings screen This is the shortcut for the following menu Settings Network Settings Wi Fi Setup When the prin...

Страница 21: ...u can view the operating instructions or the solutions to problems Icons common to each screen Scrolls the screen from side to side and up and down Cancels the settings and closes the screen Displays additional information Indicates a problem with the items Select the icon to check how to solve the problem When this is displayed on B on the home screen it means the approximate ink levels and the a...

Страница 22: ... on the left displays frequently used items for copying or scanning The Advanced Settings tab displays other items that you can set as necessary B Displays the list of setting items Make settings by selecting the item or adding a check mark Grayed out items are not available Select the item to check why it is unavailable User s Guide Printer Basics 22 ...

Страница 23: ...ols You can also switch them by using the button D Switches the character type You can enter alphanumerics symbols and special characters such as umlauts and accents You can also switch them by using the button E Changes the keyboard layout F Enters frequently used email domain addresses or URLs by simply selecting the item G Enters a space H Enters character I Deletes a character to the left On s...

Страница 24: ...he entered number D Deletes the entered number to the left Viewing Animations You can view animations of operating instructions such as loading paper or removing jammed paper on the LCD screen Select on the home screen Displays the help screen Select How To and then select the items that you want to view Select How To at the bottom of the operation screen Displays the context sensitive animation U...

Страница 25: ... reaches the end D Press r button to move to the next step Displaying a Menu Appropriate to the Operation The printer automatically displays menus appropriate to your operation If you want to stop the feature disable the Auto Selection Mode setting Settings Guide Functions Auto Selection Mode Insert an external memory device such as a memory card or a USB device Related Information Menu Options fo...

Страница 26: ...ed by Wi Fi through the wireless router Related Information Connecting to a Computer on page 27 Connecting to a Smart Device on page 28 Making Wi Fi Settings from the Printer on page 37 Wi Fi Direct Simple AP Connection Use this connection method when you are not using Wi Fi at home or at the office or when you want to connect the printer and the computer or smart device directly In this mode the ...

Страница 27: ...nnecting to a Computer We recommend using the installer to connect the printer to a computer You can run the installer using one of the following methods Setting up from the website Access the following website and then enter the product name Go to Setup and then start setting up http epson sn Setting up using the software disc only for the models that come with a software disc and users with Wind...

Страница 28: ...ttp epson sn Setup Note If you want to connect a computer and a smart device to the printer at the same time we recommend connecting the computer first Connecting to an iPhone or iPad iOS devices using Wi Fi Direct This method allows you to connect the printer directly to an iPhone or iPad without a wireless router The following conditions are required to use this function If your environment does...

Страница 29: ... and the smart device that you want to connect to once Unless you disable Wi Fi Direct or restore the network settings to their defaults you do not need to make these settings again 1 Select Smartphone connect on the home screen To select an item move the focus to the item using the u d l r buttons and then press the OK button 2 Select Start Setup 3 Select iOS User s Guide Network Settings 29 ...

Страница 30: ...11 or later You cannot connect to the printer using the Camera app for iOS 10 or earlier Also you cannot connect using an app for scanning QR codes If you cannot connect scroll the screen on the printer s control panel and then select Other OS Devices See the related information link below for details on connecting 5 Tap the message displayed on the smart device s screen User s Guide Network Setti...

Страница 31: ...e printer s control panel select Next 8 On the iPhone or iPad start Epson iPrint 9 On the Epson iPrint screen tap Printer is not selected 10 Select the printer that you want to connect to User s Guide Network Settings 31 ...

Страница 32: ...ly to your Android device without a wireless router The following conditions are required to use this function Android 4 4 or later Epson iPrint version 7 0 or later Epson iPrint is used to print from a smart device Install Epson iPrint on the smart device in advance Note You only need to make these settings for the printer and the smart device that you want to connect to once Unless you disable W...

Страница 33: ...3 Select Android 4 On the smart device start Epson iPrint 5 On the Epson iPrint screen tap Printer is not selected 6 On the Epson iPrint screen select the printer that you want to connect to User s Guide Network Settings 33 ...

Страница 34: ... the printer before select the network name SSID on the smart device s Wi Fi screen to connect them again Related Information Connecting to Devices other than iOS and Android Using Wi Fi Direct on page 34 Connecting to Devices other than iOS and Android Using Wi Fi Direct This method allows you to connect the printer directly to smart devices without a wireless router Note You only need to make th...

Страница 35: ...ect an item move the focus to the item using the u d l r buttons and then press the OK button 2 Select Start Setup 3 Select Other OS Devices The Network Name SSID and Password for Wi Fi Direct for the printer are displayed User s Guide Network Settings 35 ...

Страница 36: ...evice s Wi Fi screen select the SSID shown on the printer s control panel and then enter the password The screenshot is an example on iPhone 5 On the printer s control panel select Next User s Guide Network Settings 36 ...

Страница 37: ...the printer s control panel select Complete For smart devices that have been connected to the printer before select the network name SSID on the smart device s Wi Fi screen to connect them again Making Wi Fi Settings from the Printer You can make network settings from the printer s control panel in several ways Choose the connection method that matches the environment and conditions that you are u...

Страница 38: ...IN Code Setup WPS on page 41 Making Wi Fi Direct Simple AP Connection Settings on page 42 Making Advanced Network Settings on page 43 Making Wi Fi Settings by Entering the SSID and Password You can set up a Wi Fi network by entering the information necessary to connect to a wireless router from the printer s control panel To set up using this method you need the SSID and password for a wireless ro...

Страница 39: ...eless router On the label the password may be written Network Key Wireless Password and so on If you are using the wireless router with its default settings use the password written on the label 7 When you have finished select OK 8 Check the settings and then select Start Setup 9 Select Dismiss to finish Note If you fail to connect load A4 size plain paper and then select Print Check Report to pri...

Страница 40: ... button on the wireless router until the security light flashes If you do not know where the WPS button is or there are no buttons on the wireless router see the documentation provided with your wireless router for details 6 Press the OK button on the printer 7 Close the screen The screen automatically closes after a specific length of time Note If connection fails restart the wireless router move...

Страница 41: ... the item using the u d l r buttons and then press the OK button 2 Select Wi Fi Recommended 3 Press the OK button If the network connection is already set up the connection details are displayed Select Change Settings to change the settings 4 Select Others PIN Code Setup WPS 5 Use your computer to enter the PIN code an eight digit number displayed on the printer s control panel into the wireless r...

Страница 42: ...t a wireless router The printer acts as a wireless router 1 Select on the home screen To select an item move the focus to the item using the u d l r buttons and then press the OK button 2 Select Wi Fi Direct 3 Press the OK button If you have made Wi Fi Direct Simple AP settings the detailed connection information is displayed Go to step 5 4 Press the OK button to start making settings 5 Check the ...

Страница 43: ...vironment before making changes 1 Select Settings on the home screen To select an item move the focus to the item using the u d l r buttons and then press the OK button 2 Select Network Settings Advanced 3 Select the menu item for settings and then select or specify the setting values 4 Select Start Setup Related Information Setting Items for Advanced Network Settings on page 43 Setting Items for ...

Страница 44: ...irectly Proxy Server Do Not Use Select when you are using the printer in a home network environment Use Select when you are using a proxy server in your network environment and you want to set it to the printer Enter the proxy server address and port number Checking the Network Connection Status You can check the network connection status in the following way Network Icon You can check the network...

Страница 45: ...i Direct Simple AP and so on is printed on two or more pages Printing a Network Connection Report You can print a network connection report to check the status between the printer and the wireless router 1 Load papers 2 Select Settings on the home screen To select an item move the focus to the item using the u d l r buttons and then press the OK button 3 Select Network Settings Connection Check Th...

Страница 46: ... follow the solutions a Error code b Messages on the Network Environment Related Information E 1 on page 47 E 2 E 3 E 7 on page 47 E 5 on page 48 E 6 on page 48 E 8 on page 48 E 9 on page 49 E 10 on page 49 E 11 on page 49 E 12 on page 50 E 13 on page 50 Message on the Network Environment on page 51 User s Guide Network Settings 46 ...

Страница 47: ...p if your wireless router does not support WPS Makes sure your SSID uses only ASCII characters alphanumeric characters and symbols The printer cannot display an SSID that contains non ASCII characters Makes sure you know your SSID and password before connecting to the wireless router If you are using a wireless router with its default settings the SSID and password are located on a label on the wi...

Страница 48: ...ur wireless router is using shared authentication with WEP security make sure the authentication key and index are correct If the number of connectable devices on the wireless router is less than the number of network devices that you want to connect make settings on the wireless router to increase the number of connectable devices See the documentation provided with the wireless router to make se...

Страница 49: ...nual Reset the network address if they are incorrect You can check the IP address subnet mask and default gateway from the Network Status part on the network connection report If DHCP is enabled change the printer s Obtain IP Address setting to Auto If you want to set the IP address manually check the printer s IP address from the Network Status part on the network connection report and then selec...

Страница 50: ... the following website http epson sn Setup You can register several passwords on a wireless router that uses WEP security type If several passwords are registered check if the first registered password is set on the printer Related Information Making Advanced Network Settings on page 43 Connecting to a Computer on page 27 E 13 Solutions Check the following Network devices such as a wireless router...

Страница 51: ...connected Disconnect one of the connected devices if you want to add another one Computer and smart devices that can be connected simultaneously are connected in full in the Wi Fi Direct Simple AP connection To add another computer or smart device disconnect one of the connected devices first You can confirm the number of wireless devices which can be connected simultaneously and the number of con...

Страница 52: ...ccess the following website and then enter the product name Go to Setup and then start setting up http epson sn Setting up using the software disc only for the models that come with a software disc and users with Windows computers with disc drives Insert the software disc into the computer and then follow the on screen instructions Selecting Change the Connection Methods Follow the on screen instr...

Страница 53: ... re connect the device Change Password Change the Wi Fi Direct simple AP password for connecting to the printer to your arbitrary value You can set the password in ASCII characters that is displayed on the software keyboard on the control panel When changing the password all connected devices are disconnected Use the new password if you want to re connect the device Disable Wi Fi Direct Disable Wi...

Страница 54: ...completion message is displayed close the screen The screen automatically closes after a specific length of time 7 Press the button Disconnecting Wi Fi Direct Simple AP Connection from the Control Panel Note When Wi Fi Direct Simple AP connection disabled all computers and smart devices connected to the printer in Wi Fi Direct Simple AP connection are disconnected If you want to disconnect a speci...

Страница 55: ...y closes after a specific length of time 7 Press the button Restoring the Network Settings from the Control Panel You can restore all network settings to their defaults 1 Select Settings on the home screen To select an item move the focus to the item using the u d l r buttons and then press the OK button 2 Select Restore Default Settings Network Settings 3 Check the message and then select Yes 4 W...

Страница 56: ...Related Information Connecting to a Computer on page 27 Making Wi Fi Settings from the Printer on page 37 User s Guide Network Settings 56 ...

Страница 57: ...p too thick too thin or paper that has stickers stuck to it Using these types of paper causes paper jams and smears on the printout Fan and align the edges of the envelopes before loading When the stacked envelopes are puffed up with air press them down to flatten them before loading Do not use envelopes that are curled or folded Using these envelopes causes paper jams and smears on the printout D...

Страница 58: ...inting is not available for 2 sided printing 2 For manual 2 sided printing you can load up to 30 sheets for paper with one side already printed Paper suitable for printing documents and photos Media Name Size Loading Capacity Sheets 2 Sided Printing Borderless Printing 1 Paper Cassette 1 Paper Cassette 2 Epson Photo Quality Ink Jet Paper A4 80 Epson Double sided Photo Quality Ink Jet Paper A4 50 2...

Страница 59: ...m 10x15 cm 4x6 in 20 20 Epson Premium Semigloss Photo Paper A4 20 10x15 cm 4x6 in 20 20 Epson Photo Paper Glossy A4 20 13x18 cm 5x7 in 10x15 cm 4x6 in 20 20 Various other paper types Media Name Size Loading Capacity Sheets 1 2 Sided Printing Borderless Printing Paper Cassette 1 Paper Cassette 2 Epson Photo Stickers 16 A6 1 1 Epson Iron On Cool Peel Transfer Paper 1 A4 1 1 Only printing from comput...

Страница 60: ...d 2 Only printing from computer or smart device is available Envelopes Media Name Size Loading Capacity Envelopes 2 Sided Printing Borderless Printing Paper Cassette 1 Paper Cassette 2 Envelope Envelope 10 Envelope DL Envelope C6 10 Related Information Part Names and Functions on page 16 List of Paper Types To obtain optimum printing results select the paper type that suits the paper Media Name Me...

Страница 61: ...es are compatible with Exif Print and PRINT Image Matching when printing from the printer driver For more details see the documentation provided with the Exif Print or PRINT Image Matching compatible digital camera 2 For smart devices these media types can be selected when printing using Epson iPrint Paper Source Features This printer has two paper sources Load paper of the appropriate size and ty...

Страница 62: ...r in the Paper Cassette 2 on page 66 Loading Paper in the Paper Cassette 1 1 If the output tray is extended push it back in manually 2 Open the front cover until it clicks 3 Check that the printer is not operating and then slide out the paper cassette 1 User s Guide Loading Paper 62 ...

Страница 63: ...ightly and then pull it out 4 Slide the edge guides to their maximum position 5 With the printable side facing down load paper until it touches the back of paper cassette 1 cImportant Do not load different types of paper in the paper cassette Follow the instructions supplied with the stickers to load one sheet of Epson Photo Stickers 16 Do not load the loading support sheets into this product User...

Страница 64: ...6 Slide the edge guides to the edges of the paper cImportant Do not load more than the maximum number of sheets specified for the paper 7 Gently insert paper cassette 1 User s Guide Loading Paper 64 ...

Страница 65: ...aper settings just by selecting the registered preset To register a preset select Favorite Paper Settings press r on the next screen and then specify the paper size and paper type The paper setting screen is not displayed if you have disabled Paper Configuration in the following menus In this situation you cannot print from an iPhone or iPad using AirPrint Settings Printer Settings Paper Source Se...

Страница 66: ... manually 2 Open the front cover until it clicks 3 Check that the printer is not operating and then slide out the paper cassette 2 Note You can load paper even if you pull out paper cassette 2 completely Lift up paper cassette 2 slightly and then pull it out User s Guide Loading Paper 66 ...

Страница 67: ...it touches the back of paper cassette 2 cImportant Do not load different types of paper in the paper cassette Load envelopes or Epson Photo Stickers 16 in the direction indicated by the arrow in the following illustration until they touch the back of paper cassette 2 Envelope User s Guide Loading Paper 67 ...

Страница 68: ...t of Epson Photo Stickers 16 Do not load the loading support sheets into this product Load paper longer than A4 size as indicated in the following illustration 8 5 x 13 in Load paper using the line Legal Pull out the legal paper guide and load paper using the line User s Guide Loading Paper 68 ...

Страница 69: ... not push paper that protrudes from the cassette 6 Slide the edge guides to the edges of the paper cImportant Do not load more than the maximum number of sheets specified for the paper User s Guide Loading Paper 69 ...

Страница 70: ...ations of paper size and paper type as a favorite you do not need to set them each time You can make paper settings just by selecting the registered preset To register a preset select Favorite Paper Settings press r on the next screen and then specify the paper size and paper type The paper setting screen is not displayed if you have disabled Paper Configuration in the following menus In this situ...

Страница 71: ...Related Information Paper Handling Precautions on page 57 Available Paper and Capacities on page 58 Menu Options for Printer Settings on page 181 User s Guide Loading Paper 71 ...

Страница 72: ...ing directly onto the scanner glass 1 Open the document cover 2 Remove any dust or stains on the surface of the scanner glass using a soft dry clean cloth Note If there is any trash or dirt on the scanner glass the scanning range may expand to include it so the image of the original may be displaced or reduced User s Guide Placing Originals 72 ...

Страница 73: ...er scanning Note If you leave the originals on the scanner glass for a long time they may stick to the surface of the glass How to Place Various Originals Placing Photos for Copying You can place multiple photos at a time to make separate copies The photos should be larger than 30 40 mm Place a photo 5 mm away from the corner mark of the scanner glass and leave 5 mm between photos You can place ph...

Страница 74: ...n the center the positioning is automatically adjusted Placing Multiple Photos for Scanning at the Same Time You can scan multiple photos at the same time and save each image using Photo Mode in Epson Scan 2 Place the photos 4 5 mm away from the horizontal and vertical edges of the scanner glass and place them at least 20 mm apart from each other The photos should be larger than 15 15 mm User s Gu...

Страница 75: ...Note Enable the Thumbnail check box at the top of the preview window User s Guide Placing Originals 75 ...

Страница 76: ...e the card may get stuck Related Information Supported Memory Card Specifications on page 240 Inserting and Removing a Memory Card 1 Raise the control panel 2 Insert a memory card into the printer The printer starts reading the data and the light flashes When reading is complete the light stops flashing and remains on User s Guide Inserting a Memory Card 76 ...

Страница 77: ...card to remove it cImportant If you remove the memory card while the light is flashing the data in the memory card may be lost Note If you access the memory card from a computer you need to operate the computer to safely remove the removable device Related Information Accessing a Memory Card From a Computer on page 248 User s Guide Inserting a Memory Card 77 ...

Страница 78: ...ding direct sunlight Do not stack or insert the CD DVDs into your device until they are completely dry If the printed surface is sticky even after it has dried lower the print density Reprinting on the same CD DVD may not improve the print quality If the CD DVD tray or the internal transparent compartment are accidentally printed on immediately wipe off the ink Depending on the print area setting ...

Страница 79: ... Copying on a CD DVD Label on page 130 User s Guide Loading a CD DVD for Printing 79 ...

Страница 80: ... To select an item move the focus to the item using the u d l r buttons and then press the OK button 4 Select Print 5 When a message telling you that loading photos is complete is displayed press the OK button 6 Select the photo you want to print on the select photo screen Note Select at the top right of the screen to display the Select Photo Menu If you specify a date by using Browse only photos ...

Страница 81: ...Paper in the Paper Cassette 2 on page 66 List of Paper Types on page 60 Inserting a Memory Card on page 76 Guide to the Select Photo Screen Single View on page 82 Menu Options for Selecting Photos on page 87 Guide to the Select Photo Screen Single View on page 82 Menu Options for Paper and Print Settings on page 88 Guide to the Preview Screen on page 83 Guide to the Edit Photo Screen on page 83 Me...

Страница 82: ...s press the button Press this button again to restore the icons A Displays the Select Photo Menu that allows you to select photos easily B Displays Exif information such as the shooting date or shutter speed C Enlarges a photo Press the button to enlarge the photo and press the u d l r buttons to display the part you want to check Press the OK button to return to the original view Enlargement on t...

Страница 83: ...creen keypad Move the focus to the value and then press the OK button to display the keypad If the value does not change you cannot set the number of copies on this screen Related Information Guide to the Edit Photo Screen on page 83 Guide to the Edit Photo Screen You can crop or rotate the photo or apply color correction Switch between Correction Off and Correction On using the button When Correc...

Страница 84: ...e frame using the button B Prints in sepia or monochrome C Applies color correction You can select the level of correction for certain items using the and buttons Related Information Menu Options for Editing Photos on page 89 Printing in Various Layouts You can print the photos on your memory device in various layouts such as 2 up and 4 up Photos are placed automatically 1 Load paper in the printe...

Страница 85: ... Inserting a Memory Card on page 76 Menu Options for Paper and Print Settings on page 88 Guide to the Select Photo Screen Single View on page 82 Menu Options for Selecting Photos on page 87 Guide to the Select Photo Screen Single View on page 82 Guide to the Preview Screen on page 83 Guide to the Edit Photo Screen on page 83 Menu Options for Editing Photos on page 89 Printing ID Photos You can pri...

Страница 86: ...e Select Photo Screen Single View on page 82 Menu Options for Paper and Print Settings on page 88 Guide to the Preview Screen on page 83 Guide to the Edit Photo Screen on page 83 Menu Options for Editing Photos on page 89 Printing Photos with a Template You can print the photos on your memory device in various layouts such as 2 up 4 up and upper half You can select where to place the photos 1 Load...

Страница 87: ...lace Photos screen 14 Repeat steps 10 to 13 until all photos are placed and then press the button 15 Press the button to edit the photos as necessary 16 Enter the number of copies and then press the x button Related Information Loading Paper in the Paper Cassette 1 on page 62 Loading Paper in the Paper Cassette 2 on page 66 List of Paper Types on page 60 Inserting a Memory Card on page 76 Menu Opt...

Страница 88: ...d Paper Type Select the paper type you loaded Paper Cassettes Select the paper source that you want to use Border Setting Borderless Prints without margins around the edges The image is enlarged a little to remove borders from the edges of the paper With Border Prints with white margins around the edges Expansion With borderless printing the image is enlarged a little to remove borders from the ed...

Страница 89: ... wide size Landmark Prints the name of the place or landmark where the photo was taken for digital cameras that have the landmark feature See the website of the manufacturer of your camera for more details The information can only be printed in borderless printing on 10 15 cm 13 18 cm or 16 9 wide size Clear All Settings Resets the paper and print settings to their defaults CD Density For CD DVD p...

Страница 90: ...nhance feature Fix Red Eye Fixes red eye in photos Corrections are not applied to the original file only to the printouts Depending on the type of photo parts of the image other than the eyes may be corrected Brightness Adjusts the brightness of the image Contrast Adjusts the difference between the brightness and darkness Sharpness Enhances or defocuses the outline of the image Saturation Adjusts ...

Страница 91: ... and then press the x button Related Information Loading Paper in the Paper Cassette 2 on page 66 List of Paper Types on page 60 Printing Photos with Handwritten Notes You can print a photo on a memory device with handwritten text or drawings This allows you to create original cards such as New Year s cards or birthday cards First select a photo and print a template on plain paper Write or draw on...

Страница 92: ...g 9 Press the x button to print a template 10 Check the printout and then select Close 11 Follow the instructions on the template to write and draw 12 Store the output tray by hand Load photo paper in paper cassette 1 13 Select Print Using the Template 14 Check the screen place the template on the scanner glass and then press the OK button Note Make sure that the text on the template is completely...

Страница 93: ...l To select an item move the focus to the item using the u d l r buttons and then press the OK button 3 Select Copy to CD DVD Print on CD DVD 4 Select the layout CD DVD 1 up CD DVD 4 up and CD DVD Variety are available 5 When a message telling you that loading photos is complete is displayed select Dismiss 6 Do one of the following CD DVD 1 up Select a photo select Proceed to set up Outer Inner an...

Страница 94: ...inting select Test print on A4 paper and then load A4 plain paper in paper cassette 2 You can check the printout image before printing on a CD DVD label 13 When the message prompts you to load a CD DVD select How To and load a CD DVD by referring to the instructions cImportant Place a CD DVD on the CD DVD tray with the printable side facing up Press the center of the CD DVD to securely set it on t...

Страница 95: ... using a photo on your memory device Print the jacket on A4 size paper and then cut it to fit in the jewel case 1 Load paper in the printer 2 Insert a memory device into the SD card slot or the external interface USB port of the printer 3 Select Various prints on the control panel To select an item move the focus to the item using the u d l r buttons and then press the OK button 4 Select Copy to C...

Страница 96: ...ad paper in the printer 2 Insert a memory device into the SD card slot or the external interface USB port of the printer 3 Select Various prints on the control panel To select an item move the focus to the item using the u d l r buttons and then press the OK button 4 Select Calendar 5 Select the type of calendar 6 Make the paper settings and then press the r button to set the date 7 Set the year a...

Страница 97: ...y print a Monthly Weekly or Daily schedule 1 Load paper in the printer 2 Select Various prints on the control panel To select an item move the focus to the item using the u d l r buttons and then press the OK button 3 Select Schedule 4 Select the type of schedule 5 Make the paper settings and then press the r button 6 When you select Monthly or Daily set the date and then select Done 7 Enter the n...

Страница 98: ...t the type of ruled line 5 Make the paper settings 6 Press the r button 7 Enter the number of copies and then press the x button Related Information Loading Paper in the Paper Cassette 2 on page 66 List of Paper Types on page 60 Menu Options for Paper and Print Settings on page 88 Guide to the Preview Screen on page 83 Printing Original Writing Paper You can easily print original writing paper wit...

Страница 99: ...Press the button if you want to print in landscape orientation Color Select the background color make the paper settings and then press the r button No Background Make the paper settings and then press the r button This is not available when Without Rule is selected as the type of writing paper 8 Enter the number of copies and then press the x button Related Information Loading Paper in the Paper ...

Страница 100: ...the photo as necessary 11 Enter the number of copies and then press the x button Related Information Loading Paper in the Paper Cassette 1 on page 62 Loading Paper in the Paper Cassette 2 on page 66 List of Paper Types on page 60 Inserting a Memory Card on page 76 Menu Options for Printing Original Message Cards on page 100 Menu Options for Paper and Print Settings on page 88 Guide to the Preview ...

Страница 101: ...then press the OK button 4 Select Coloring Book 5 Do one of the following When selecting Scan an original Make the print settings and then press the r button Place the original on the scanner glass and then press the OK button When selecting Choose from the memory card Select a photo select Print Settings and then make the print settings Press the r button 6 Press the x button Related Information ...

Страница 102: ...re than the paper size so that no margins are printed around the edges of the paper Click Settings to select the amount of enlargement Orientation Select the orientation you set in the application Paper Type Select the type of paper you loaded Quality Select the print quality Selecting High provides higher quality printing but the printing speed may be slower Color Select Grayscale when you want t...

Страница 103: ... for details 1 Load paper in the printer 2 Open the file you want to print 3 Select Print from the File menu or another command to access the print dialog If necessary click Show Details or d to expand the print window 4 Make the following settings Printer Select your printer Presets Select when you want to use the registered settings Paper Size Select the paper size you loaded in the printer When...

Страница 104: ...n sn 6 Make the following settings Paper Source Select the paper source in which you loaded the paper If you select Auto Select the paper source is automatically selected according to the paper size and type selected on the printer s control panel If you enable the Automatic Cassette Switching function and select paper cassette 1 as the Paper Source setting the printer automatically feeds paper fr...

Страница 105: ...page 62 Loading Paper in the Paper Cassette 2 on page 66 Guide to Mac OS Printer Driver on page 192 List of Paper Types on page 60 Printing on 2 Sides You can use either of the following methods to print on both sides of the paper Automatic 2 sided printing Manual 2 sided printing for Windows only When the printer has finished printing the first side flip the paper over to print on the other side ...

Страница 106: ...olded booklet select Booklet 6 Click Print Density select the document type from Select Document Type and then click OK The printer driver automatically sets the Adjustments options for that document type Note Printing may be slow depending on the combination of options selected for Select Document Type in the Print Density Adjustment window and for Quality on the Main tab For manual 2 sided print...

Страница 107: ...gh to the reverse side adjust the print density and ink drying time by clicking the arrow mark next to Adjustments 7 Set the other items as necessary 8 Click Print Related Information Loading Paper in the Paper Cassette 1 on page 62 Loading Paper in the Paper Cassette 2 on page 66 Printing Basics Mac OS on page 103 Printing Several Pages on One Sheet You can print two or four pages of data on a si...

Страница 108: ...ng Paper in the Paper Cassette 2 on page 66 Printing Basics Windows on page 101 Printing Several Pages on One Sheet Mac OS 1 Load paper in the printer 2 Open the file you want to print 3 Access the print dialog 4 Select Layout from the pop up menu 5 Set the number of pages in Pages per Sheet the Layout Direction page order and Border 6 Set the other items as necessary 7 Click Print Related Informa...

Страница 109: ...e paper size you set in the application Output Paper Select the paper size you loaded in the printer Fit to Page is selected automatically Note If you want to print a reduced image at the center of the page select Center 5 Set the other items on the Main and More Options tabs as necessary and then click OK 6 Click Print Related Information Loading Paper in the Paper Cassette 1 on page 62 Loading P...

Страница 110: ...Paper Cassette 2 on page 66 Printing Basics Mac OS on page 103 Printing Multiple Files Together for Windows Only Job Arranger Lite allows you to combine several files created by different applications and print them as a single print job You can specify the print settings for combined files such as layout print order and orientation 1 Load paper in the printer 2 Open the file you want to print 3 A...

Страница 111: ... menu Related Information Loading Paper in the Paper Cassette 1 on page 62 Loading Paper in the Paper Cassette 2 on page 66 Printing Basics Windows on page 101 Printing One Image on Multiple Sheets to Create a Poster for Windows Only This feature allows you to print one image on multiple sheets of paper You can create a larger poster by taping them together Note This feature is not available for b...

Страница 112: ... Paper in the Paper Cassette 1 on page 62 Loading Paper in the Paper Cassette 2 on page 66 Printing Basics Windows on page 101 Making Posters Using Overlapping Alignment Marks Here is an example of how to make a poster when 2x2 Poster is selected and Overlapping Alignment Marks is selected in Print Cutting Guides User s Guide Printing 112 ...

Страница 113: ... of Sheet 1 along the vertical blue line through the center of the top and bottom cross marks 2 Place the edge of Sheet 1 on top of Sheet 2 and align the cross marks then temporarily tape the two sheets together from the back User s Guide Printing 113 ...

Страница 114: ...long the vertical red line through the alignment markers this time the line to the left of the cross marks 4 Tape the sheets together from the back 5 Repeat steps 1 to 4 to tape Sheet 3 and Sheet 4 together User s Guide Printing 114 ...

Страница 115: ... horizontal blue line through the center of the left and right side cross marks 7 Place the edge of Sheet 1 and Sheet 2 on top of Sheet 3 and Sheet 4 and align the cross marks and then temporarily tape them together from the back User s Guide Printing 115 ...

Страница 116: ...8 Cut the taped sheets in two along the horizontal red line through the alignment markers this time the line above the cross marks 9 Tape the sheets together from the back User s Guide Printing 116 ...

Страница 117: ...rinting features available on the printer driver Related Information Windows Printer Driver on page 188 Mac OS Printer Driver on page 191 Adding a Printing Preset to Print Easily If you create your own preset of frequently used print settings on the printer driver you can print easily by selecting the preset from the list User s Guide Printing 117 ...

Страница 118: ...ng on the application See the application s help for details Select Page Setup or Print from the File menu Select the printer from Format For select the paper size and then enter a percentage in Scale Close the window and then print following the basic printing instructions Adjusting the Print Color You can adjust the colors used in the print job PhotoEnhance produces sharper images and more vivid...

Страница 119: ...rmark Printing a Header and Footer for Windows Only You can print information such as a user name and printing date as headers or footers Click Watermark Features in the More Options tab and then select Header Footer Click Settings and select necessary items from the drop down list Printing Photos Using Epson Easy Photo Print Epson Easy Photo Print lets you lay out and print photos easily on vario...

Страница 120: ...as the Media Type on the Print Settings menu On some applications you may need to specify the tray type Select Epson Tray Type 2 The setting name may vary slightly depending on the application Related Information Application for Printing Text or Images on a Disc Epson Print CD on page 196 Installing Applications on page 198 Printing from Smart Devices Using Epson iPrint Epson iPrint is an applicat...

Страница 121: ...pplication is started B Displays information on how to setup the printer and a FAQ C Displays the screen where you can select the printer and make printer settings Once you have selected the printer you do not need to select it again from the next time D Select what you want to print such as photos and documents E Displays the screen to make print settings such as paper size and paper type F Displ...

Страница 122: ...droid device install the Epson Print Enabler plug in from Google Play 4 Connect your Android device to the same wireless network as your printer 5 Go to Settings on your Android device select Printing and then enable Epson Print Enabler 6 From an Android application such as Chrome tap the menu icon and print whatever is on the screen Note If you do not see your printer tap All Printers and select ...

Страница 123: ...tal camera For more details on making operations on your camera see the documentation provided with your camera Usually digital camera settings are given priority however in the following situations the printer settings are given priority When the camera s print setting is set to use printer settings When the Sepia or B W option is selected in the printer s print settings When combining the print ...

Страница 124: ...as PictBridge wireless LAN 1 Make sure the icon that indicates that the printer is connected to a wireless network is displayed on the home screen 2 Load paper in the printer 3 Select Settings Camera Print Settings from the home screen To select an item move the focus to the item using the u d l r buttons and then press the OK button 4 Select Print Settings or Photo Adjustments and change the sett...

Страница 125: ...nnot cancel a print job from the computer once it has been completely sent to the printer In this case cancel the print job by using the printer s control panel When printing several pages from Mac OS you cannot cancel all of the jobs by using the control panel In this case cancel the print job from the computer If you have sent a print job from Mac OS X v10 6 8 through the network you may not be ...

Страница 126: ...c OS 1 Click the printer icon in the Dock 2 Select the job you want to cancel 3 Cancel the job OS X Mountain Lion or later Click next to the progress meter Mac OS X v10 6 8 to v10 7 x Click Delete User s Guide Printing 126 ...

Страница 127: ... for Original Orientation and Binding Margin Select Done to confirm Density Select the item to make settings for copy density Press the button to increase the density and press the button to decrease the density Select Done to confirm 5 Select the Advanced Settings tab and then change the settings as necessary 6 Select the Copy tab and then set the number of copies 7 Press the x button Note The co...

Страница 128: ...opy Copies without margins around the edges The image is enlarged a little to remove margins from the edges of the paper 4 Place the originals For Book Copy place the first page of the originals following the instructions displayed on the screen and then press the OK button 5 Make the settings on the Copy tab Available items vary depending on the copy menu 6 Make the settings for each item on the ...

Страница 129: ...otos are scanned and displayed on the screen 6 Press the button if necessary to make settings such as photo adjustments Note If you want to print by enlarging part of a photo select Crop Zoom and then make settings Slide the print area frame using the u d l r buttons and then change the frame size using the or button 7 Set the number of copies as necessary and then press the x button Related Infor...

Страница 130: ...ing the contrast saturation and brightness of the original image data Filter Copies in monochrome Crop Zoom Enlarges a part of the photo to be copied Clear Edit Clear photo edit Copying on a CD DVD Label You can copy a disc label or a square original such as a photo onto a CD DVD label cImportant Before printing on the CD DVD see the CD DVD handling precautions Do not insert the CD DVD tray while ...

Страница 131: ...4 plain paper in the paper cassette You can check the printout image before printing on a CD DVD label 6 When the message is displayed on the screen telling you to load a CD DVD select How To and then follow the on screen instructions to load a CD DVD cImportant Place a CD DVD on the CD DVD tray with the printable side facing up Press the center of the CD DVD to securely set it on the CD DVD tray ...

Страница 132: ...can be specified Depending on the setting the CD DVD or CD DVD tray may get dirty Set the range to fit the printable area of your CD DVD Print on CD DVD Test print on A4 paper Select whether to print on a CD DVD or make a test print on A4 size plain paper When you select Test print on A4 paper you can check the print result before printing on a CD DVD Print position adjustment Start scanning the o...

Страница 133: ...e of an original onto a single side of paper 1 2 Sided Copies two single sided originals onto both sides of a single sheet of paper Select the orientation of your original and the binding position of the paper Density Increase the level of density by using when the copying results are faint Decrease the level of density by using when ink smears Reduce Enlarge Enlarges or reduces the originals Sele...

Страница 134: ...source that you want to use Multi Page Single Page Copies a single sided original onto a single sheet 2 up Copies two single sided originals onto a single sheet in 2 up layout You can select the orientation and the size of your original Check the image on the right side to select Original Orientation and then select Done to confirm Quality Select the quality for copying Selecting Best provides hig...

Страница 135: ...r 2 Place the originals 3 Select Scan on the home screen To select an item move the focus to the item using the u d l r buttons and then press the OK button 4 Select Memory Device If you attach multiple memory devices to the printer select the memory device to which the scanned images are saved 5 Set items on Scan tab such as the save format B W Color Select whether to scan in color or in monochro...

Страница 136: ...ch to save the scanned image Quality Original Type Select the type of your original Resolution Select the scanning resolution Advanced Menu Options for Scanning to a Memory Device Scan Settings Scan Size Select the scan size To crop the white space around the text or image when scanning select Auto Cropping To scan at the maximum area of the scanner glass select Max Area Original Orientation Selec...

Страница 137: ...connected to a network you can select the computer to which you want to save the scanned image You can display up to 20 computers on the printer s control panel If you set Network Scan Name Alphanumeric on Epson Event Manager it is displayed on the control panel 5 Select to select how to save the scanned image to a computer Save as JPEG Saves the scanned image in JPEG format Save as PDF Saves the ...

Страница 138: ...ent Manager on page 195 Making Custom Settings in Epson Event Manager You can set the scan settings for Follow custom setting in Epson Event Manager See the Epson Event Manager help for details 1 Start Epson Event Manager 2 Make sure that your scanner is selected as the Scanner on the Button Settings tab on the main screen User s Guide Scanning 138 ...

Страница 139: ...3 Click Make Job Settings User s Guide Scanning 139 ...

Страница 140: ... such as the resolution or the color for saving the scanned image Target Folder Select the save folder for the scanned image Filename Prefix Start Number Change the settings for the file name you want to save File Format Select the save format Launch Action Select the action when scanning Test Settings Starts test scanning using current settings 5 Click OK to return to the main screen User s Guide...

Страница 141: ...ake settings using Epson Connect See the following Epson Connect portal website for details https www epsonconnect com http www epsonconnect eu Europe only Note You cannot save multiple originals as one PDF file when scanning from the control panel By using Epson Scan 2 and setting Add or edit pages after scanning on the Document Mode you can scan additional originals after you scanned the origina...

Страница 142: ...7 Select Advanced Settings tab and then check settings and change them if necessary 8 Select Scan tab and then press the x button Note The color size and border of the scanned image will not be exactly the same as the original Related Information Placing Originals on the Scanner Glass on page 72 Basic Menu Options for Scanning to the Cloud B W Color Select whether to scan in color or in monochrome...

Страница 143: ...Scanning Using WSD Note This feature is only available for computers running Windows 10 Windows 8 1 Windows 8 Windows 7 Windows Vista If you are using Windows 7 Windows Vista you need to setup your computer in advance using this feature 1 Place the originals 2 Select Scan on the home screen To select an item move the focus to the item using the u d l r buttons and then press the OK button 3 Select...

Страница 144: ...ter 1 Turn the printer on 2 Click start and then click Network on the computer 3 Right click the printer and then click Install Click Continue when the User Account Control screen is displayed Click Uninstall and start again if the Uninstall screen is displayed Note The printer name you set on the network and model name EPSON XXXXXX XX XXXX are displayed on the network screen You can check the pri...

Страница 145: ...e on the network is displayed Select the printer name when using with WSD Scanning from a Computer Scanning Using Epson Scan 2 You can scan by using the scanner driver Epson Scan 2 See the Epson Scan 2 help for an explanation of each setting item Related Information Application for Scanning Documents and Images Epson Scan 2 on page 194 Scanning Documents Document Mode Using Document Mode in Epson ...

Страница 146: ...ge Type Select the color for saving the scanned image Resolution Select the resolution Note The Document Source setting is fixed as Scanner Glass You cannot change this setting If you set Add or edit pages after scanning you can scan additional originals after scanning the original In addition if you set the Image Format as PDF or Multi TIFF you can save the scanned images as one file 5 Make other...

Страница 147: ...ss You can adjust the brightness for the scanned image Contrast You can adjust the contrast for the scanned image Gamma You can adjust the gamma brightness of the intermediate range for the scanned image Threshold You can adjust the border for monochrome binary black and white Unsharp Mask You can enhance and sharpen the outlines of the image Descreening You can remove moiré patterns web like shad...

Страница 148: ...canned image from the list You can select another folder or create a new folder by selecting Select from the list 7 Click Scan Related Information Placing Originals on the Scanner Glass on page 72 Scanning Photos or Pictures Photo Mode Using Photo Mode in Epson Scan 2 you can scan originals with wide variety of image adjustment features that are suitable for photos or pictures 1 Place the original...

Страница 149: ... the color for saving the scanned image Resolution Select the resolution Note The Document Source setting is fixed as Scanner Glass and the Document Type setting is fixed as Reflective Reflective means originals which are not transparent for example ordinary papers or photos You cannot change these settings User s Guide Scanning 149 ...

Страница 150: ...images are displayed as thumbnails Note To preview the entire scanned area clear the Thumbnail check box at the top of the preview widow 6 Confirm the preview and make image adjustment settings on the Advanced Settings tab if necessary User s Guide Scanning 150 ...

Страница 151: ...at appear when scanning printed papers such as a magazine Dust Removal You can remove dust on the scanned image Note The items may not be available depending on other settings you made Depending on the original the scanned image may not be adjusted correctly When multiple thumbnails are created you can adjust the image quality for each thumbnail Depending on the adjustment items you can adjust the...

Страница 152: ...ted to the same wireless network as your printer You can save the scanned data on a smart device or to Cloud services send it by email or print it If you start Epson iPrint when the printer is not connected to the network a message is displayed instructing you to connect to the printer Follow the instructions to complete the connection See the URL below for the operating conditions http epson sn I...

Страница 153: ...ou have selected the printer you do not need to select it again from the next time D Displays the scanning screen E Displays the screen where you can make scan settings such as resolution F Displays scanned images G Starts scanning H Displays the screen where you can save scanned data to a smart device or Cloud services I Displays the screen where you can send scanned data by email J Displays the ...

Страница 154: ... buttons and then press the OK button 2 Select Supply Status Checking the Status of the Remaining Ink and the Maintenance Box Windows 1 Access the printer driver window 2 Click EPSON Status Monitor 3 on the Maintenance tab and then click Details Note If EPSON Status Monitor 3 is disabled click Extended Settings on the Maintenance tab and then select Enable EPSON Status Monitor 3 Related Informatio...

Страница 155: ...a large cartridge Note For users in Europe visit the following website for information on Epson s ink cartridge yields http www epson eu pageyield For Australia and New Zealand BK Black PB Photo Black C Cyan M Magenta Y Yellow 302 302XL 302 302XL 302 302XL 302 302XL 302 302XL XL indicates a large cartridge Epson recommends the use of genuine Epson ink cartridges Epson cannot guarantee the quality ...

Страница 156: ...acing ink cartridges Do not touch the sections shown in the illustration Doing so may prevent normal operation and printing Install all ink cartridges otherwise you cannot print Do not replace ink cartridges with the power off Do not move the print head by hand otherwise you may damage the printer After installing the ink cartridge the power light continues to flash while the printer is charging i...

Страница 157: ...cartridge The yields quoted for you do not include this reserve Do not disassemble or remodel the ink cartridge otherwise you may not be able to print normally You cannot use the cartridges that came with the printer for the replacement Finish ink cartridge replacement promptly Do not leave the printer with the ink cartridges removed Consumption of Ink To maintain optimum print head performance so...

Страница 158: ...ng even after the printer indicates that the ink is low However prepare new ink cartridges as soon as possible 1 If the CD DVD tray has been inserted remove the tray 2 Do one of the following When prompted to replace ink cartridges Check which ink cartridge needs to be replaced select Next and then select Yes replace now When replacing ink cartridges before they are expended Select Maintenance Ink...

Страница 159: ... color cartridges and the photo black cartridge remove the new color cartridges and the photo black cartridge from their package without shaking BK cImportant Do not shake cartridges after opening the package as they may leak 4 Remove the new ink cartridge from its package and then select Next User s Guide Replacing Ink Cartridges and Other Consumables 159 ...

Страница 160: ...ration and printing 6 Open the scanner unit with the document cover closed 7 Confirm the message and then press the Start button The ink cartridge holder moves to the replacement position However the ink cartridge holder may return after a few minutes In that case repeat steps 2 to 7 User s Guide Replacing Ink Cartridges and Other Consumables 160 ...

Страница 161: ...If you replace two or more cartridges at a time or if replacement takes time some ink may be consumed to guarantee printer performance 9 Insert the ink cartridge diagonally into the cartridge holder and gently push it down until it clicks into place 10 Close the scanner unit and then select Completed User s Guide Replacing Ink Cartridges and Other Consumables 161 ...

Страница 162: ...charging is incomplete you may not be able to print Do not insert the CD DVD tray until ink charging is complete Related Information Ink Cartridge Codes on page 155 Ink Cartridge Handling Precautions on page 156 Maintenance Box Code The maintenance box can be purchased and replaced by the user Epson recommends the use of a genuine Epson maintenance box The following is the code for the genuine Eps...

Страница 163: ...from the maintenance box the printer is designed to stop printing when the absorbing capacity of the maintenance box has reached its limit Whether and how often this is required will vary according to the number of pages you print the type of material that you print and the number of cleaning cycles that the printer performs When a message is displayed prompting you to replace the maintenance box ...

Страница 164: ...vent normal operation and printing Note A transparent bag for the used maintenance box is provided with the new maintenance box 2 Lift up paper cassette 2 slightly to pull it out 3 Open the control panel 4 Loosen the screw with a flat head screwdriver and then remove the cover User s Guide Replacing Ink Cartridges and Other Consumables 164 ...

Страница 165: ...so may prevent normal operation and you may get smeared with ink 6 Put the used maintenance box in the transparent bag that came with the new maintenance box and seal the bag shut 7 Insert the new maintenance box all the way into the printer User s Guide Replacing Ink Cartridges and Other Consumables 165 ...

Страница 166: ...in a printer it cannot be used with other printers Related Information Maintenance Box Code on page 162 Maintenance Box Handling Precautions on page 162 Temporarily Printing with Black Ink When color ink or photo black ink is expended but black ink still remains while printing from a computer you can use the following settings to continue printing for a short time using only black ink Type of pape...

Страница 167: ...Monitor 3 The available period varies depending on the usage conditions Temporarily Printing with Black Ink Windows 1 When the following window is displayed cancel printing Note If you cannot cancel printing from the computer cancel using the printer s control panel 2 Access the printer driver window 3 Clear Borderless on the Main tab 4 Select plain papers or Envelope as the Paper Type setting on ...

Страница 168: ...er s control panel 3 Select System Preferences from the menu Printers Scanners or Print Scan Print Fax and then select the printer Click Options Supplies Options or Driver 4 Select On as the Permit temporary black printing setting 5 Access the print dialog 6 Select Print Settings from the pop up menu 7 Select any paper size except for a borderless size as the Paper Size setting 8 Select plain pape...

Страница 169: ...Maintenance tab and then select Enable EPSON Status Monitor 3 Composite black looks slightly different from pure black In addition the print speed is reduced To maintain the quality of the print head black ink is also consumed Menu Descriptions Yes Select to use a mixture of color inks and photo black ink to create black This window is displayed the next time you print a similar job No Select to c...

Страница 170: ...e check again and repeat the head cleaning if necessary We recommend to turn off the printer If print quality has still not improved contact Epson support To prevent the print head from drying out do not unplug the printer while the power is on Checking and Cleaning the Print Head Control Panel 1 Load A4 size plain paper in the paper cassette 2 Select Maintenance on the home screen To select an it...

Страница 171: ... the Maintenance tab 4 Follow the on screen instructions Related Information Loading Paper in the Paper Cassette 2 on page 66 Windows Printer Driver on page 188 Checking and Cleaning the Print Head Mac OS 1 Load A4 size plain paper in the paper cassette 2 Select System Preferences from the menu Printers Scanners or Print Scan Print Fax and then select the printer 3 Click Options Supplies Utility O...

Страница 172: ...tal Alignment Select this if you see horizontal banding at regular intervals 5 Follow the on screen instructions to print an alignment pattern and select the number for the optimum pattern Vertical Alignment Find and select the number for the most solid pattern in each group Horizontal Alignment Find and select the number for the least separated and overlapping pattern Related Information Loading ...

Страница 173: ... Maintenance on the home screen To select an item move the focus to the item using the u d l r buttons and then press the OK button 3 Select Paper Guide Cleaning 4 Follow the on screen instructions to clean the paper path 5 Repeat the above procedure until the paper is not smeared with ink If the paper still gets dirty with ink even after cleaning several times go to next step 6 Turn off the print...

Страница 174: ...tion Loading Paper in the Paper Cassette 2 on page 66 Cleaning the Paper Path for Paper Feeding Problems When paper is not fed from the paper cassette correctly clean the roller inside 1 Turn off the printer by pressing the P button 2 Unplug the power cord and then disconnect the power cord User s Guide Maintaining the Printer 174 ...

Страница 175: ...hen pull it out 5 Stand the printer with the control panel s P button at the top Caution Be careful not to trap your hand or fingers when standing the printer Otherwise you may be injured 6 Dampen a cloth with water wring it out thoroughly and then wipe the roller while rotating it with the cloth User s Guide Maintaining the Printer 175 ...

Страница 176: ... surface is stained with grease or some other hard to remove material use a small amount of glass cleaner and a soft cloth to remove it Wipe off all remaining liquid Do not press the glass surface too hard Be careful not to scratch or damage the surface of the glass A damaged glass surface can decrease the scan quality Cleaning the Translucent Film When the printout is not improved after aligning ...

Страница 177: ...ilm is smeared Smears are easier to see if you use a light If there are smears such as finger marks or grease on the translucent film A go to the next step A Translucent film B Rail cImportant Be careful not to touch the rail B Otherwise you may not be able to print Do not wipe off the grease on the rail because this is necessary for operations User s Guide Maintaining the Printer 177 ...

Страница 178: ...eared 7 Visually check that the film is not smeared Saving Power The printer enters sleep mode or turns off automatically if no operations are performed for a set period You can adjust the time before power management is applied Any increase will affect the product s energy efficiency Please consider the environment before making any change Depending on the location of purchase the printer may hav...

Страница 179: ...f Inactive or Power Off If Disconnected and then make settings Select Sleep Timer or Power Off Timer and then make settings Note Your product may have the Power Off Settings or Power Off Timer feature depending on the location of purchase User s Guide Maintaining the Printer 179 ...

Страница 180: ... Select Memory Card Data to display photos as a slideshow when no operations are performed for about three minutes LCD Brightness Adjust the brightness of the LCD screen Auto Power On Select On to turn on the printer automatically when it receives a print or scan job over a USB connection or a network connection To start printing you need to slide out the output tray Also enabling Auto Power On in...

Страница 181: ...region Sleep Timer Adjust the time period to enter a sleep mode energy saving mode when the printer has not performed any operations The LCD screen turns black when the setting time passes Language Select the language used on the LCD screen Clear All Settings Resets the Basic Settings to their defaults Related Information Saving Power on page 178 Menu Options for Printer Settings Select the menus ...

Страница 182: ... noise level Ink Drying Time Select the ink drying time you want to use when performing 2 sided printing The printer prints the other side after printing one side If your printout is smeared increase the time setting Bidirectional Select On to change the print direction Prints while the print head moves to the left and to the right If vertical or horizontal ruled lines on your printout look blurre...

Страница 183: ...menus on the control panel as described below Settings Web Service Settings Epson Connect Services Displays whether the printer is registered and connected to Epson Connect You can register to the service by selecting Register and follow the instructions When you have registered you can change the following settings Suspend Resume Unregister For details see the following web site https www epsonco...

Страница 184: ...gs Make settings when printing from a digital camera Related Information Menu Options for Paper and Print Settings on page 88 Menu Options for Editing Photos on page 89 Menu Options for Guide Functions Select the menus on the control panel as described below Settings Guide Functions Paper Mismatch Displays a warning if the paper settings print settings for the print job do not match the printer s ...

Страница 185: ...ou can select whether or not to start updating Notification Select On to receive a notification if a firmware update is available Related Information Software Update Tools EPSON Software Updater on page 198 Menu Options for Restore Default Settings Select the menus on the control panel as described below Settings Restore Default Settings Network Settings Resets the network settings to their defaul...

Страница 186: ...rol Panel Follow the steps below to register the printer 1 Select Settings on the home screen To select an item move the focus to the item using the u d l r buttons and then press the OK button 2 Select Web Service Settings Epson Connect Services Register Start Setup on the home screen to print the registration sheet 3 Follow the instructions on the registration sheet to register the printer Appli...

Страница 187: ...rk connection report 2 Launch a Web browser from a computer or smart device and then enter the printer s IP address Format IPv4 http the printer s IP address IPv6 http the printer s IP address Examples IPv4 http 192 168 100 201 IPv6 http 2001 db8 1000 1 Note Using the smart device you can also run Web Config from the maintenance screen of Epson iPrint Related Information Using Epson iPrint on page...

Страница 188: ...r utility Note You can change the language of the printer driver Select the language you want to use from the Language setting on the Maintenance tab Accessing the printer driver from applications To make settings that apply only to the application you are using access from that application Select Print or Print Setup from the File menu Select your printer and then click Preferences or Properties ...

Страница 189: ... you click the printer icon and select Printer Settings you can access the same printer settings window as the one displayed from the control panel If you double click this icon you can check the status of the printer Note If the printer icon is not displayed on the task bar access the printer driver window click Monitoring Preferences on the Maintenance tab and then select Register the shortcut i...

Страница 190: ...s of the paper or printing multiple pages on one sheet More Options Tab You can select additional layout and printing options such as changing the size of a printout or making color corrections User s Guide Network Service and Software Information 190 ...

Страница 191: ...ee the online help for explanations of the setting items Related Information Windows Printer Driver on page 188 Mac OS Printer Driver The printer driver controls the printer according to the commands from an application Making settings on the printer driver provides the best printing results You can also check the status of the printer or keep it in top operating condition using the printer driver...

Страница 192: ...ac OS Printer Driver Print dialog Switch the pop up menu on the center of the screen to show more items Pop up Menu Descriptions Layout You can select a layout for printing several pages on one sheet or select to print a border Color Matching You can adjust the colors Paper Handling You can reduce or enlarge the size of the print job to automatically fit the paper size you loaded Cover Page You ca...

Страница 193: ...e the printer and then add the printer again Access the following website and then enter the product name Go to Support and then see Tips http epson sn Epson Printer Utility You can run a maintenance feature such as nozzle check and print head cleaning and by starting EPSON Status Monitor you can check printer status and error information Making Operation Settings for the Mac OS Printer Driver Acc...

Страница 194: ...sible because the printer is shared with Windows computers on a network or for any other reason Related Information Temporarily Printing with Black Ink on page 166 Application for Scanning Documents and Images Epson Scan 2 Epson Scan 2 is an application for controlling scanning You can adjust the size resolution brightness contrast and quality of the scanned image You can also start Epson Scan 2 f...

Страница 195: ... address directly 3 Select the scanner on the Scanner Settingsscreen and then click OK Application for Configuring Scanning Operations from the Control Panel Epson Event Manager Epson Event Manager is an application that allows you to manage scanning from the control panel and save images to a computer You can add your own settings as presets such as the document type the save folder location and ...

Страница 196: ...led Starting on Windows Windows 10 Click the start button and then select Epson Software Epson Easy Photo Print Windows 8 1 Windows 8 Enter the application name in the search charm and then select the displayed icon Windows 7 Windows Vista Windows XP Click the start button and then select All Programs or Programs Epson Software Epson Easy Photo Print Starting on Mac OS Go Applications Epson Softwa...

Страница 197: ...nload site Starting When you install E Web Print it is displayed in your browser Click Print or Clip Related Information Installing Applications on page 198 Application for Scanning and Transferring Images Easy Photo Scan Easy Photo Scan is an application that allows you to scan photos and easily send the scanned image to a computer or cloud service You can also easily adjust the scanned image See...

Страница 198: ...N Software Updater Note You can also start EPSON Software Updater by clicking the printer icon on the task bar on the desktop and then selecting Software Update Starting on Mac OS Select Go Applications Epson Software EPSON Software Updater Related Information Installing Applications on page 198 Installing Applications Connect your computer to the network and install the latest version of applicat...

Страница 199: ...r the printer until the update is complete otherwise the printer may malfunction Note If you cannot find the application you want to update in the list you cannot update using the EPSON Software Updater Check for the latest versions of the applications from your local Epson website http www epson com Related Information Software Update Tools EPSON Software Updater on page 198 Updating the Printer ...

Страница 200: ...ps Uninstalling Applications Log in to your computer as an administrator Enter the administrator password if the computer prompts you Uninstalling Applications Windows 1 Press the P button to turn off the printer 2 Quit all running applications 3 Open Control Panel Windows 10 Click on the start button and then select Windows System Control Panel Windows 8 1 Windows 8 Select Desktop Settings Contro...

Страница 201: ...ing applications 5 Select Go Applications Epson Software Uninstaller 6 Select the application you want to uninstall and then click Uninstall cImportant The Uninstaller removes all drivers for Epson inkjet printers on the computer If you use multiple Epson inkjet printers and you only want to delete some drivers delete all of them first and then install the necessary printer driver again Note If yo...

Страница 202: ... printing When you select Continue printing the printer may stop printing indicating it is time to replace the ink cartridge In this case printing fails and the paper is ejected Select No cancel printing and then replace the cartridge If you select Yes replace now printing continues after you replace the cartridge and more paper is wasted When the printer stops during copying indicating it is time...

Страница 203: ...son who setup the network for assistance To use cloud services update the root certificate from the Epson Web Config utility Run Web Config and then update the root certificate Application for Configuring Printer Operations Web Config on page 186 Cannot recognize the media See your documentation for more details about the media See the link below External Storage Device Specifications on page 240 ...

Страница 204: ...ns and then set Paper Mismatch to Off No paper has been loaded that matches the paper size setting Change the print settings according to the paper size loaded in the paper cassette or load paper in the paper cassette that matches the print settings If you do not want to display this message from the next time select Settings Guide Functions and then set Paper Mismatch to Off Recovery Mode The pri...

Страница 205: ...printer 2 Click Options Supplies Utility Open Printer Utility 3 Click EPSON Status Monitor You can check the printer status ink levels and error status Removing Jammed Paper Check the error displayed on the control panel and follow the instructions to remove the jammed paper including any torn pieces Next clear the error cImportant Remove the jammed paper carefully Removing the paper vigorously ma...

Страница 206: ...1 Open the scanner unit with the document cover closed 2 Remove the jammed paper User s Guide Solving Problems 206 ...

Страница 207: ...touch the white flat cable or translucent film inside the printer Doing so may cause a malfunction 3 Close the scanner unit Removing Jammed Paper from Rear Cover 1 Remove the rear cover User s Guide Solving Problems 207 ...

Страница 208: ...om the rear cover 4 Insert the rear cover in the printer Removing Jammed Paper from the Paper Cassette 1 Store the output tray 2 Pull out the paper cassette For paper cassette 2 lift it up slightly and then pull it out User s Guide Solving Problems 208 ...

Страница 209: ... paper supported by this printer Follow the paper handling precautions Do not load more than the maximum number of sheets specified for the paper Make sure the paper size and paper type settings match the actual paper size and paper type loaded in the printer Clean the roller inside the printer Related Information Environmental Specifications on page 243 Paper Handling Precautions on page 57 Avail...

Страница 210: ...sette 2 on page 66 Several Sheets of Paper are Fed at a Time Load one sheet of paper at a time When several sheets of paper are fed at a time during manual 2 sided printing remove any paper which is loaded in the printer before you reload the paper CD DVD Tray is Ejected Make sure the disc is properly set on the tray and reinsert the tray correctly Do not insert the CD DVD tray until you are instr...

Страница 211: ...ture depending on the location of purchase LCD Screen Gets Dark The printer is in sleep mode Press any button on the control panel to return the LCD screen to its former state The Auto Power On Features does not Work Make sure that the Auto Power On setting in Basic Settings has been enabled Make sure that the printer is properly connected with a USB cable or to a network Related Information Menu ...

Страница 212: ...r or smart device to the same SSID as the printer Turn off the devices you want to connect to the network Wait for about 10 seconds and then turn on the devices in the following order access point computer or smart device and then printer Move the printer and computer or smart device closer to the access point to help with radio wave communication and then try to make network settings again Print ...

Страница 213: ... for Genuine Epson Printer Drivers on page 213 Checking for Genuine Epson Printer Drivers You can check if a genuine Epson printer driver is installed on your computer by using one of the following methods Windows Select Control Panel View devices and printers Printers Printers and Faxes and then do the following to open the print server properties window Windows 10 Windows 8 1 Windows 8 Windows 7...

Страница 214: ...System Preferences from the menu Printers Scanners or Print Scan Print Fax and then select the printer Click Options Supplies and if the Options tab and Utility tab are displayed on the window a genuine Epson printer driver is installed on your computer Related Information Installing Applications on page 198 User s Guide Solving Problems 214 ...

Страница 215: ...he printer is offline or pending clear the offline or pending setting from the Printer menu Make sure the printer is selected as the default printer from the Printer menu there should be a check mark on the menu item If the printer is not selected as the default printer set it as the default printer If there are multiple icons in Control Panel View devices and printers Printers Printers and Faxes ...

Страница 216: ...ess router computer or smart device and then printer Move the printer and computer or smart device closer to the wireless router to help with radio wave communication and then try to make network settings again Select Settings Network Settings Connection Check and then print the network connection report If an error has occurred check the network connection report and then follow the printed solut...

Страница 217: ...ter or smart device to the same wireless router as the printer Disable the tethering function on the smart device if it is enabled You may not be able to connect to the wireless router when the wireless router has multiple SSIDs and devices are connected to different SSIDs on the same wireless router Connect the computer or smart device to the same SSID as the printer User s Guide Solving Problems...

Страница 218: ...cannot communicate between the printer and the computer or smart device even if they are connected to the same network disable the privacy separator on the wireless router See the manual provided with the wireless router for details Related Information Checking the SSID Connected to the Printer on page 218 Checking the SSID for the Computer on page 219 Checking the SSID Connected to the Printer Se...

Страница 219: ...k tray on the desktop Check the name of the connected SSID from the list displayed Mac OS Click the Wi Fi icon at the top of the computer screen A list of SSIDs is displayed and the connected SSID is indicated with a check mark User s Guide Solving Problems 219 ...

Страница 220: ...ffed or Color is Missing If you have not used the printer for a long time the print head nozzles may be clogged and ink drops may not be discharged Perform a nozzle check and then clean the print head if any of the print head nozzles are clogged Related Information Checking and Cleaning the Print Head on page 170 Banding or Unexpected Colors Appear The print head nozzles may be clogged Perform a n...

Страница 221: ...ign the print head using the Vertical Alignment feature Related Information Aligning the Print Head Control Panel on page 172 Print Quality Does Not Improve Even After Aligning the Print Head During bidirectional or high speed printing the print head prints while moving in both directions and vertical lines may be misaligned If print quality does not improve disable the bidirectional or high speed...

Страница 222: ...fter printing Dry the printouts completely before filing or displaying them When drying the printouts avoid direct sun light do not use a dryer and do not touch the printed side of paper When printing images or photos Epson recommends using genuine Epson paper rather than plain paper Print on the printable side of the genuine Epson paper Checking the print settings Select the appropriate paper typ...

Страница 223: ...may slow down Control panel Select Settings Printer Settings from the home screen and then enable Thick Paper Windows Click Extended Settings on the printer driver s Maintenance tab and then select Thick Paper and Envelopes Mac OS Select System Preferences from the menu Printers Scanners or Print Scan Print Fax and then select the printer Click Options Supplies Options or Driver Select On as the T...

Страница 224: ...ted in Unexpected Colors When printing from the control panel or from the Windows printer driver the Epson auto photo adjustment setting PhotoEnhance is applied by default depending on the paper type Try change the setting Control panel Change the Enhance setting from Auto to People Night Scene or Landscape If changing the setting does not work turn off PhotoEnhance by selecting Enhance Off Window...

Страница 225: ... on a display are not quite identical to those on paper because the display device and the printer have a different process of producing colors Related Information Guide to Windows Printer Driver on page 189 Guide to Mac OS Printer Driver on page 192 Cannot Print Without Margins Make borderless setting in the print settings If you select a paper type that does not support borderless printing you c...

Страница 226: ...stains on the glass the copy area may extend to include the dust or stains resulting in the wrong copying position or small images Select the appropriate paper size setting Adjust the margin setting in the application so that it falls within the printable area Related Information Loading Paper in the Paper Cassette 1 on page 62 Loading Paper in the Paper Cassette 2 on page 66 Cleaning the Scanner ...

Страница 227: ...acters Are Incorrect or Garbled Connect the USB cable securely to the printer and the computer Cancel any paused print jobs Do not put the computer manually into the Hibernate mode or the Sleep mode while printing Pages of garbled text may be printed next time you start the computer Related Information Canceling Printing on page 125 The Printed Image Is Inverted Clear any mirror image settings in ...

Страница 228: ...ge 173 Cleaning the Scanner Glass on page 176 Menu Options for Copying on page 133 Moiré Cross Hatch Patterns Appear in the Copied Image Change the reduce and enlarge setting or place the original at a slightly different angle Related Information Menu Options for Copying on page 133 An Image of the Reverse Side of the Original Appears in the Copied Image For a thin original place the original on t...

Страница 229: ...ng setting Disable the Quiet Mode Control panel Select on the home screen and then disable it Windows Disable Quiet Mode on the printer driver s Main tab Mac OS Select System Preferences from the menu Printers Scanners or Print Scan Print Fax and then select the printer Click Options Supplies Options or Driver Select Off as the Quiet Mode setting If you are printing over a network the network devi...

Страница 230: ...orrect printer scanner is selected on Epson Scan 2 Check whether or not the printer is recognized when using Windows In Windows make sure the printer scanner is displayed in Scanner and Camera The printer scanner should be displayed as EPSON XXXXX printer name If the printer scanner is not displayed uninstall and then re install Epson Scan 2 See the following to access Scanner and Camera Windows 1...

Страница 231: ...y trash or dirt that adheres to the original Do not press with too much force on the original or the document cover If you press with too much force blurring smudges and spots may occur Related Information Cleaning the Scanner Glass on page 176 The Image Quality Is Rough Set the Mode in Epson Scan 2 according to the original you want to scan Scan using the settings for documents in Document Mode a...

Страница 232: ...Image Option Text Enhancement Select Document Mode as the Mode in Epson Scan 2 Scan using the settings for documents in Document Mode In Document Mode in Epson Scan 2 when Image Type on the Main Settings tab is set to Black White adjust Threshold on the Advanced Settings tab When you increase the Threshold the black color area becomes larger If the resolution is low try increasing the resolution a...

Страница 233: ...s situation clear the Thumbnail check box at the top of the preview widow to preview the entire scanned area and then create marquees manually Related Information Scanning Photos or Pictures Photo Mode on page 148 Text is Not Recognized Correctly when Saving as a Searchable PDF On the Image Format Options window in Epson Scan 2 check that Text Language is set correctly on the Text tab Check that t...

Страница 234: ...ograms EPSON Epson Scan 2 Epson Scan 2 Utility Mac OS Select Go Applications Epson Software Epson Scan 2 Utility 2 Select the Other tab 3 Click Reset Note If initialization does not solve the problem uninstall and re install Epson Scan 2 Related Information Uninstalling Applications on page 200 Installing Applications on page 198 Other Scanning Problems Scanning Speed Is Slow Lower the resolution ...

Страница 235: ... to the computer that is connected to the printer Operation Sounds Are Loud If operations sounds are too loud enable Quiet Mode Enabling this feature may reduce printing speed Control panel Select on the home screen and then enable Quiet Mode Windows printer driver Enable Quiet Mode on the Main tab Mac OS printer driver Select System Preferences from the menu Printers Scanners or Print Scan Print ...

Страница 236: ...age 241 Application Is Blocked by a Firewall for Windows Only Add the application to the Windows Firewall allowed program in security settings on the Control Panel Is Displayed on the Photo Selection Screen is displayed on the LCD screen when the image file is not supported by the product Related Information Supported Data Specifications on page 241 User s Guide Solving Problems 236 ...

Страница 237: ...o 24 lb Even when the paper thickness is within this range the paper may not feed in the printer or the print quality may decline depending on the paper properties or quality Printable Area Printable Area for Single Sheets Print quality may decline in the shaded areas due to the printer s mechanism Printing with borders A 3 0 mm 0 12 in B 3 0 mm 0 12 in C 41 0 mm 1 61 in D 37 0 mm 1 46 in Borderle...

Страница 238: ...mm 4 57 in D 120 mm 4 72 in Scanner Specifications Scanner Type Flatbed Photoelectric Device CIS Maximum Document Size 216 297 mm 8 5 11 7 in A4 Letter Resolution 1200 dpi main scan 4800 dpi sub scan Color Depth Color 48 bits per pixel internal 16 bits per pixel per color internal 24 bits per pixel external 8 bits per pixel per color external Grayscale 16 bits per pixel internal 8 bits per pixel e...

Страница 239: ...ting Mac OS IPv4 IPv6 IPP Printing Windows Mac OS IPv4 IPv6 UPnP Printing IPv4 Information appliance PictBridge Printing Wi Fi IPv4 Digital camera Epson Connect Email Print Remote Print IPv4 AirPrint iOS Mac OS IPv4 IPv6 iOS 5 or later Mac OS X v10 7 or later Google Cloud Print IPv4 IPv6 Network Scanning Epson Scan 2 IPv4 IPv6 Event Manager IPv4 Epson Connect Scan to Cloud IPv4 AirPrint Scan IPv4 ...

Страница 240: ... a Wi Fi connection infrastructure 4 Wi Fi Direct supports WPA2 PSK AES only 5 Complies with WPA2 standards with support for WPA WPA2 Personal Security Protocol SSL TLS HTTPS Server Client IPPS Supported Third Party Services AirPrint Print iOS 5 or later Mac OS X v10 7 x or later Scan OS X Mavericks or later Google Cloud Print External Storage Device Specifications Supported Memory Card Specificat...

Страница 241: ...d by USB Use only external USB devices with independent AC power sources 2 Read only You cannot use the following devices A device that requires a dedicated driver A device with security settings password encryption and so on A device with a built in USB hub Epson cannot guarantee operations for all externally connected devices Supported Data Specifications File Format JPEGs JPG with the Exif Vers...

Страница 242: ...D DVD tray Electrical Specifications Model 100 to 240 V Model 100 to 120V Model Rated Frequency Range 50 to 60 Hz 50 to 60 Hz Rated Current 0 6 to 0 3 A 0 6A Power Consumption with USB Connection Standalone copying Approx 18 W ISO IEC24712 Ready mode Approx 6 W Sleep mode Approx 0 6 W Power off Approx 0 15 W Standalone copying Approx 18 W ISO IEC24712 Ready mode Approx 6 W Sleep mode Approx 0 6 W ...

Страница 243: ...e 16 C 3 2 F Ink thaws and is usable after approximately 3 hours at 25 C 77 F You can store for one month at 40 C 104 F System Requirements Windows 10 32 bit 64 bit Windows 8 1 32 bit 64 bit Windows 8 32 bit 64 bit Windows 7 32 bit 64 bit Windows Vista 32 bit 64 bit Windows XP SP3 or later 32 bit Windows XP Professional x64 Edition SP2 or later macOS High Sierra macOS Sierra OS X El Capitan OS X Y...

Страница 244: ... This equipment complies with FCC IC radiation exposure limits set forth for an uncontrolled environment and meets the FCC radio frequency RF Exposure Guidelines in Supplement C to OET65 and RSS 102 of the IC radio frequency RF Exposure rules This equipment should be installed and operated so that the radiator is kept at least 7 9 inches 20 cm or more away from a person s body excluding extremitie...

Страница 245: ...t issued revenue stamps and securities issued according to legal procedure Exercise caution when copying the following items Private marketable securities stock certificates negotiable notes checks etc monthly passes concession tickets etc Passports driver s licenses warrants of fitness road passes food stamps tickets etc Note Copying these items may also be prohibited by law Responsible use of co...

Страница 246: ...erwise the port will dry out and become unusable when you insert it back into the printer 1 Turn off the printer by pressing the Pbutton 2 Make sure the power light turns off and then unplug the power cord cImportant Unplug the power cord when the power light is off Otherwise the print head does not return to the home position causing the ink to dry and printing may become impossible 3 Disconnect ...

Страница 247: ...ure the ink cartridge holder to the case by attaching the supplied protective material on top with tape 9 Close the scanner unit 10 Prepare to pack the printer as shown below 11 Pack the printer in its box using the protective materials User s Guide Appendix 247 ...

Страница 248: ...ion method Note It takes a while to recognize data from a computer if a large external storage device such as 2TB HDD is connected Windows Select an external storage device in Computer or My Computer The data on the external storage device is displayed Note If you connected the printer to the network without the software disc or Web Installer map a memory card slot or USB port as a network drive O...

Страница 249: ... if you give them the following information Product serial number The serial number label is usually on the back of the product Product model Product software version Click About Version Info or a similar button in the product software Brand and model of your computer Your computer operating system name and version Names and versions of the software applications you normally use with your product ...

Страница 250: ...w Zealand Epson New Zealand wishes to provide you with a high level of customer service In addition to your product documentation we provide the following sources for obtaining information Internet URL http www epson co nz Access the Epson New Zealand World Wide Web pages Worth taking your modem here for the occasional surf The site provides a download area for drivers Epson contact points new pro...

Отзывы: