157
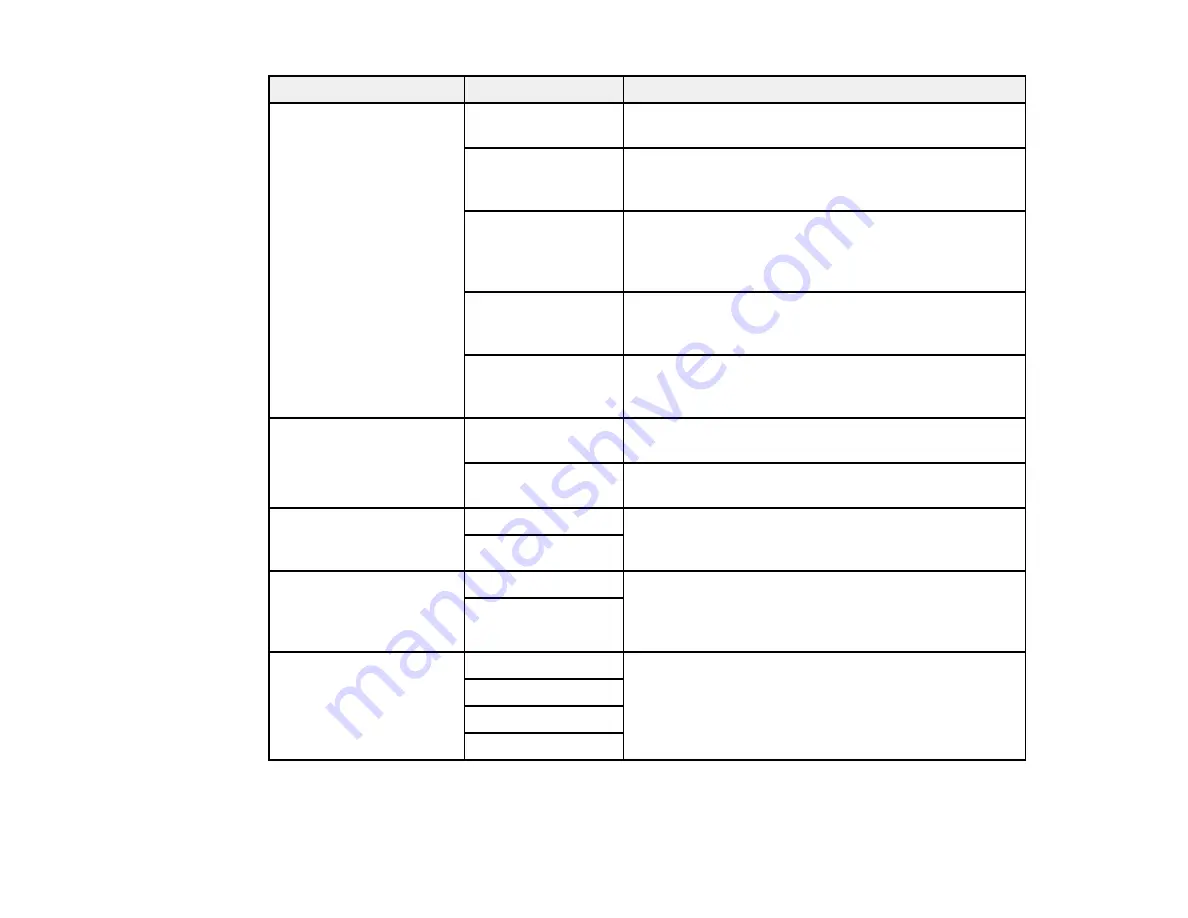
Setting
Options
Description
Fax Output
Other Settings
Lets you create a folder for saving faxes on a memory
device and select settings for forwarding faxes.
Save to Inbox
Saves incoming faxes in the product's memory. You
can view the faxes on the LCD screen and print if
needed.
Save to Computer
To enable this option, you must use the Epson FAX
Utility. Once
Save to Computer
is enabled, you can
select
Yes and Print
to have faxes saved and printed
automatically.
Save to Memory
Device
Saves incoming faxes to a connected memory card or
USB storage device. Select
Yes and Print
to have
faxes saved and printed automatically.
Forward
Forwards incoming faxes to as many as 5 numbers in
your contact list. Select
Yes and Print
to have faxes
saved and printed automatically.
Auto Reduction
On
Reduces incoming faxes to fit on the paper size in the
selected paper source.
Off
Prints large incoming faxes at their original size on
multiple sheets.
Auto Rotation
On
The
On
setting rotates landscape-oriented incoming
faxes so that they are printed correctly on the selected
paper (depending on the size of the incoming fax).
Off
Collation Stack
On
The
On
setting prints incoming faxes last page first so
that the pages are stacked in the correct order. (When
the product is running low on memory, this option may
not be available.)
Off
Print Suspend Time
Off
Sets a time period to stop automatic printing of faxes
or reports. During the time period, received faxes are
saved in the product’s memory. Make sure there is
enough free memory before using this function.
On
Time to Stop
Restart Time
Содержание ET-16500
Страница 1: ...ET 16500 User s Guide ...
Страница 2: ......
Страница 55: ...55 2 Pull out the paper cassette and remove the paper cassette cover 3 Slide the edge guides outward ...
Страница 61: ...61 2 Pull out the paper cassette and remove the paper cassette cover 3 Slide the edge guides outward ...
Страница 66: ...66 2 Pull out the paper cassette and remove the paper cassette cover 3 Slide the edge guides outward ...
Страница 70: ...70 3 Open the rear paper feed slot and push it back 4 Slide out the edge guides ...
Страница 88: ...88 Related topics Copying ...
Страница 132: ...132 You see an Epson Scan 2 window like this ...
Страница 134: ...134 You see an Epson Scan 2 window like this ...
Страница 136: ...136 You see this window ...
Страница 143: ...143 DSL connection 1 Telephone wall jack 2 DSL filter 3 DSL modem ...
Страница 144: ...144 ISDN connection 1 ISDN wall jack 2 Terminal adapter or ISDN router ...
Страница 155: ...155 You see this screen 6 Select Fax Output You see this screen 7 Select Settings ...
Страница 176: ...176 Windows OS X 5 To add an entry do one of the following Windows Select an empty entry and click the icon ...
Страница 223: ...223 6 Close the rear cover Parent topic Refilling Ink Related references Ink Bottle and Maintenance Box Part Numbers ...
Страница 264: ...264 2 Press the tabs and open the rear cover 3 Remove the duplexer ...
Страница 265: ...265 4 Carefully remove any jammed paper Note Do not touch the paper rollers 5 Remove any jammed paper from the duplexer ...
Страница 266: ...266 6 Open the duplexer 7 Carefully remove any jammed paper stuck inside 8 Reinstall the duplexer ...


