background image

4.

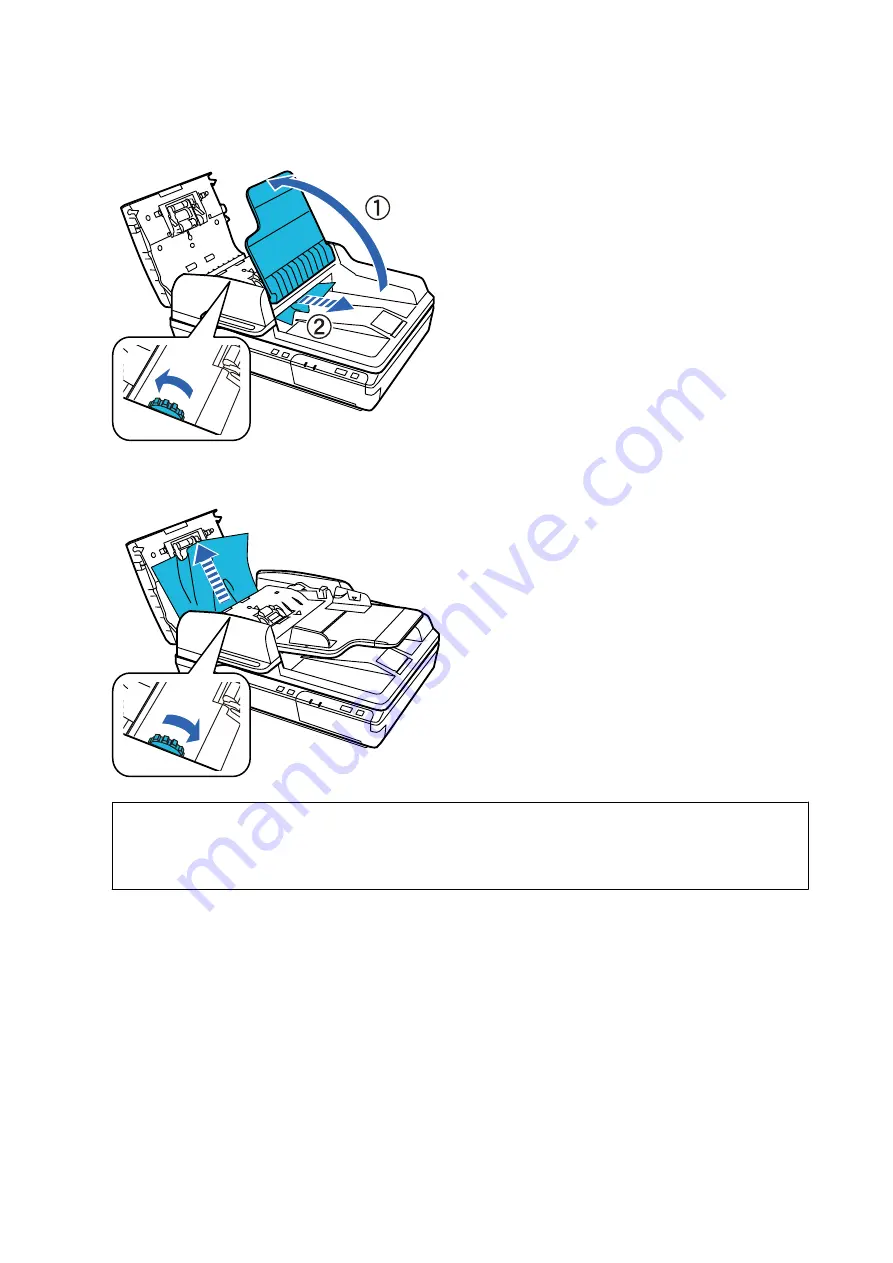
While turning the dial, slowly remove the jammed paper.

5.

If most of the paper has been ejected to the ADF input tray, remove the jammed paper while turning the dial.

c

Important:

Remove the paper carefully. If the paper is removed with too much force, the documents or the product could be
damaged.

6.

Close the ADF input tray.

User's Guide

Solving Problems

63

Содержание DS-6500 WorkForce DS-6500

Страница 1: ...User s Guide NPD6191 04 EN ...

Страница 2: ...penses incurred by the purchaser or third parties as a result of accident misuse or abuse of this product or unauthorized modifications repairs or alterations to this product or excluding the U S failure to strictly comply with Seiko Epson Corporation s operating and maintenance instructions Seiko Epson Corporation and its affiliates shall not be liable for any damages or problems arising from the...

Страница 3: ...ited States and or other countries Apple macOS and OS X are trademarks of Apple Inc registered in the U S and other countries Adobe Adobe Reader and Acrobat are registered trademarks of Adobe Systems Incorporated Intel is a registered trademark of Intel Corporation General Notice Other product names used herein are for identification purposes only and may be trademarks of their respective owners E...

Страница 4: ...pson Scan 2 34 Advanced Scanning Setting a Job Scan Save and Send 38 Creating and Registering a Job Windows 38 Creating and Registering a Job Mac OS 39 Enabling a Job to Run from the Control Panel Button Assignment 39 Assigning a Job to the Control Panel Windows 39 Assigning a Job to the Control Panel Mac OS 40 Separation Feature for Windows Only 40 Sorting and Saving Scanned Images into a Separat...

Страница 5: ...cal Specifications 73 Scanner Electrical Specifications 73 AC Adapter Electrical Specifications 74 Environmental Specifications 74 System Requirements 74 Standards and Approvals Standards and Approvals for European Models 76 Standards and Approvals for Australian Models 76 Where to Get Help Technical Support Web Site 77 Contacting Epson Support 77 Before Contacting Epson 77 Help for Users in Europ...

Страница 6: ...the various Epson applications Marks and Symbols Caution Instructions that must be followed carefully to avoid bodily injury cImportant Instructions that must be observed to avoid damage to your equipment Note Provides complementary and reference information Related Information Links to related sections Descriptions Used in this Manual Screenshots for the applications are from Windows 10 or macOS ...

Страница 7: ...icrosoft Windows 8 operating system Microsoft Windows 7 operating system Microsoft Windows Vista operating system Microsoft Windows XP operating system Service Pack 3 Microsoft Windows XP Professional x64 Edition operating system Service Pack 2 Microsoft Windows Server 2019 operating system Microsoft Windows Server 2016 operating system Microsoft Windows Server 2012 R2 operating system Microsoft W...

Страница 8: ...p the cord straight at the end Use only the power cord supplied with the product and do not use the cord with any other equipment Use of other cords with this product or the use of the supplied power cord with other equipment may result in fire or electric shock Use only the AC adapter that comes with your product Using any other adapter could cause fire electrical shock or injury The AC adapter i...

Страница 9: ...n the scanner glass and do not press the glass with too much force Restrictions on Copying Observe the following restrictions to ensure the responsible and legal use of your product Copying of the following items is prohibited by law Bank bills coins government issued marketable securities government bond securities and municipal securities Unused postage stamps pre stamped postcards and other off...

Страница 10: ...his guide are of the Automatic Document Feeder ADF scanner shown on the left Note Use all the items that came with your product a P Power button b Wake Up Sleep button c Ready light d Error light e Start button f y Stop button User s Guide Scanner Basics 10 ...

Страница 11: ...Automatic Document Feeder ADF b ADF cover c Edge guides d ADF input tray e ADF output tray f Control panel a Document cover b Document glass c Carriage in the document glass User s Guide Scanner Basics 11 ...

Страница 12: ...Function P button Turns the product on if pressed once Press again to turn the product off button Changes to Sleep mode Press again to return the scanner to ready status button Lets you start scan y button Cancels scanning You can customize button controls from Document Capture Pro for Windows and Document Capture for Mac OS Related Information Assigning a Job to the Control Panel Windows on page ...

Страница 13: ...ther as a standalone application or by using TWAIN compliant application software See the Epson Scan 2 help for details on using the application Document Capture Pro Document Capture Document Capture Pro is an application that allows you to easily digitize originals such as documents and forms You can save scanned images to a specified folder send by email and perform copying functions by linking ...

Страница 14: ... save each file in specific folders by using these methods or by setting specific pages Document Capture Pro Server Document Capture Pro Server is an application for Windows Server that allows you to manage up to 100 scanners on the network through servers By using a web browser you can register and monitor scanners or register jobs 1 Scan 2 Save 3 Send and assign them to individual scanners You c...

Страница 15: ...Part name Codes 2 Specifications Network Interface Panel 1 B12B808411 Available for 1000BASE T 100BASE TX 10BASE T IPv6 IEEE802 3az 1 When mounted you cannot use the scanner or a computer over a USB connection 2 Codes may vary by region Installing the Network Interface Panel Epson Scan 2 works with the optional Network Interface Panel together to enable direct control of all of the features of you...

Страница 16: ...cified 2 This number was reached by consecutively scanning using Epson test original papers and is a guide to the replacement cycle The replacement cycle may vary depending on different paper types such as paper that generates a lot of paper dust or paper with a rough surface that may shorten the life cycle Related Information Replacing the Roller Assembly Kit on page 51 Cleaning Kit Codes Use thi...

Страница 17: ... 8 5 inches Length 148 to 1 016 mm 5 8 to 40 inches Weight Thickness All sizes 50 to 128 g m2 Less than A6 60 to 190g m2 Paper type Standard paper High quality paper Recycled paper Note Even when the original meets the specifications for originals that can be placed in the ADF it may not feed from the ADF or the scan quality may decline depending on the paper properties or quality Document with th...

Страница 18: ...g documents in the ADF cImportant Do not feed photographs or valuable original artwork into the ADF Misfeeding may wrinkle or damage the original Scan these documents on the document glass instead Remove any documents from the document glass Make sure there is no dust on the glass before loading documents in the ADF 1 Slide the edge guides on the ADF input tray all the way outward User s Guide Spe...

Страница 19: ... powder tap the edges of the paper on a flat surface to align the sheets and then load it correctly Do not load additional documents while the current document is being scanned Related Information Scanning from the Button on page 23 Scanning Using Document Capture Pro Windows on page 23 Scanning Using Epson Scan 2 on page 34 Placing Documents on the Document Glass cImportant Do not place heavy obj...

Страница 20: ... down on the document glass Make sure the top of the document is against the left edge and centered on the arrow mark 3 Close the document cover gently so that your original does not move User s Guide Specifications of Originals and Placing Originals 20 ...

Страница 21: ...ws on page 23 Scanning Using Epson Scan 2 on page 34 Placing Thick Documents on the Document Glass cImportant Do not place heavy objects on the document glass and do not press the glass with too much force Note The illustrations used in this guide are of the ADF scanner Follow these steps to scan a large or thick document on the document glass 1 Place a large or thick document face down on the doc...

Страница 22: ...ment is very thick or curled at the edges cover the edges with paper to block external light as you scan You can place documents up to 15 mm 0 6 inch thick Related Information Scanning from the Button on page 23 Scanning Using Document Capture Pro Windows on page 23 Scanning Using Epson Scan 2 on page 34 User s Guide Specifications of Originals and Placing Originals 22 ...

Страница 23: ...ty of methods to sort the documents into separate files such as detecting barcodes or characters on the pages You can also register scanning settings for a job to simplify scanning operations See the Document Capture Pro help for details on the features Note Document Capture Pro does not support Windows Vista Windows XP and Windows Server 1 Start Document Capture Pro Windows 10 Click the start but...

Страница 24: ...n is displayed Note A preset job is available that allows you to save scanned images as a PDF When using this job skip this procedure and go to procedure 10 3 Click New Job The Job Settings screen is displayed User s Guide Basic Scanning 24 ...

Страница 25: ...ect double sided to scan both sides of the originals Document Size Select the size of the original you placed Image Type Select the color you want to use to save the scanned image Rotation Select the rotation angle depending on the original you want to scan Resolution Select the resolution User s Guide Basic Scanning 25 ...

Страница 26: ...Scan 2 features to adjust scanned images 6 Click 2 Save and then make the save settings File Name Set the file name you want to use when saving the scanned image Click Details to change the settings for component items for the file name and then click File Name Components to add the items File Type Select the save format from the list Click Option to make detailed settings for the file Browse Sele...

Страница 27: ...e If you want to upload to a cloud service you need to set up your account with the cloud service in advance If you want to use Evernote as the destination download the Evernote application from the Evernote Corporation Website and install it before using this feature 8 Click OK to close the Job Settings screen 9 Click OK to close the job list screen 10 Place the original User s Guide Basic Scanni...

Страница 28: ...ocument Capture Pro Document Capture on page 13 Specifications of Originals and Placing Originals on page 17 Scanning Using Document Capture Mac OS This application allows you to perform various tasks such as saving the image to your computer sending it by email printing and uploading to a server or a cloud service You can also register scanning settings for a job to simplify scanning operations S...

Страница 29: ...te You may need to select the scanner you want to use from the scanners list 2 Click The Job List screen is displayed Note A preset job is available that allows you to save scanned images as a PDF When using this job skip this procedure and go to procedure 10 User s Guide Basic Scanning 29 ...

Страница 30: ...3 Click the icon The job setting screen is displayed 4 Set the Job Name User s Guide Basic Scanning 30 ...

Страница 31: ...se to save the scanned image Rotation Select the rotation angle depending on the original you want to scan Resolution Select the resolution Note You can also adjust the image using following items Text Enhancement Select to make blurred letters in the original clear and sharp Correct Document Skew Select to correct the slant of the original Skip Blank Page Select to skip blank pages if there are a...

Страница 32: ... of the file name for the current settings Prefix Character Set a prefix for the file name Date Add the date to the file name Time Add the time to the file name Page Counter Add the page counter to the file name File Type Select the save format from the list Click Options to make detailed settings for the file User s Guide Basic Scanning 32 ...

Страница 33: ...tem Note If you want to upload to a cloud service you need to set up your account with the cloud service in advance If you want to use Evernote as the destination download the Evernote application from the Evernote Corporation Website and install it before using this feature 8 Click OK to close the job settings screen 9 Click OK to close the Job List screen 10 Place the original User s Guide Basic...

Страница 34: ...ation Document Capture Pro Document Capture on page 13 Specifications of Originals and Placing Originals on page 17 Scanning Using Epson Scan 2 You can scan the originals using detailed settings that are suitable for text documents 1 Place the original Note If you want to scan multiple originals place them into the ADF 2 Start Epson Scan 2 Windows 10 Windows Server 2019 Windows Server 2016 Click t...

Страница 35: ... Settings tab Document Source Select the source where the original is placed Scanning Side Select the side of the original you want to scan when scanning from ADF Document Size Select the size of the original you placed Original orientation buttons Select the set orientation of the original you placed Depending on the size of the original this item may be set automatically and cannot be changed Im...

Страница 36: ... Advanced Settings tab you can make detailed image adjustment settings that are suitable for text documents such as the following Remove Background Remove the background of the originals Text Enhancement You can make blurred letters in the original clear and sharp Auto Area Segmentation You can make letters clear and images smooth when performing black and white scanning for a document that contai...

Страница 37: ...the save file name displayed You can change settings for file name by selecting Settings from the list Folder Select the save folder for the scanned image from the list You can select other folder or create a new folder by selecting Select from the list 6 Click Scan The scanned image is saved to the folder you specified Related Information Specifications of Originals and Placing Originals on page ...

Страница 38: ...he Job Settings screen is displayed 4 Make job settings on the Job Settings screen Job Name Enter the name of the job you want to register 1 Scan Scan Settings Make scan settings such as the size of the originals or the resolution 2 Save Save Settings Set the saving destination the saving format the naming rules of the files and so on You can sort and save continued scanned images automatically by...

Страница 39: ...n FTP server or Web server 5 Click OK to return to the Job List window The created job is registered in the Job List 6 Click OK to return to the main window Related Information Document Capture Pro Document Capture on page 13 Scanning from the Button on page 23 Enabling a Job to Run from the Control Panel Button Assignment By assigning a job to the scanner s control panel in advance using Document...

Страница 40: ...he features 1 Start Document Capture 2 Click the icon on the main window The Job List window is displayed 3 Click the icon and select Event Settings 4 Select the job you want to run on the control panel from the pull down menu 5 Click OK to return to the Job List window The job is assigned to the scanner s control panel 6 Click OK to return to the main window Related Information Scanning from the ...

Страница 41: ...ot support Windows Vista Windows XP and Windows Server Split the data every three pages and save as multi page PDFs fixed pages Enter barcode information and save as multi page PDFs 1 2 3 4 5 0 0 0 2 0 4 0 6 0 8 1 0 1 2 1 2 3 4 5 0 0 0 2 0 4 0 6 0 8 1 0 1 2 Enter barcode information and separate into folders 1 2 3 4 5 0 0 0 2 0 4 0 6 0 8 1 0 1 2 1 2 3 4 5 0 0 0 2 0 4 0 6 0 8 1 0 1 2 1 2 3 4 5 0 0 ...

Страница 42: ...rt scanned images you can use a variety of detection methods such as blank pages inserted between the originals or barcodes on the originals 1 Place the originals including indicators such as blank pages between the pages where you want to separate the scanned images 2 Start Document Capture Pro 3 Click Job Settings 4 Click New Job User s Guide Advanced Scanning 42 ...

Страница 43: ...5 Set the Job Name 6 Make scanning settings on the 1 Scan tab User s Guide Advanced Scanning 43 ...

Страница 44: ...7 Click 2 Save make the save settings and then select Apply job separation 8 Click Separation Settings User s Guide Advanced Scanning 44 ...

Страница 45: ...r Recognition and separate accordingly Form Select to separate by detecting the type of Form File Size Select to separate by detecting the file size of scanned images Patch Code Select to separate by detecting the Patch Code 10 Set detailed settings for separation and then click OK Settings for separation vary depending on the Separator you selected For details on the settings for separation click...

Страница 46: ...he destination you selected Make detailed settings as necessary Click Help for details on each item 12 Click OK to close the Job Settings screen 13 Click OK to close the job list screen The separation job is created 14 Click the job icon The separation job is performed User s Guide Advanced Scanning 46 ...

Страница 47: ...format file using Document Capture Pro Note Document Capture Pro does not support Windows Vista Windows XP and Windows Server This feature is only available when the EPSON Scan OCR component is installed 1 Place the original 2 Start Document Capture Pro 3 Click on the Scan and bar to display the destination screen If you have already displayed the destination screen skip this procedure User s Guid...

Страница 48: ...r Settings window is displayed 7 Select the Office format file you want to save as from the File Type list 8 Click Option to display the optional settings window 9 Make settings for each item in the window and then click OK 10 Make other settings on the Save Settings window or the Transfer Settings window and then click OK The scanned image is saved as an Office format file User s Guide Advanced S...

Страница 49: ...ful not to spill liquid into the product mechanism or electronic components This could permanently damage the mechanism and circuitry Do not spray lubricants to the product Never open the scanner case When using the Epson cleaning kit make sure to put the liquid in the cleaning cloth before use If the liquid dropped directly inside the scanner the product could be damaged 1 Turn off the product 2 ...

Страница 50: ...eaner directly on the glass surface Do not use the Epson cleaning kit for the surface of the document glass It should only be used to clean the glass for the ADF 5 Clean the document cover if it gets dirty User s Guide Maintenance 50 ...

Страница 51: ...the Roller Assembly Kit You need to replace the parts on the Roller Assembly Kit after scanning every 100 000 times Removal part Part number Number of scanning Roller Assembly Kit B12B813481 100 000 To replace the Roller Assembly Kit follow the steps below 1 Turn off the scanner 2 Remove all paper from the input tray 3 Unplug the AC adapter from the product User s Guide Maintenance 51 ...

Страница 52: ...4 Open the ADF cover 5 Press the hook on both sides of the pickup roller cover then open the cover 6 Slide and remove the installed pickup roller User s Guide Maintenance 52 ...

Страница 53: ...w pickup roller to the correct position cImportant Do not touch the surface of the pickup roller 8 Close the pickup roller cover 9 Press in the hooks on both sides of the pre separation pad User s Guide Maintenance 53 ...

Страница 54: ... until you hear it click into place cImportant Do not touch the surface of the separation pad 12 Attach the pre separation pad as shown in the illustration 13 Close the ADF cover 14 Plug the AC adapter and then turn on the scanner 15 Reset the scan number on the control panel or by using Epson Scan 2 Utility User s Guide Maintenance 54 ...

Страница 55: ...Utility Windows 10 Windows Server 2019 Windows Server 2016 Click the start button and then select EPSON Epson Scan 2 Epson Scan 2 Utility Windows 8 1 Windows 8 Windows Server 2012 R2 Windows Server 2012 Start screen Apps Epson Epson Scan 2 Utility Windows 7 Windows Vista Windows XP Windows Server 2008 R2 Windows Server 2008 Windows Server 2003 R2 Windows Server 2003 Click the start button and then...

Страница 56: ...s Server 2019 Windows Server 2016 Click the start button and then select EPSON Epson Scan 2 Epson Scan 2 Utility Windows 8 1 Windows 8 Windows Server 2012 R2 Windows Server 2012 Start screen Apps Epson Epson Scan 2 Utility Windows 7 Windows Vista Windows XP Windows Server 2008 R2 Windows Server 2008 Windows Server 2003 R2 Windows Server 2003 Click the start button and then select All Programs or P...

Страница 57: ... you need to lock the carriage to prevent damage 1 Make sure the carriage is in the home position on the left side of the product If the carriage is not in the home position turn on the product and wait until the carriage moves to the home position 2 Turn off the product then unplug the AC adapter cord 3 Disconnect the USB cable from the product User s Guide Maintenance 57 ...

Страница 58: ...rn off the computer or the scanner while updating 1 Make sure that the scanner and the computer are connected and the computer is connected to the internet 2 Start EPSON Software Updater and update the applications or the firmware Note Windows Server operating systems are not supported Windows 10 Click the start button and then select Epson Software EPSON Software Updater Windows 8 1 Windows 8 Ent...

Страница 59: ...d the application you want to update in the list you cannot update using the EPSON Software Updater Check for the latest versions of the applications on your local Epson website http www epson com User s Guide Maintenance 59 ...

Страница 60: ... connected to the product and a working electrical outlet Check that the electrical outlet is working Plug another device into the electrical outlet and check that you can turn the power on Turn off the product and computer and then check the interface cable connection between them to make sure it is secure Make sure you select the correct product if a scanner list appears when starting to scan Co...

Страница 61: ...er Use the USB cable that came with the scanner Connect the scanner directly to the computer s USB port The scanner may not work properly when connected to the computer through one or more USB hubs Make sure the scanner is turned on Wait until the status light stops flashing indicating that the scanner is ready to scan If you are using any TWAIN compliant applications make sure that the correct sc...

Страница 62: ...r is selected as the scanner or source setting Related Information Installing Your Applications on page 70 Paper Feeding Problems The paper jams in the ADF If paper jams inside the ADF open the ADF and remove any paper from the document glass Then look to see if paper is extending from either end of the feeder To clear the jammed paper follow these steps Note Remove any pages remaining at either e...

Страница 63: ...per has been ejected to the ADF input tray remove the jammed paper while turning the dial cImportant Remove the paper carefully If the paper is removed with too much force the documents or the product could be damaged 6 Close the ADF input tray User s Guide Solving Problems 63 ...

Страница 64: ...ltiple originals at a time Clean the ADF Reduce the number of originals being placed at a time Related Information Cleaning the Scanner on page 49 The Originals Get Dirty Clean the inside of the scanner Related Information Cleaning the Scanner on page 49 Scanning Takes a Long Time When the resolution is high scanning may take some time Computers with USB 2 0 Hi Speed ports can scan faster than tho...

Страница 65: ...cal Settings Temp Scanned Image Problems Scan quality is unsatisfactory Scan quality can be improved by changing the current settings or adjusting the scanned image Straight Lines Appear when Scanning from ADF Clean the ADF Straight lines may appear in the image when trash or dirt gets into the ADF Remove any trash or dirt that adheres to the original Related Information Cleaning the Scanner on pa...

Страница 66: ...t by increasing the resolution or adjusting the image quality Change the resolution and then scan again Set the appropriate resolution for the purpose of your scanned image Check that Text Enhancement is selected Document Capture Pro Windows Click Scan Settings Text Enhancement Epson Scan 2 Mac OS Click the Advanced Settings tab Text Enhancement When Black White is selected as the Image Type Depen...

Страница 67: ...h creases or wrinkles Paper type made of thermal paper such as receipts may deteriorate due to age or friction Scan them as soon as possible When saving to Microsoft Office or Searchable PDF files check that the correct languages are selected Moiré Patterns Web Like Shadows Appear If the original is a printed document moiré patterns web like shadows may appear in the scanned image Check that Descr...

Страница 68: ...r Size Auto Depending on the original the area of the original may not be detected correctly when using the Auto Detect feature Select the appropriate size of the original from the Document Size list Note If the size of the original you want to scan is not on the list create the size manually in the Epson Scan 2 window When you are using Document Capture Pro you can open the window by pressing the...

Страница 69: ...inistrator Enter the administrator password if the computer prompts you Uninstalling Your Applications for Windows 1 Quit all running applications 2 Disconnect the scanner from your computer 3 Open the Control Panel Windows 10 Windows Server 2019 Windows Server 2016 Click on the start button and then select Windows System Control Panel Windows 8 1 Windows 8 Windows Server 2012 R2 Windows Server 20...

Страница 70: ...nload it again each time you uninstall the application 2 Disconnect the scanner from your computer 3 To uninstall the scanner driver select System Preferences from the Apple menu Printers Scanners or Print Scan Print Fax and then remove the scanner from the enabled scanner list 4 Quit all running applications 5 Select Go Applications Epson Software Uninstaller 6 Select the application you want to ...

Страница 71: ...unning applications 2 When installing Epson Scan 2 disconnect the scanner and the computer temporarily Note Do not connect the scanner and the computer until you are instructed to do so 3 Install the application by following the instructions on the Website below http epson sn Note For Windows you can also use the software disc that came with the scanner User s Guide Solving Problems 71 ...

Страница 72: ... to 9600 dpi in 1 dpi increments Document Size Document glass 216 297 mm 8 5 11 7 inches ADF 216 1 016 mm 8 5 40 inches ADF Paper input Face up loading ADF Paper output Face down ejection ADF Paper capacity 100 sheets of paper at 80 g m2 Color Depth 16 bits per pixel per color internal 1 to 8 bits per pixel per color external Interface Hi speed USB port Note Optional optical resolution is the maxi...

Страница 73: ...and the input tray Electrical Specifications Scanner Electrical Specifications Rated Voltage DC 24 V Rated Input Current 2 0 A Power Consumption DS 5500 Operating Approx 17 5 W Ready mode Approx 8 5 W Sleep mode Approx 1 6 W Power off 0 3 W or below DS 6500 DS 7500 Operating Approx 44 5 W Ready mode Approx 12 0 W Sleep mode Approx 1 6 W Power off 0 3 W or below Note For European users see the foll...

Страница 74: ...ry office or home conditions Avoid operating the scanner in direct sunlight near a strong light source or in extremely dusty conditions System Requirements Windows 1 Windows 10 32 bit 64 bit Windows 8 1 32 bit 64 bit Windows 8 32 bit 64 bit Windows 7 32 bit 64 bit Windows Vista 32 bit 64 bit Windows XP Professional x64 Edition Service Pack 2 Windows XP 32 bit Service Pack 3 Windows Server 2019 Win...

Страница 75: ...ricks OS X Mountain Lion Mac OS X v10 7 x Mac OS X v10 6 8 1 Document Capture Pro does not support Windows Vista Windows XP and Windows Server 2 Fast User Switching on Mac OS or later is not supported 3 The UNIX File System UFS for Mac OS is not supported User s Guide Technical Specifications 75 ...

Страница 76: ...5024 AC adapter Low Voltage Directive 2006 95 EC EMC Directive 2004 108 EC EN 60950 1 EN55032 Class B EN55024 EN 61000 3 2 EN 61000 3 3 Standards and Approvals for Australian Models Product EMC AS NZS CISPR22 Class B AC adapter A471H Safety AS NZS 60950 1 EMC AS NZS CISPR22 Class B User s Guide Standards and Approvals 76 ...

Страница 77: ...ur product Epson support will be able to help you much more quickly if you give them the following information Product serial number The serial number label is usually on the back of the product Product model Product software version Click About Version Info or a similar button in the product software Brand and model of your computer Your computer operating system name and version Names and versio...

Страница 78: ...stralia World Wide Web pages Worth taking your modem here for the occasional surf The site provides a download area for drivers Epson contact points new product information and technical support e mail Epson Helpdesk Phone 1300 361 054 Epson Helpdesk is provided as a final backup to make sure our clients have access to advice Operators on the Helpdesk can aid you in installing configuring and oper...

Страница 79: ...Thailand Contacts for information support and services are World Wide Web http www epson co th Information on product specifications drivers for download Frequently Asked Questions FAQ and e mail are available Epson Call Centre Phone 66 2685 9899 Email support eth epson co th Our Call Centre team can help you with the following over the phone Sales enquiries and product information Product usage q...

Страница 80: ...rvice Serpong Ruko Melati Mas Square Blok A2 No 17 Serpong Banten 082120090084 082120090085 esstag epson indonesia co id esstag support epson indonesia co id SEMARANG Epson Sales and Service Semarang Komplek Ruko Metro Plaza Block C20 Jl MT Haryono No 970 Semarang JAWA TENGAH 024 8313807 024 8417935 esssmg epson indonesia co id esssmg support epson indonesia co id JAKARTA Epson Sales and Service J...

Страница 81: ... Jl Haji Abdul Wahab Saimin Ruko Villa Bukit Mas RM 11 Kec Dukuh Pakis Surabaya 60225 031 5120994 sby technical epson indonesia co id sby admin epson indonesia co id YOGYAKARTA Epson Service Center Yogyakarta YAP Square Block A No 6 Jl C Simanjutak Yogyakarta DIY 0274 581 065 ygy technical epson indonesia co id ygy admin epson indonesia co id JEMBER Epson Service Center Jember JL Panglima Besar Su...

Страница 82: ...co id bdj technical epson indonesia co id DENPASAR EPSON SALES AND SERVICE Denpasar JL MAHENDRADATA NO 18 DENPASAR BALI 0361 3446699 9348428 dps admin epson indonesia co id dps technical epson indonesia co id JAKARTA EPSON SALES AND SERVICE CILANDAK CIBIS Business Park Tower 9 LT MEZZANINE Jalan TB Simatupang No 2 Jakarta Selatan DKI JAKARTA 12560 021 80866777 esscibis support1 epson indonesia co ...

Страница 83: ...pport and services are World Wide Web http www epson com my Information on product specifications drivers for download Frequently Asked Questions FAQ Sales Enquiries questions through e mail Epson Call Centre Phone 1800 81 7349 Toll Free Email websupport emsb epson com my Sales enquiries and product information Product usage questions or problems Enquiries on repair services and warranty Head Offi...

Страница 84: ... Wide Web http www epson com ph Information on product specifications drivers for download Frequently Asked Questions FAQ and E mail Enquiries are available Epson Philippines Customer Care Toll Free PLDT 1 800 1069 37766 Toll Free Digital 1 800 3 0037766 Metro Manila 632 8441 9030 Web Site https www epson com ph contact E mail customercare epc epson com ph Accessible 9am to 6pm Monday through Satu...

Отзывы: