25
Using the Network Interface Unit
See these sections to use the optional Epson Network Interface Unit to scan over a network.
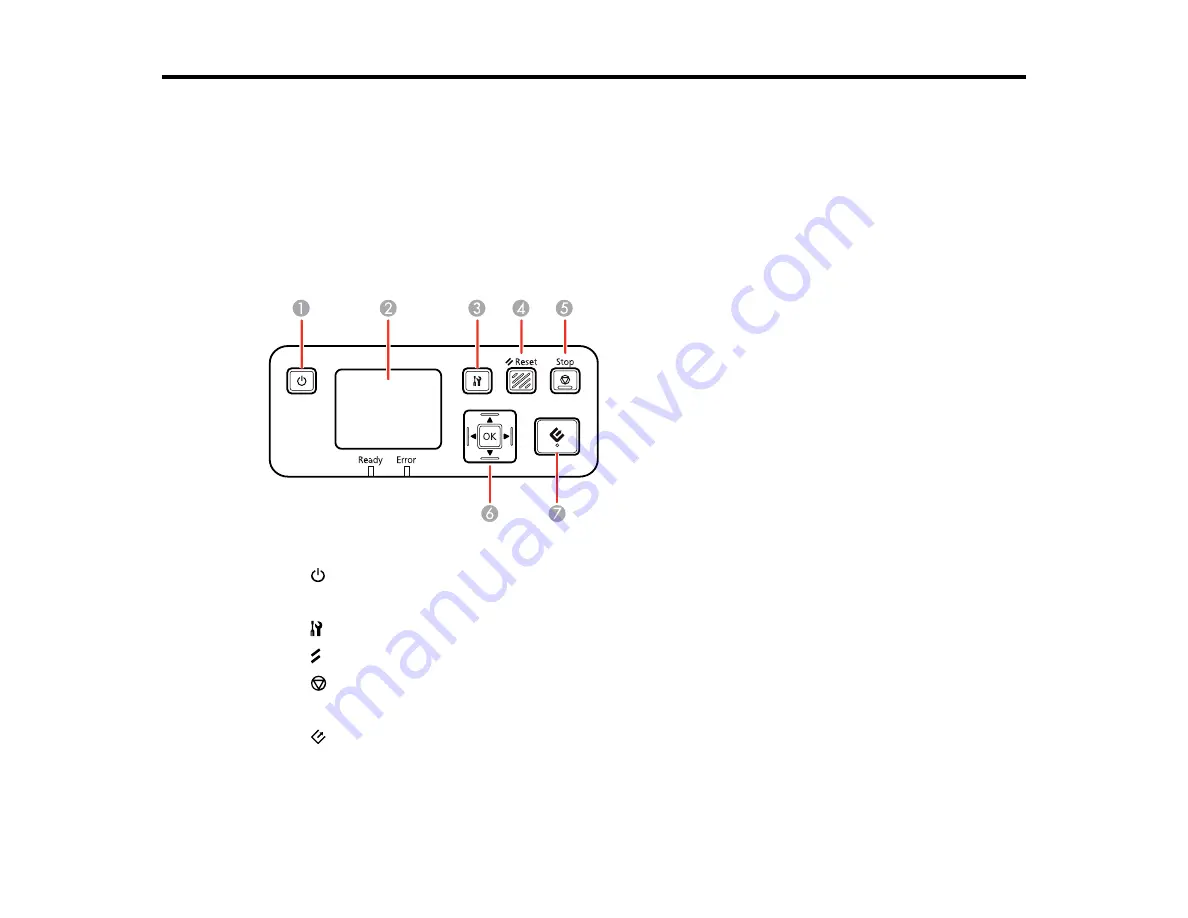
Network Interface Unit Control Panel
Connecting the Network Interface Unit
Setting Up Network Scanning
Scanning to Network Computers from the Network Interface Unit - Windows
Network Interface Unit Control Panel
1
power button (turns the unit on and off)
2
LCD screen (displays status, operations, and error messages)
3
settings button (selects product settings, network settings, and maintenance options)
4
Reset
button (returns the LCD to the default screen)
5
Stop
button (cancels scanning)
6
OK
button and arrows (use the arrows to highlight an option and the
OK
button to select it)
7
start button (starts scanning when networking is enabled)
Parent topic:
Содержание DS-1630
Страница 1: ...DS 1630 User s Guide ...
Страница 2: ......
Страница 6: ......
Страница 9: ...9 2 ADF cover 3 Input tray 4 Edge guides 5 Stopper 6 Output tray 7 Control panel 1 Document mat ...
Страница 21: ...21 1 Open the scanner cover Caution Be careful not to open the scanner cover more than 70 or you may damage it ...
Страница 23: ...23 Note Move your original about 0 1 inch 2 5 mm away from the edges as shown to avoid cropping ...
Страница 36: ...36 You see an Epson Scan 2 window like this ...
Страница 38: ...38 You see an Epson Scan 2 window like this ...
Страница 49: ...49 You see this window ...
Страница 58: ...58 4 Click the Scan Settings button then click Detailed Settings You see an Epson Scan 2 window like this ...
Страница 74: ...74 You see a window like this ...
Страница 80: ...80 4 Open the ADF ...
Страница 81: ...81 5 Press the tabs on the document mat and remove the mat ...
Страница 89: ...89 3 If you cannot remove the originals make sure the ADF cover is open and raise the ADF ...
Страница 90: ...90 4 Press the tabs on the document mat and remove the mat ...


