background image

EPSON Stylus Photo 825

6 -

 EPSON Stylus Photo 825 1

1

/02

Printing Your Photos

You can select one or more photos for printing:

If you select one photo, you can print one or more copies of 
it on a page, depending on your selected layout. With the 
copies option, you can print multiple pages of your selected 
layout.

If you select a set of photos, you can print them as a group 
using a variety of layouts. If you’ve selected more photos 
than can fit on a page, the printer automatically prints 
additional pages as needed, using the selected layout. 

Make sure the type of paper you want to use is loaded in the 
printer, then follow these steps:

1. Select your Print Mode (

All

One

, or 

Set

), depending on 

which photos you want to print. 

2. Select the appropriate Paper Type and Paper Size settings. 

See page 3 to choose the correct Paper Type setting. 

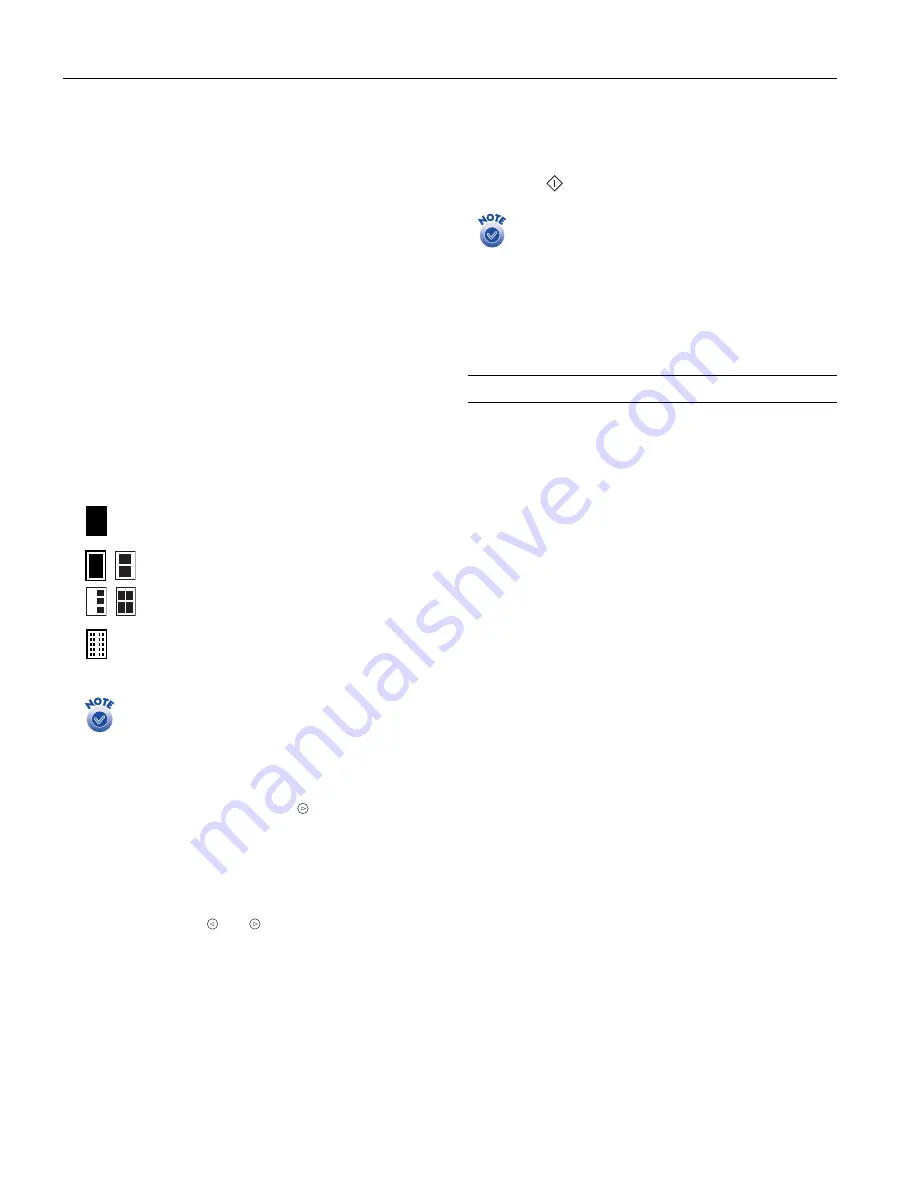
3. In the Page Layout menu, select one of the options shown 

below. 

Prints one photo per sheet, borderless; fits the photo 
lengthwise on the paper.

Prints 1, 2, 3, or 4 photos per sheet, with borders 
around the edges.

Prints 20 photos per sheet. If you select a set of photos, 
the photo number and date are also printed with each 
photo. (Good for printing larger-size index prints.)

Your photos are automatically sized to fit the type of 
paper you’ve loaded.

If you’re printing on roll paper, the page layout is 
automatically selected (you can print only borderless 
photos on roll paper).

4. At the Select Photo menu, press the   button to select the 

picture you want to print. 

If you’re printing various photos, press the round 

Select 

Photo

 button when the number of the picture you want to 

print is displayed. Continue pressing this button to print 
additional copies of this photo (shown in the Copies menu). 
When done, use the   and   buttons to select additional 
photos.

If you’re printing just one photo (Print Mode is set to 

One

), 

you can use the Copies menu to select the number of pages 
you want to print. (If the Print Mode is on 

Set

, the number 

of pages is automatically determined; you cannot change 
this setting.)

5. In the PhotoEnhance menu, select 

On

 (if your camera 

supports PRINT Image Matching

 or to improve 

brightness and contrast) or 

Off

6. Press the 


Print

 button. Your print job begins printing. 

When using the printer in stand-alone mode, you can make 
additional changes to your images before printing. For 
example, you can adjust the brightness or use various 
filters to make color corrections. These changes do not 
affect your original photo files, just the way they’re printed. 
For details, see the 

Printer Basics

 book. 

To cancel a print job while printing, press the Cancel 
button. 

Testing the Printer

You can run a printer self-test to determine whether a problem 
comes from the printer itself or some other source. 

1. Make sure both the printer and computer are turned off. 

Then disconnect the USB cable from the printer.

2. Make sure letter-size or larger paper is loaded in the printer.

3. Hold down the 

b

 maintenance button, then press and 

release the


P

power button. 

The printer prints a test page showing its ROM version 
number, black and color ink percentages remaining, and a 
nozzle check pattern. (If the pattern has gaps, you need to 
clean the print head; see page 8.)

If the test page prints, the problem probably lies in your 
memory card, software settings, interface cable, or 
computer. Your software may not be installed correctly.

If the test page doesn’t print, you may have a problem 
with the printer. Try the suggestions in the 

Printer 

Basics

 book. If you can’t solve the problem yourself, 

contact your dealer or EPSON.

4. After examining the test page, remember to turn off the 

printer and reconnect its cable to your computer.

Содержание C11C498001 - Stylus Photo 825 Inkjet Printer

Страница 1: ...rd eject button Memorycard slot Output tray extended Left edge guide adjustable Preview monitor slot Roll paper holders Paper thickness lever Preview monitor port USB port Power button Maintenance button Roll paper button Processing light Ink cartridge replacement button Error light Ink cartridge holder Option Part number Preview monitor black C12C860005 Preview monitor gray C11C860005 PCMCIA Comp...

Страница 2: ...acement The actual print capacity may vary depending on how often you turn on the printer and how often you clean the print head Ink thaws and is usable after approximately 3 hours at 77 F 25 C To ensure good results use genuine EPSON cartridges and do not refill them Other products may cause damage to your printer not covered by EPSON s warranties Don t use an ink cartridge that s older than the ...

Страница 3: ...s 4 x 6 inches S041682 Borderless 5 x 7 inches S041464 Borderless 8 x 10 inches S041465 Roll 4 inches x 26 feet S041302 EPSON Matte Paper Heavyweight Borderless 8 x 10 inches S041467 Letter 8 5 x 11 inches S041257 EPSON Premium Semigloss Photo Paper Letter 8 5 x 11 inches S041331 Roll 4 inches x 26 feet S041329 EPSON Photo Stickers Kit CD ROM paper A6 4 1 x 5 8 inches S041144 KIT EPSON Photo Stick...

Страница 4: ...r stock before purchasing large quantities or printing large jobs Poor quality paper may reduce print quality and cause paper jams and other problems If you encounter problems switch to a higher grade of paper Do not load curled or folded paper Use papers under these conditions Temperature 59 to 77 F 15 to 25 C Humidity 40 to 60 RH Store printouts on Photo Quality Glossy Film and Self Adhesive She...

Страница 5: ... from a memory card make sure the Processing light is not flashing before you remove the card Then press the button to eject the card and pull it out of the slot Do not eject a card while the Processing light is flashing or you may lose data on the card If your computer is connected and turned on you should also take these steps On a Macintosh select the memory card icon on your desktop and drag i...

Страница 6: ...u When done use the and buttons to select additional photos If you re printing just one photo Print Mode is set to One you can use the Copies menu to select the number of pages you want to print If the Print Mode is on Set the number of pages is automatically determined you cannot change this setting 5 In the PhotoEnhance menu select On if your camera supports PRINT Image Matching or to improve br...

Страница 7: ...within six months of installing them and before the expiration date on the package Black ink cartridge T007201 Color ink cartridge T008201 To ensure good results use genuine EPSON ink cartridges and do not refill them Other products may cause damage to your printer not covered by EPSON s warranty When you need new ink cartridges contact your dealer or call the EPSON Store at 800 873 7766 or visit ...

Страница 8: ... is flashing unless the printer hasn t moved or made noise for more than 5 minutes Cleaning the Print Head If your printouts are unexpectedly light or faint colors are missing or dots or lines are missing out of place or broken you may need to clean the print head This unclogs the nozzles so they can deliver ink properly Print head cleaning uses ink so clean it only if quality declines When you do...

Страница 9: ...pes 1 Turn on the printer and load a sheet of letter size plain paper 2 Windows Right click the printer icon on your taskbar in the lower right corner of your screen and select Print Head Alignment Macintosh OS 8 6 to 9 x Choose File Page Setup or Print Click the Utility button then click the Print Head Alignment button Macintosh OS X Open the Applications folder and select EPSON Printer Utility S...

Страница 10: ...inter level as you transport it After moving the printer remove the tape securing the print head before turning on the printer If print quality is poor clean the print head see page 8 if output is misaligned align the print head as described in the previous section Related Documentation CPD 14526 EPSON Stylus Photo 825 Printer Basics CPD 14525 EPSON Stylus Photo 825 Start Here CPD 14524 EPSON Styl...

Отзывы: