23
EN
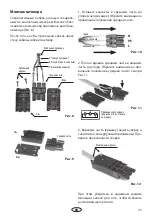
Fig. 8
Connection plug assembly
The connection cable is fitted with a 3-pole con-
nection plug. The plug is supplied disassembled
to facilitate cable installation (Fig. 8)
After you have installed the cable, assemble the
connection plug as described below.
cable to radiator
cover
Cover with screws
bottom
Bottom
middle part
Middle part
„N“ wire (blue)
„Gr“ wire (yellow-green)
„L“ wire (brown)
mounting
screws
1. Insert the three contacts into the three corre-
sponding holes of the middle part firmly until
they snap in. Pay attention to the correct posi-
tion of the L, N and Gr wires.
N
Gr
L
blue
brown
yellow-green
Fig. 9
Fig. 10
Correct orien-
tation of the
middle part
2. Press the middle part firmly into the bottom
part until it snaps in. Pay attention to the cor-
rect orientation of the middle part - see Fig. 11.
3. Place the top cover on the plug and secure it
with 2 screws. Double check the assembly.
Fig. 12
mounting screws
Fig. 11
Make sure that the cable sheath is reliably se-
cured for a proper stain relief of the connector.
Содержание VITAE
Страница 2: ...2 Deutsch 3 English 15 27...
Страница 27: ...27 RU 28 30 31 32 32 35 33 33 34 35 36 36 37 38 ASB 38...
Страница 28: ...28 RU...
Страница 29: ...29 RU 8 230V50Hz EU 60335 2 53 VDE 0700 53...
Страница 30: ...30 RU 3 5...
Страница 32: ...32 RU 1 3 5 2 4 7 9 6 8 5 9 94 4396 94 2046 2 2b 3 5 1 3500 750 4 9 3 5 3b 2 2b 2 5 944396 944960 942046 3500...
Страница 33: ...33 RU 3 3 750 50 350 500 15 4 94 4954 9 min 50 cm min 7 cm IR Emitter Vitae min 15 cm min 9 cm 7 50 9 4 4 6...
Страница 35: ...35 RU 8 3 8 N PE L 1 N PE L 9 10 2 11 3 2 12 11...
Страница 36: ...36 RU 5 4...
Страница 38: ...38 RU ASB I II III IV V VI 24 06 2015...

