Entrust Artista CR875 Скачать руководство пользователя страница 25

CR825 and CE875 Instant Issuance System Installation and Administrator’s Guide

15


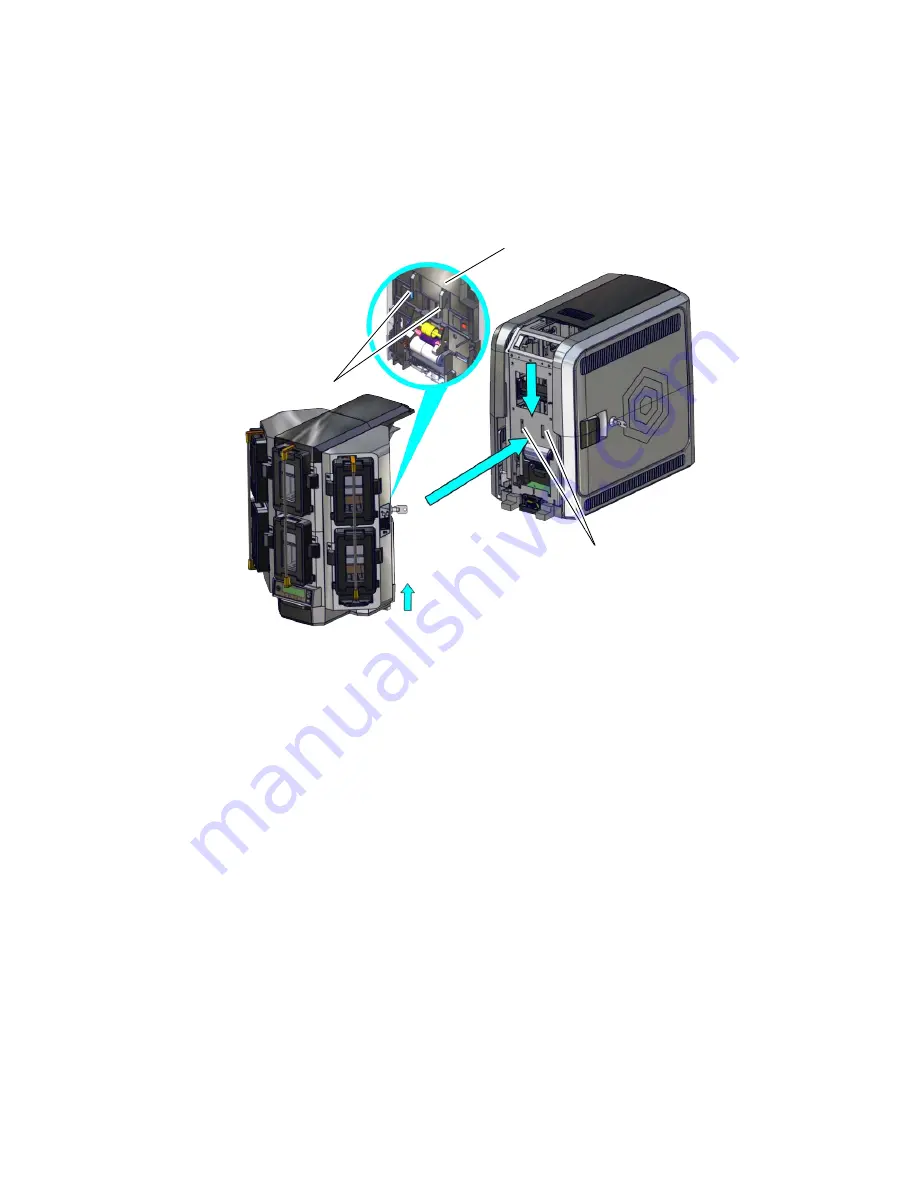
Assemble the Multi-Hopper Printer

1. 

Match the two large hooks on the back center of the multi-hopper with the two slots on the 
printer frame.


2. 

Lift the multi-hopper approximately one inch (25.4 mm) and push it in slightly to engage the 
hooks into the frame.

3. 

Push down to secure the multi-hopper to the printer.

Multi-Hopper 

Attachment Hooks

Multi-Hopper 

Back

Hopper Attachment 

Slots

1 in.

(25.4 mm)

Содержание Artista CR875

Страница 1: ...April 2021 527748 001 Rev G Installation and Administrator s Guide Entrust Artista CR825 Instant Inssuance System Entrust Artista CR875 Instant Inssuance System...

Страница 2: ...orporation in the United States and other countries MasterCard is a registered trademark of MasterCard International Incorporated Visa is a registered trademark of Visa International Service Associati...

Страница 3: ...t branding B August 2017 Added new cleaning procedures and multi hopper support C September 2017 Updated multi hopper information D July 2018 Added modular single hopper support and general updates E...

Страница 4: ...iv...

Страница 5: ...10 Use the Bolt Down Openings 11 Install the Multi Hopper 13 Unpack the Multi Hopper 13 Prepare the Multi Hopper 14 Assemble the Multi Hopper Printer 15 Plug In and Power On the Printer 16 Activate th...

Страница 6: ...hat Affect Bar Codes 46 Apply a Second Layer of Retransfer Film 47 Non Printing Areas 48 Standard Magnetic Stripe Non Printing Area 49 Standard Smart Card Non Printing Area 49 Custom Non Printing Area...

Страница 7: ...74 Behavior 76 VitalProductData 79 FrontPanel 80 Print 81 Pick 83 Transport 84 VertTransport 84 Flipper 85 BarcodeReader 86 CardStock 87 HeatRoller 90 Retransfer 91 Debower 92 SmartCard 92 MagStripeG...

Страница 8: ...114 Card Size 114 Card Material 114 Card Surface Finish 114 Card Irregularities 114 Card Die Cutting 115 Card Handling 115 Card Storage 116 Cleaning Supplies 116 Replacement Parts 117 Ink Ribbon Cartr...

Страница 9: ...e the Embosser Bolt Down Openings A 8 Use the Embosser Cable Lock A 10 Assemble the Printer and Embosser A 11 Connect the Power Cords A 12 Connect the System to the Network A 12 Load Embosser Supplies...

Страница 10: ...x...

Страница 11: ...em administrator to determine the optimum location for card production PC Requirements Use a PC that meets or exceeds the following A 32 or 64 bit processor running at 2 GHz or faster 4 GB or more mem...

Страница 12: ...following 1Gbase T 1 gigabyte per second or 100base T 100 megabits per second An Ethernet cable to connect the printer to the network An Ethernet cable is not supplied with the printer A PC that meets...

Страница 13: ...he equipment Place the printer on a sturdy level surface Place the printer away from direct sunlight Do not place the printer near heating ducts fans or other air vents Do not use the printer for purp...

Страница 14: ...4 Printer Installation Multi Hopper Printer 13 4 in 340 mm 16 2 in 411 mm 25 6 in 651 mm...

Страница 15: ...additional clearance around the system to maintain access to the power cord and data cables and to allow you to load and remove cards and supplies Single Hopper Printer Multi Hopper Printer Options su...

Страница 16: ...hat are warmer than the recommended temperatures can cause cards to warp and retransfer film errors Storage Environment If you are storing the printer for an extended length of time remove the ink rib...

Страница 17: ...our system administrator or your service provider If your card production site requires secure printing use the following An Entrust Datacard CR825 instant issuance system with secure printing DPCL2Se...

Страница 18: ...pper This allows you to install the multi hopper with six input hoppers each with a 125 card capacity An optional 125 card output hopper also is available and can be installed without tools on single...

Страница 19: ...nts described in Site Requirements on page 3 If the printer is ordered with the optional multi hopper the printer is shipped without an input hopper The multi hopper is shipped separately from the pri...

Страница 20: ...e T bar of the cable lock 1 Prepare the printer by installing the metal security plate a Tip the printer on its right side b Locate the security plate receptacle on the underside of the printer toward...

Страница 21: ...upplies The bolt down kit part no 512969 001 contains two M6 well nuts Two M6 6 mm screws purchased separately The length of the screws you need depends on the thickness of the mounting surface The sc...

Страница 22: ...over the holes that are drilled in the mounting surface 5 Secure the printer to the mounting surface a Place a flat washer on each of the screws beneath the mounting surface b Insert the M6 screws thr...

Страница 23: ...and Administrator s Guide 13 Install the Multi Hopper Use the following information if you purchased the optional multi hopper Unpack the Multi Hopper 1 Remove the multi hopper from the shipping carto...

Страница 24: ...emove it from the enclosure transition Pull the bottom pin straight down from the multi hopper The bottom pin includes a spacer 2 Rotate the enclosure transition 90 so that it aligns with the top of t...

Страница 25: ...hooks on the back center of the multi hopper with the two slots on the printer frame 2 Lift the multi hopper approximately one inch 25 4 mm and push it in slightly to engage the hooks into the frame 3...

Страница 26: ...into the facility power source The front panel of the printer provides the controls you need to operate the system Refer to the printer s User s Guide for complete information about using the front p...

Страница 27: ...ort at 1 800 328 3996 Do this before starting the activation process Have the printer serial number ready for phone confirmation The serial number is located on the configuration label of the printer...

Страница 28: ...plays on line 2 of the LCD panel c Press ENTER to enter the Enable menu 3 Enter the activation code a Press the up and down arrow keys to cycle through the numeric characters Press ENTER to select eac...

Страница 29: ...ard through the newly installed printer to remove any dust that might have collected during shipping or storage 1 Open the ink ribbon container and remove the isopropanol cleaning card package 2 Open...

Страница 30: ...card appears bowed insert it as shown 5 Close and lock the input hopper 6 Continue with Start the Cleaning Cycle on page 21 Multi Hopper Printer 1 Power on the printer if necessary 2 Pull out the mult...

Страница 31: ...ine 2 of the LCD panel Press ENTER to enter the Cleaning Card menu 5 Isopropanol displays on line 2 of the LCD panel Press ENTER to select the isopropanol cleaning card 6 Start displays on line 2 of t...

Страница 32: ...nk Ribbon The printer uses the ink ribbon to print the card images onto the retransfer film Do the following to load the ink ribbon 1 Unlock the printer if necessary and open the printer access door 2...

Страница 33: ...rect side of the cartridge b Route the ink ribbon around the rollers on the cartridge A diagram on the cartridge shows the correct routing pattern c Slide the empty silver take up spool onto the cartr...

Страница 34: ...nter The printer ships with the cleaning spindle in the accessories box 1 Load the cleaning sleeve a Remove the cleaning spindle from the accessories box b Remove the cleaning sleeve from the ribbon p...

Страница 35: ...in the printer 4 Continue with Install the Retransfer Film Install the Retransfer Film The retransfer film contains the images printed with the ink ribbon A heated roller then bonds the film onto the...

Страница 36: ...dge until it clicks into place The supply roll can go on only one way and fits only on the correct side of the cartridge b Route the film around the rollers on the cartridge A diagram on the cartridge...

Страница 37: ...by Entrust Cards can stick together Slide or fan the cards to separate the edges before placing them in the input hopper Insert ISO magnetic stripe cards with the stripe back side facing down and to t...

Страница 38: ...he card weight so that it is lowered on top of the cards 8 Follow step 3 through step 7 to load cards into each input hopper cartridge 9 Rotate all the lock bars back into position 10 Slide the lock b...

Страница 39: ...utput hopper that holds up to 125 cards The large output hopper consists of a 125 card replacement hopper and an extended pedestal base Do the following to install the large output hopper 1 Remove the...

Страница 40: ...30 Printer Installation 3 Insert the 125 card output hopper into the printer and pedestal until it clicks into place 4 Follow the instructions included in the upgrade kit to complete the installation...

Страница 41: ...cable is not supplied with the system 1 Connect one end of the Ethernet cable to the network connection port on the printer 2 Connect the other end to a network port 3 Refer to Set a Static IP Address...

Страница 42: ...hen the printer is powered off Instant Financial Issuance software requires that the printer use a static IP address Refer to Set a Static IP Address Set a Static IP Address Instant Financial Issuance...

Страница 43: ...ys on line 2 d Press ENTER to enter the Configuration menu e Press ENTER to enter the Network IPv4 menu DHCP Static IP displays on line 2 f Press ENTER to select an address method g Press the up or do...

Страница 44: ...The next section of the address entry Subnet Mask or Gateway Address displays on line 2 of the LCD panel b Repeat step a i through ii to enter the subnet mask and gateway address 4 Press ENTER when yo...

Страница 45: ...communicate using the static IP address and to test that the printer is functioning correctly You might use this procedure if you set up multiple printers in a central location before installing them...

Страница 46: ...36 Printer Installation 4 On the Local Area Connection Properties dialog box select Internet Protocol Version 4 TCP IPv4 Click Properties...

Страница 47: ...e front panel of the printer c When you finish entering values for IP address subnet mask and gateway address click OK 6 Test the printer to verify that it can communicate with the computer using the...

Страница 48: ...nstall Supplies on page 22 for complete information 1 Begin with the printer Ready The USER button shows steady green 2 Press the USER button to display Suspended on line 1 of the LCD panel 3 Press EN...

Страница 49: ...inancial Issuance software Define the printer to Instant Financial Issuance Administrator Refer to the Card Printers in Adaptive Issuance Instant Financial Issuance Software Setup Guide for more infor...

Страница 50: ...40 Printer Installation...

Страница 51: ...art Card Processing on page 54 Embossing and Indenting Design on page 56 Settings for Card Design in Printer Manager on page 56 Basic Card Design Card design includes Color and monochrome printing The...

Страница 52: ...he card in the reverse order that they were applied to the retransfer film The primer which is applied last to the retransfer film is applied first to the card and allows the image layers to bond to t...

Страница 53: ...as black normally print with the K panel Because the printer is pigment based the black panel is used to darken other colors in addition to printing any black elements The black ink is beneath the col...

Страница 54: ...he black panel Full color print ribbon also prints any monochrome or one bit per pixel graphics using the K panel Print Text in Monochrome Printing text using a K panel can make text look crisp becaus...

Страница 55: ...e bar code Bar Code Guidelines Bar codes print more successfully when you observe the following guidelines Follow the standards for the type of bar code you are printing Bar Code Placement Maintain th...

Страница 56: ...ds from the beginning middle and end of the batch Use exactly the same card stock for testing that you use for production The card stock can affect the readability of bar codes Usually a white surface...

Страница 57: ...sfer film layer must be requested by Instant Financial Issuance software when it sends the card to the printer Refer to your Instant Financial Issuance documentation for more information You cannot ap...

Страница 58: ...ting areas automatically If necessary you can use the measurements provided in the following sections to customize your non printing areas Print several cards using your card design and application to...

Страница 59: ...The following table shows the measurements for a typical smart card chip The smart card chip can vary in size shape and location Adjust these values based on the card stock you use The retransfer fil...

Страница 60: ...ith no unprinted margins The following illustration shows the image that is sent to the printer Size pixels Description Image 2100 x 1344 The size of the 600 dpi image that is sent to the printer Film...

Страница 61: ...as Image Placement Use the following suggestions to help you place important images such as a photo logo or bar code When placing images avoid areas of high wear Do not place an important image on the...

Страница 62: ...format for each track or can use a different combination of tracks and data formats Three Track Option ISO IAT The default data formats for a three track magnetic stripe option are Track 1 IATA Track...

Страница 63: ...l characters _ A PC running a Japanese edition of a supported Windows operating system also supports Japanese language special characters and 55 Katakana characters They include the following Special...

Страница 64: ...zation The smart card step of personalization is controlled by an application that is separate from the rest of card personalization The smart card reader can be factory installed or installed later a...

Страница 65: ...ppropriate interface installed Single Wire Smart Card Single wire smart card processing allows a single USB or Ethernet connection with the printer to carry data for both smart card personalization an...

Страница 66: ...characters is to create the Bank Identification Number BIN and Card Security Code CSC sometimes called the Card Verification Value CVV on financial credit and debit cards Indent ribbon is available in...

Страница 67: ...CR825 and CE875 Instant Issuance System Installation and Administrator s Guide 57...

Страница 68: ...58 Elements of Card Design...

Страница 69: ...information about the printer System administrators and service providers can use Printer Manager to fine tune card appearance set advanced options and troubleshoot printing problems You can access Pr...

Страница 70: ...Setting Maintenance and Log Out WebAdmin WebAdmin access allows an administrator to make minor adjustments to the printer The WebAdmin user has access to configuration options and the use of diagnosti...

Страница 71: ...er on the PC and enter the IP address using the following format https xxx xxx xxx xxx For example https 123 12 3 123 3 When the Printer Manager Log In screen displays select the language in which to...

Страница 72: ...t Current saves any changed settings on the displayed page When you change a value and click Set Current the printer uses the new settings If you exit a page without clicking Set Current your changes...

Страница 73: ...that are available to WebUser and WebAdmin access level users For information about settings available to the WebService access level contact your service provider The options available in Printer Ma...

Страница 74: ...umbers and version numbers Print this page for reference if you need to contact your service provider View View Printer Status Display printer status information including the printer mode the printer...

Страница 75: ...or all the counters and can be useful to track card production activity and problem history View View Adapters Display information about the IP address configured for the printer The page shows the IP...

Страница 76: ...dress method used by the printer including Cloud communication if it is enabled No Change all Current Values ActivityLog Set values in the activity log to help isolate card production issues No Change...

Страница 77: ...SpeedMM View only TransMedSpeedMM Change other Current Values VertTransport Display the speed at which the vertical transport motor runs when clearing errors No View VertTransMedSpeed Flipper Set the...

Страница 78: ...etic stripe values for track 1 No Change all Current Values MagStripeCustomTrack2 Set customized magnetic stripe values for track 2 No Change all Current Values MagStripeCustomTrack3 Set customized ma...

Страница 79: ...ate passwords for the WebUser and WebAdmin access levels No Change WebUser and WebAdmin passwords Set Job Queue State Enter values for shipping the printer to a repair facility or when securing the pr...

Страница 80: ...dMQTTSocks5Host 6 CloudMQTTSocks5Password 7 CloudMQTTSocks5Port 3301 3301 1 65535 8 CloudMQTTSocks5Username 9 CloudMQTTTemporaryURI 10 EthAddressMethod DHCP DHCP 11 EthDnsAddress1 0 0 0 0 0 0 0 0 12 E...

Страница 81: ...password for the Socks5 proxy server CloudMQTTSocks5Port Enter the port number for the Socks5 proxy server CloudMQTTSocks5Username Enter the account name for the Socks5 proxy server CloudMQTTTemporary...

Страница 82: ...nly DualStack The printer can use both IPv4 and IPv6 addressing The remaining IPv6 settings become applicable when IPMode is set to DualStack IPv6DefaultGateway Set a default gateway address This sett...

Страница 83: ...ation specified for the printer is retained but is not used IPv6StatelessAddrSelect Enable the printer to allow the router to provide one or more network prefixes used for stateless automatic address...

Страница 84: ...igChanges Write configuration change actions with the specified severity and higher to the activity log FilterJobStates Write changes to the state of a print or exception job with the specified severi...

Страница 85: ...terJobStates status recorded in the activity log to help isolate a card production problem 1 Select Printer Setting Activity Log 2 Set FilterJobStates to Error from the drop down list Changes to the s...

Страница 86: ...ntactlessATRMode Legacy Legacy 6 DoorCloseLockTimeout 5 5 0 15 7 DPCL Enabled Enabled 8 DPCL2 Enabled Enabled 9 DPCL2Secure Enabled Enabled 10 DPCLSecure Enabled Enabled 11 Plugin Enabled Disabled 12...

Страница 87: ...s Allows the smart card application to control the ATR mode DoorCloseLockTimeout The number of seconds after all printer doors are closed before the printer is locked The timeout period starts when al...

Страница 88: ...e mode used by an application for the smart card reader You can select from the following options Direct The application allocates the smart card reader for its private use and controls it directly No...

Страница 89: ...smart card readers WebServerSecure Enable or disable access to Printer Manager the web server through the secure port VitalProductData The VitalProductData settings allow WebService access level user...

Страница 90: ...cked Best practices recommend that you clean the printer each time you change the ink ribbon or more often depending on your environment or if the print quality diminishes LedPrintheadCyclesToCleaning...

Страница 91: ...ings allow you to restore the color management profile used by the printer after an upgrade to that used by an earlier firmware version As future firmware versions are released additional emulation ve...

Страница 92: ...end of a print job Possible values are Original The retransfer film index mark is positioned so that it does not block the film sensor StopOnIndexMark The retransfer film index mark is positioned so t...

Страница 93: ...atchWarnings Specify if a warning message displays if the card stock is not compatible with the primerless ribbon Primerless ribbon should only be used with PVC or composite cards Possible values are...

Страница 94: ...empts to eject the card FinalEjectSpeed Select the speed at which to eject cards Possible values are Normal The speed used to eject a card is 125 motor steps second This is the default value specified...

Страница 95: ...t are allowed in the reject tray before an error is issued Change the setting as needed and then click Set Current to apply the change RejectHopperCapacity The number of cards allowed in the printer r...

Страница 96: ...rcodeMM The distance in millimeters from the leading edge of the card to the beginning of the bar code The printer uses this value to position the card so the bar code is within the imaging area Enter...

Страница 97: ...ck1 Hopper 1 6 CardStockLoaded CardStock1 ImpressDepthOffset 0 9 0 0 2000 2000 ImpressDwellTimeOffset 0 9 0 0 1000 1000 ImpressTemperatureOffset 0 9 0 0 200 200 RetransferCoolTime 0 0 0 10000 Retransf...

Страница 98: ...card if the card design includes inhibitor or smart card programming The setting applies to the card stock specified in CardStockDisplayed ExceptionCardStockLoaded The card stock that will be inserted...

Страница 99: ...when a ribbon without a primer P panel is installed in the printer The primerless ribbon requires a compatible retransfer film and is supported only for PVC or composite card stock V2RetransferLamina...

Страница 100: ...tes of printer idle time before the heated roller is turned off After waiting the specified number of minutes the roller is allowed to cool down A value of 0 allows the roller to start cooling down im...

Страница 101: ...seconds the card remains in the printer before it is moved into the laminator This allows the card time to cool before moving into the laminator This setting applies only to systems with a laminator R...

Страница 102: ...fter the image has been transferred to the card Debower settings are available for WebService access level users only Contact your service provider for assistance if you need to change the printer s d...

Страница 103: ...Current Value unit Allowed Range 1 Attempts 3 3 1 5 2 Coercivity HICO HICO 3 DataFormat1 IATA IATA 4 DataFormat2 ABA ABA 5 DataFormat3 TTS TTS 6 NoDataDisableTrack Disabled Disabled 7 ReadTrack1 Enabl...

Страница 104: ...are HICO LOCO NTT1 NTT2 NTT3 DataFormat 1 2 3 Specify the names of the data formats used for tracks 1 2 and 3 For single track magnetic stripe encoding set DataFormat3 to JIS and DataFormat1 and DataF...

Страница 105: ...95 Tracks 2 3 63 95 63 0 255 2 CustomCharLength Track 1 6 Tracks 2 3 4 6 4 1 8 3 CustomCharLow Track 1 32 Tracks 2 3 48 32 48 0 255 4 CustomCharMask Track 1 32 Track 2 48 32 48 0 255 5 CustomCharMax T...

Страница 106: ...f magnetic stripe media for the track also called bits per inch or bpi Allowed values are 75 bpi or 210 bpi CustomEndSentinel Specify the last character encoded which identifies the end of encoded dat...

Страница 107: ...he Emboss settings let you specify values when using an embossing system 1 Enter a value within the allowable range in the Current Value column RegistrationXDist The distance at which the card is regi...

Страница 108: ...lays in the Printer Setting menu only when a multi hopper is attached to the printer The WifiNetworkStationSetup option displays in the Printer Setting menu only when a Wi Fi Dongle is installed in th...

Страница 109: ...the static IP address for the printer WifiSubnetMask Enter the subnet mask for the Wi Fi network WifiDnsAddress1 WifiDnsAddress2 WifiDnsSearchSuffix These settings are not used at this time WifiMacAdd...

Страница 110: ...The WifiModes option displays in the Printer Setting menu only when a Wi Fi Dongle is installed in the printer Set the WifiModes values after you enter the settings in WifiNetworkStationSetup The pri...

Страница 111: ...tering the correct country code provides the optimum performance The following regions are supported Country Symbol Country Symbol Austria AT Italy IT Belgium BE Latvia LV Bulgaria BG Lithuania LT Can...

Страница 112: ...nter the current password If a current password is not set leave this field blank 3 Enter the new password in the corresponding field To remove a password leave this field blank 4 Enter the new passwo...

Страница 113: ...te to apply the changes This setting is used primarily for financial printers Contact your service provider for more information Field Value Description Current Password Enter the currently set passwo...

Страница 114: ...a magnetic stripe module view and print the activity log reset the log reset counters and reset the printer TroubleShooting Menu Option Function WebUser WebAdmin SSA Test Calculate the location of the...

Страница 115: ...you request service 1 Click Download to save the activity log information 2 Enter a location on your PC to save the file 3 Save and send the activity log to your service provider when you request serv...

Страница 116: ...ory Click Download and specify a location to save the audit log The Audit Log data is saved as a txt file that you can view or print Reset Log The Reset Log option allows a WebAdmin access level user...

Страница 117: ...d Refer to the printer s User s Guide for complete information about cleaning the printer Clean the Printer 1 Unlock the printer 2 Remove the ink ribbon and retransfer film cartridges and the cleaning...

Страница 118: ...he printer several times and ejects it in the output hopper or places it in the card reject tray 9 Unlock the printer 10 Remove the used cleaning card 11 Replace the cards in the input hopper 12 Insta...

Страница 119: ...the printer To upload a settings file 1 Click Browse and select the file to upload 2 Click Upload File Log Out Menu Use the Log Out option to end the current Printer Manager session and return to the...

Страница 120: ...110 Printer Manager...

Страница 121: ...h your printer This chapter includes the following information Printer Supplies on page 112 Cards on page 114 Cleaning Supplies on page 116 Replacement Parts on page 117 Optional Equipment on page 117...

Страница 122: ...ew ink ribbon Refer to the printer s User s Guide for complete information about cleaning the printer The following ink ribbons are available Retransfer Film The following retransfer film is available...

Страница 123: ...tore supplies near heating ducts or blowers The supplies maintain their quality for about one year For optimal card quality purchase and store quantities that you can use in less than a year The ink r...

Страница 124: ...y work the best Print quality may suffer on cards with a matte finish Card Irregularities The heated roller must not lose close contact with the card and retransfer film for proper transfer to the car...

Страница 125: ...hey need to load the cards in the correct orientation into the card printer For additional information about card stock guidelines refer to the Card Stock Requirements Guide Card Handling These guidel...

Страница 126: ...ults keep additional cleaning supplies available The following cleaning supplies are available Supply Part No Description Isopropanol cleaning cards 552141 002 Pack of 10 double sided isopropanol clea...

Страница 127: ...ndle The cleaning spindle holds the replaceable cleaning sleeve Optional Equipment Large Output Hopper The printer can be used with a large output hopper which holds about 125 cards You can replace th...

Страница 128: ...se a standard Ethernet network cable either a Cat 5 or Cat 5e cable to connect the printer to a network port Printer Power Supply The printer power supply is rated as follows Input 110 240V 50 60Hz 1...

Страница 129: ...facility power Be sure to use power cords that ground to the facility power source The following country specific power cords are available USA Power cord Australia power cord Brazil power cord China...

Страница 130: ...120 Supplies and Parts...

Страница 131: ...characters on the card The embosser creates the raised lettering and numbering on the front and back of most financial or debit cards The embosser can contain an embossing wheel and topping and inden...

Страница 132: ...e for the system and for clearance around the system Use the following system dimensions and clearance area System Dimensions The external system dimensions are shown in the following illustrations Si...

Страница 133: ...CR825 and CE875 Instant Issuance System Installation and Administrator s Guide A 3 Multi Hopper System 15 0 in 381 mm 26 6 in 675 mm 26 8 in 681 mm...

Страница 134: ...access doors are open and the power cord is connected We recommend that you provide at least 3 inches 76 2 mm of additional clearance around the system to maintain access to the power cords and data c...

Страница 135: ...r supply is rated as follows The power supply detects the input voltage and works within the stated range System Component Electrical Requirements Input Output Printer 85 230VAC 47 63 Hz 1 2Amp 24V 6...

Страница 136: ...bosser from the carton and remove the foam end caps 3 Place the embosser on a surface that meets the requirements specified in Site Requirements on page A 2 Refer to Unpack the Printer on page 9 for i...

Страница 137: ...pping foil cartridges 3 Remove the foam T and block inserts used to secure the topping and transport mechanisms during shipping Save the inserts in case you need to repack the embosser for transport 4...

Страница 138: ...ckness inch 20 mm Bolt length maximum is surface thickness 1 inch 30 mm Two 5 8 inch 18 mm outer diameter washers Two 1 4 inch 6 mm nuts Lock nuts are recommended a Drill holes in the mounting surface...

Страница 139: ...CR825 and CE875 Instant Issuance System Installation and Administrator s Guide A 9...

Страница 140: ...ate receptacle at the back of the embosser 2 Insert the security plate vertically into the receptacle from below the embosser with the open end toward the embosser 3 Insert the T bar of the cable lock...

Страница 141: ...ng lock in the unlocked position 3 Lift the printer over the embosser and align the pins on the embosser with the holes on the underside of the printer 4 Press down on the printer carefully but firmly...

Страница 142: ...g the power supply cord into the power outlet 3 Connect the embosser power cord to the embosser and to the embosser power supply 4 Plug the power supply cord into the power outlet Connect the System t...

Страница 143: ...t roll a Open the embosser supplies access door and remove the indent ribbon cartridge from the embosser if necessary The indent ribbon cartridge is on the right as you face the open embosser b Place...

Страница 144: ...into the spindle a Match the keyed pattern of the take up spool hub with the right side spindle b Push the take up spool into the spindle until it clicks securely into place 6 Turn the take up spool...

Страница 145: ...package 2 Secure the supply spool into the spindle a Match the keyed pattern of the blue supply spool hub with the right side spindle b Push the supply spool into the spindle until it clicks securely...

Страница 146: ...in until it clicks and stops 7 Close and lock the embosser supplies access door Power On the System Press the power button on the front panel of the printer to power on the system The printer and embo...

Страница 147: ...er card the font size and the print length Topping Foil The following topping foils are available Indent Ribbon Part No Description Ribbon Black 504461 001 Up to 900 7 character cards per roll Yield c...

Страница 148: ...ake cards Choose a location away from direct sunlight with a temperature between 32 and 77 F 0 and 25 C A humidity range from 40 to 60 non condensing is recommended Keep supply rolls at room temperatu...

Страница 149: ...ge holds the indent ribbon Topping Foil Cartridge The topping foil cartridge holds the topping foil used on the embossed characters Embosser Power Supply The embosser power supply is rated as follows...

Страница 150: ...A 20 CE875 Instant Issuance System...

Отзывы: