background image

www.ensembledesigns.com

Page 60

BrightEye NXT 450 Clean Streaming Router 

             Installation, Configuration and Operations Guide

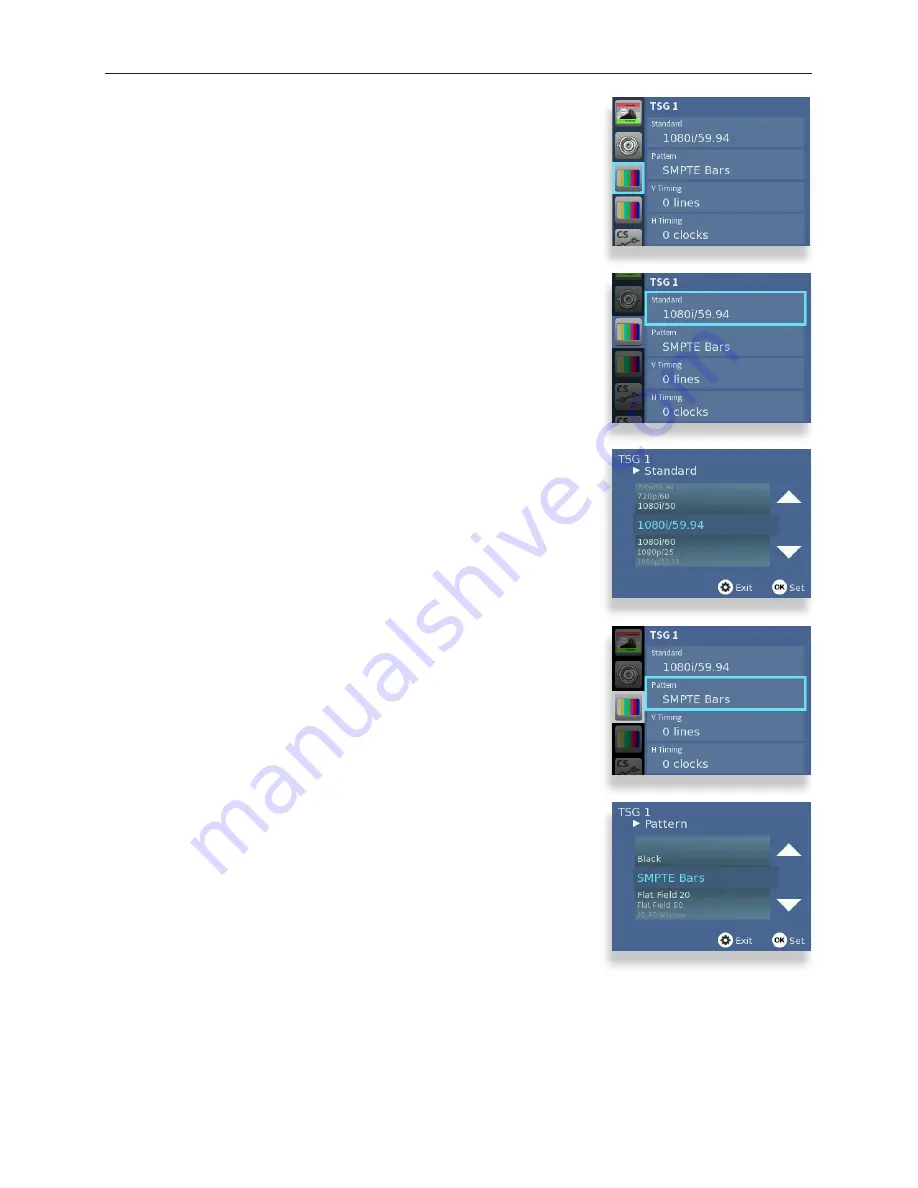
To Select the TSG Standard

1.  Press the Configuration button. The top level menus display. 

2.  Use the up or down arrow buttons to select the top level menu for 

TSG1 or TSG2. 

3.  Press the right arrow button (or OK) to highlight the Standard 

submenu. 

4.  Press the right arrow button (or OK) to go to the Standard selection 

submenu. 

5.  Press the up or down arrow buttons to select the Standard you 

want to use. 

6.  Press OK to set your Standard selection, or press the Configuration 

button to cancel your selection. 

7.  Press the Configuration button to back out of the menu one 

level at a time. Or wait approximately 30 seconds until the screen 
automatically returns to Operational mode.  

The BrightEye NXT 450 uses the video format selection of the Primary 
Test Signal Generator to determine two system-wide parameters—
System Frame Rate, and Vertical Interval Switch Point. 

To Select the TSG Pattern

1.  Press the Configuration button. The top level menus display. 

2.  Use the up or down arrow buttons to select the top level menu for 

TSG1 or TSG2. 

3.  Press the right arrow button (or OK) to access the top level of the 

submenus. 

4.  Use the up or down arrow buttons to highlight the Pattern 

submenu. 

5.  Press the right arrow buton (or OK) to go to the Pattern selection 

submenu. 

6.  Press the up or down arrow buttons to select the Pattern you want 

to use. 

7.  Press OK to set your Pattern selection, or press the Configuration 

button to cancel your selection. 

8.  Press the Configuration button to back out of the menu one 

level at a time. Or wait approximately 30 seconds until the screen 
automatically returns to Operational mode. 

Содержание BrightEye NXT 450

Страница 1: ...Revision 1 1 SW v2 0 9 BrightEye NXT 450 Clean Streaming Router Installation Configuration and Operations Guide...

Страница 2: ...business and we re here to stay Bricks and Mortar of Your Facility The bricks and mortar of a facility include pieces like up downconverters audio embedders video converters routers protection switche...

Страница 3: ...nal Resources 17 Chapter 2 System Overview 18 In this Chapter 18 Features 19 High Quality High Profile MPEG Encoder Decoder 19 IP and DVB ASI Streaming Connections 19 Assignable I O and Flexible Archi...

Страница 4: ...ng Cables to Ports 30 Connecting a Reference If Needed 30 Connecting Ethernet for Web Control Points 31 Connecting Ethernet for GigE Streaming Media I O Port 31 RS 232 Interface Option 31 Connecting t...

Страница 5: ...initions of Port Configuration Types 41 Unassigned 41 Source 41 Destination 41 Follow 41 Primary TSG TSG 1 42 Secondary TSG TSG 2 42 Port Configuration Choices Available According to Port Type 42 For...

Страница 6: ...m the Front Panel 51 To Assign a Clean Switch to a Destination 51 To Set the Output Standard 51 To Set the Output Timing for Clean Switches 52 To Set the Audio Enables for Clean Switches 52 To Set Aud...

Страница 7: ...al Test Signal Generators from the Web Interface 66 To Select the TSG Standard 67 To Select the TSG Pattern 67 To Set the Vertical and Horizontal Timing 68 To Configure Audio Embedding 68 To Configure...

Страница 8: ...the Decoding Menus are Organized 84 Configuring Decoding from the Front Panel Menus 85 Specifying the Decoder Input 85 Configuring the Unicast Receive Port 85 Configuring the Multicast IP Address 86...

Страница 9: ...ol Point 102 Approving Pending Authorizations 102 Number of Control Points That Can Operate Simultaneously 103 Asymmetrical Bandwidth Requirements 103 Best Practice Closing Web Browser Control Points...

Страница 10: ...tion Settings 120 To Upload Configuration Settings 120 Chapter 5 Operations and Step by Step Procedures 121 In this Chapter 121 Encoding Decoding and Routing 121 Routing an SDI Signal to the Encoder 1...

Страница 11: ...d Action Control Panel 127 To Perform a Direct Take 127 To Exit Direct Take Mode 127 Accessing Ancillary Data with the Router and Action Control Panel 127 To Access Ancillary Data 127 Operations Using...

Страница 12: ...External Control 135 The BrightEye NXT 450 s Approach to Control Integration 135 RS 232 Interface Option 135 9 Pin D Connector Pin Out 135 Router and Action Control Panel 5835 GPI Inputs 135 Supported...

Страница 13: ...Browsers 161 Troubleshooting the Router and Action Control Panel 5835 162 Router and Action Control Panel has Lost its Connection to the Router 162 Rebooting the Router and Action Control Panel 162 Re...

Страница 14: ...ing ports working with clean switches audio level adjustments audio channel mapping setting up timing and genlock configuring internal test signal generators configuring encoding streaming and decodin...

Страница 15: ...system how they work together and the practical aspects of working with the unit to meet your facility s needs Use the Contents and the Preface to quickly link to a specific chapter or topic Intended...

Страница 16: ...erning the unit s architecture and capabilities Click the image to link to the video on the Ensemble Designs web site Click the image to link to the video on the Ensemble Designs web site Overview Thi...

Страница 17: ...ture of the Encoder and Decoder of the BrightEye NXT 450 Clean Streaming Router Additional Resources In addition to this document please refer to the following additional resources BrightEye NXT 450 C...

Страница 18: ...High Profile MPEG Encoder Decoder IP and DVB ASI Streaming Connections Assignable I O and Flexible Architecture Instantaneous Clean Switching and Format Conversion Multiple Intuitive Control Options...

Страница 19: ...solution output simultaneously Any SDI input can be fed to the Encoder through the built in format converting Clean Switch allowing seamless switching or mixing between all inputs The independent Deco...

Страница 20: ...gnals Multiple Intuitive Control Options Control and configuration of the NXT 450 can be made from a variety of interfaces The front panel provides a full motion real time video display of sources and...

Страница 21: ...Guide Front Panel Controls The BrightEye NXT 450 s front panel is illustrated below Virtually all tasks can be performed from the front panel controls A limited number of additional tasks can be perf...

Страница 22: ...on and Operations Guide Rear Connectors The BrightEye NXT Clean Streaming Router s rear connectors are shown below RS 232 Interface Option If requested at the time of ordering the Clean Streaming Rout...

Страница 23: ...ation from the LCD display on the Router and Action Control Panel Being only 1 8 45mm deep it can be installed in very shallow positions Long Distance Capability Because each 5835 Router and Action Co...

Страница 24: ...ix Transitions Quiet Audio Switching SD HD 3G SDI DVB ASI Crosspoint Matrix Live Cam 1 Up Down Cross Conversion Clean Switch Cut Mix Transitions Quiet Audio Switching Streaming Media Port H 264 Encode...

Страница 25: ...Switch Cut Mix Transitions Quiet Audio Switching SD HD 3G SDI DVB ASI Crosspoint Matrix Live Cam 1 Up Down Cross Conversion Clean Switch Cut Mix Transitions Quiet Audio Switching Streaming Media Port...

Страница 26: ...onfigured from the front panel either as a Source or Destination Please see Configuring the Router s Ports from the Front Panel on page 43 and Configuring the Router s Ports from the Web Interface on...

Страница 27: ...nd Action shortcuts from your tablet or any web enabled device The 5835 Router and Action Control Panel is fully customizable to put exactly the right controls in front of operators Action Keys Action...

Страница 28: ...Production Van 1080i HD SDI High Res Multicast to Local Breakout Rooms DVI or VGA HD SDI House of Worship Application Simultaneously send your live service to an HDMI projector to the youth room and t...

Страница 29: ...or customer settings for quick recall University Stadium Sports Event Application Use the NXT 450 Clean Streaming Router for a combination of reception decoding up down cross converting switching and...

Страница 30: ...panel Air output occurs through the rear panel If placing the unit on a surface the four feet must be mounted on its base If mounted in a rack the unit must be installed in such a way that the air fl...

Страница 31: ...rs on your network The Control Network Ethernet port will auto sense cable direction so a cross over cable is not needed Connecting Ethernet for GigE Streaming Media I O Port Use CAT5 or CAT6 cabling...

Страница 32: ...onnection using PoE Power over Ethernet provided that you have a PoE enabled Ethernet switch to insert power into the Ethernet cables Long Distance Capability Because the Router and Action Control Pan...

Страница 33: ...on When combining them one appears higher on the button and the other appears lower To Place a Button Legend Inside a Control Panel Button 1 Pull a button off of the Control Panel by simply squeezing...

Страница 34: ...he GPI Inputs is made through the female 9 pin D Sub connector on the rear of the Router and Action Control Panel The pinout of this connector is organized as follows Pin Function 1 8 GPI Inputs 1 thr...

Страница 35: ...Clean Switches and Clean Switch Configuration Configuring Clean Switches from the Front Panel Configuring Clean Switches from the Web Interface Setting Up Timing and Genlock Working with the Internal...

Страница 36: ...ake Panel Brightness Audio Meters Meter Reference Level Peak Display Live Video On or Muted Ports Define ports according to port type edit port names adjust audio levels and audio mapping TSG1 Select...

Страница 37: ...utput format Unicast A Turn on or off select high or low resolution set the destination IP address the destination port TTL time to live packet size source port Unicast B Same set of controls as for U...

Страница 38: ...n menus Once in the configuration menus pressing the Configuration button backs out one level Pressing any operational button any button to the left of the screen will take you immediately from config...

Страница 39: ...gure slate text cyclops settings audio reference levels enable audio groups select tone frequencies of audio channels 1 16 Clean Switches Assign a clean switch to an output or to the encoder or decode...

Страница 40: ...shortcut button ASI Decoder destination SDI Encoder destination Output 5 destination Output 4 destination TSG 2 source TSG 1 source Encoder ASI source Decoder SDI source SFP 8 source Port 6 source Po...

Страница 41: ...ssigned For all Port Types A port can be set to Unassigned when it is not in use This will remove it from the list of Sources and Destinations that can be assigned to a Control Profile Source For Fixe...

Страница 42: ...tput port independently of any user control of the switching matrix Port Configuration Choices Available According to Port Type These three port types fixed input fixed output bi directional can be co...

Страница 43: ...rrow button to select the top level Ports menu 3 Press the right arrow button or OK to highlight the top Ports submenu 4 Press the up or down arrow buttons to select the Port you want to assign 5 Pres...

Страница 44: ...r input and per channel basis The BrightEye NXT Clean Streaming Router can apply gain or attenuation from 12 0 dB to 70 dB When the Clean Switch is in Mix mode the audio output will properly mix betwe...

Страница 45: ...g Port Input 1 suppose you needed to switch channels 1 and 2 with channels 3 and 4 on the outputs Using the Audio Map menu you can assign inputs 1 and 2 to outputs 3 and 4 and assign inputs 3 and 4 to...

Страница 46: ...ned a port it becomes available to include in a Profile It s fine to leave ports unassigned if you don t need to use them Giving ports descriptive names makes them easier to work with Port names displ...

Страница 47: ...vels click Done The Audio Level Gain menu closes and you will return to the main Ports page Adjusting Audio Levels When the signal is output through a Clean Switch you can adjust audio levels on a per...

Страница 48: ...4 and assign inputs 3 and 4 to outputs 1 and 2 This configuration is shown in the above screen capture on the right To Remap Audio Channels 1 From the Ports page of the web interface select the Audio...

Страница 49: ...d to Reference The Clean Switches are genlocked to the reference being used within the Router This ensures that the output is stable regardless of the input signal Not only does this ensure clean swit...

Страница 50: ...e line early compared to the output the frame sync will add only one line of delay But if the incoming video is just one line late the frame sync will add nearly an entire frame less one line to bring...

Страница 51: ...Press the right arrow button or OK to go to the Assignment selection submenu 5 Press the up or down arrow buttons to select the destination Port to which you want to assign the selected Clean Switch 6...

Страница 52: ...oximately 30 seconds until the screen automatically returns to Operational mode To Set the Audio Enables for Clean Switches The Clean Switch supports 16 channels four groups of embedded audio In order...

Страница 53: ...arrow buttons to navigate to the Audio Source menu 2 Press the right arrow button or OK to go to the Audio Source submenu 3 Use the up or down arrow buttons to select the audio source you want to desi...

Страница 54: ...nfiguration and Operations Guide Configuring Clean Switches from the Web Interface There are two sets of configuration controls one for each of the two Clean Switches Clean Switch 1 and Clean Switch 2...

Страница 55: ...e CS to another you must first release the original assignment by selecting Unassigned Output 4 Output 5 SDI Encoder ASI Decoder are the default selections available for Clean Switch assignment After...

Страница 56: ...ables for Clean Switches The Clean Switch supports 16 channels four groups of embedded audio In order for the Clean Switch output to have a consistent configuration of audio regardless of what is pres...

Страница 57: ...tely 30 seconds until the screen automatically returns to Operational mode The BrightEye NXT 450 uses the video format selection of the Primary Test Signal Generator to determine two system wide param...

Страница 58: ...xist 60 Hz The not quite 60 Hz challenges of the 59 94 world are addressed with this family which includes 24 Hz 30 Hz and 60 Hz field and frame rates Though not used for broadcast this family is usef...

Страница 59: ...e test signals internally the TSGs are available as sources in the Router without consuming a physical input BNC and can be selected to any output destination Source names can be assigned to them in t...

Страница 60: ...cally returns to Operational mode The BrightEye NXT 450 uses the video format selection of the Primary Test Signal Generator to determine two system wide parameters System Frame Rate and Vertical Inte...

Страница 61: ...e Configuration button to back out of the menu one level at a time Or wait approximately 30 seconds until the screen automatically returns to Operational mode To Set the TSG Horizontal Timing 1 Press...

Страница 62: ...me Or wait approximately 30 seconds until the screen automatically returns to Operational mode To Configure the TSG Slate Text 1 Press the Configuration button The top level menus display 2 Use the up...

Страница 63: ...n button to cancel your selection 8 Press the Configuration button to back out of the menu one level at a time Or wait approximately 30 seconds until the screen automatically returns to Operational mo...

Страница 64: ...4 Use the up or down arrow buttons to highlight the Audio Enables submenu 5 Press the right arrow button or OK to access the Audio Enables selection submenu 6 Press the right or left arrow buttons to...

Страница 65: ...n arrow buttons to highlight the Audio Channels submenu 5 Press the right arrow button or OK to access the Audio Channels selection submenu 6 Press the right or left arrow buttons to select a channel...

Страница 66: ...r each TSG for both the BrightEye NXT 450 front panel and the web interface These configurations are independent allowing the two generators to operate in different formats and even at different frame...

Страница 67: ...d which is incompatible with the System Frame Rate determined by the Primary TSG then it will have a free running H and V This makes it possible for example to produce both HD1080i 59 94 in the Primar...

Страница 68: ...will all be in vertical and horizontal alignment with each other Note The timing adjustments for the Primary Test Signal Generator are also used to position the vertical interval switching point in t...

Страница 69: ...the text which has been entered in the Slate Text field will appear over top of the test pattern Meanwhile the Beep Pop feature will add variety to the tones carried by the embedded audio Selecting B...

Страница 70: ...0 dBFS is the common practice in NTSC countries while 18 dBFS is used in PAL countries To Configure the TSG Audio Source Selections Choose between Silence or one of eight tone frequencies The tone gen...

Страница 71: ...g encoded signals back to the routing matrix as a DVB ASI signal You can then deliver the signal to a BNC output or to fiber for delivery to a distant location How the Encoding Menus are Organized The...

Страница 72: ...the High Resolution Encoder are in the top section the configuration controls for the Low Resolution Encoder are in the lower section Notice the additional Preset control that is found only in the web...

Страница 73: ...evel menus display 2 Use the up and down arrows to navigate to the High Res Encoder or Low Res Encoder configuration menu 3 Press the right arrow button or OK to highlight the Video Bit Rate submenu 4...

Страница 74: ...ows to select Baseline Main or High 4 Press OK to set your selection or press the Configuration button to cancel Selecting the Encoder s Level Encoding levels specify the maximum picture resolution fr...

Страница 75: ...press the Configuration button to cancel Assigning PIDs Packet IDs PMT Program Map Table PID Defines the set of PIDs that are being used with a program Video PID Identifies the video stream PCR Progra...

Страница 76: ...Bit Rate PMT PID Video PID PCR PID and Audio PID See the previous section Configuring Encoding from the Front Panel Menus for information about these controls Presets Unlike the front panel controls h...

Страница 77: ...rst configure all the fields needed for your encoding application whether it is High Resolution or Low Resolution From the corresponding Preset control click New The New Preset dialog box displays Giv...

Страница 78: ...rate locations or you can deliver both the high and low resolution feed to one location How the Streaming Menus are Organized The streaming configuration controls of the unit s front panel and its web...

Страница 79: ...n or press the Configuration button to cancel Select the Streaming Source After configuring the settings of the High Resolution Encoder or the Low Resolution Encoder select which of these encoders you...

Страница 80: ...address of the destination to which you are sending the streaming output 1 While in the Unicast A configuration menu press the up or down arrow buttons to highlight the Dest Port submenu 2 Press the...

Страница 81: ...w buttons to adjust the Packet Size setting 4 Press OK to set your new setting or press the Configuration button to cancel Setting the Source Port This is the port address from which the unicast strea...

Страница 82: ...ination Port TTL time to live Packet Size and Source Port See the previous section Configuring Streaming from the Front Panel Menus for information about these controls Presets Unlike the front panel...

Страница 83: ...igure all the fields needed for your application whether it is for Unicast Stream A Unicast Stream B or Multicast Stream From the corresponding Preset control click New The New Preset dialog box displ...

Страница 84: ...ill convert the signal to the specified format Once decoded and delivered into the routing matrix you can up down cross convert signals if needed then send signals out of the Clean Streaming Router as...

Страница 85: ...set your new selection or press the Configuration button to cancel Configuring the Unicast Receive Port This is the port address through which the Unicast stream will be received Default port value 12...

Страница 86: ...or the signal you will be receiving 1 While in the Decoding configuration menu press the down arrow button to navigate to the Multicast IP Adr submenu 2 Press the right arrow button or OK to go to the...

Страница 87: ...controls for Input Unicast Receive Port Multicast IP Address Multicast Port and Output Format See the previous section Configuring Decoding from the Front Panel Menus for more information about these...

Страница 88: ...o create a Preset first configure all the fields needed for your specific decoding application From the corresponding Preset control click New The New Preset dialog box displays Give your new preset a...

Страница 89: ...ting it access to the Clean Streaming Router and Assigning it a Profile Note Please connect the Router and Action Control Panel to the network before turning on its power The Router and Action Control...

Страница 90: ...nter and exit menus and to select Cancel or Save A white arrow points to the currently selected menu or submenu Entering invalid combinations of network settings causes errors Invalid network settings...

Страница 91: ...ent segments of the IP address 4 Once you have set the IP address to your desired setting press Enter to exit the Address menu and return to the Network Settings screen Subnet Mask 1 Use the navigatio...

Страница 92: ...u and return to the Network Settings screen DNS Server optional 1 Use the navigation buttons to select the DNS Server menu 1 Press Enter The Set DNS Server screen displays 2 Use the Up and Down naviga...

Страница 93: ...ints 6 Click Done At this point now that you have assigned a compatible IP address to the Control Panel and you have added it as a Control Point it will connect to the Router The NXT 450 Settings Cont...

Страница 94: ...Connecting an Ethernet Cable Your BrightEye NXT Clean Streaming Router is equipped with a Control Network Ethernet interface To establish network connectivity between a web control point and the Clean...

Страница 95: ...the fields in the Address submenu with an IP address that is compatible with your network For example you may want to change the IP address to something like the following 10 123 131 158 6 Press OK t...

Страница 96: ...or OK to highlight the Address submenu 4 Press the down arrow button to highlight the Subnet Mask submenu 5 Press the right arrow button or OK to go to the Subnet Mask selection submenu 6 Using the a...

Страница 97: ...that suits your network environment you can connect to it to establish a web control point 1 Navigate to the Clean Streaming Router s new IP address with your web browser The Control Point Needed win...

Страница 98: ...ration and Operations Guide 4 Click System Settings from the upper left part of the browser window The Settings window displays 5 From the lower left menu you may need to scroll down click Control Poi...

Страница 99: ...file to the Web Control Point Next assign a Profile that defines which sources and destinations this Control Point can access To begin with choose the Factory Default Profile 1 From the Profile drop d...

Страница 100: ...Operations Guide Thumbnail representations of the router s Sources are shown in the upper area Destinations in the lower area You are now presented with a BrightEye NXT Clean Streaming Router control...

Страница 101: ...he left navigation panel of the web interface The administrator assigns a previously created Profile to each of the various Control Points Control Points can be either assigned or requested These meth...

Страница 102: ...To assign the IP address of a device to create a Control Point 1 From the Admin Control Point navigate to the IP address of the BrightEye NXT 2 In the upper left area click Settings The Settings page...

Страница 103: ...may begin to degrade Asymmetrical Bandwidth Requirements The continuous delivery of video thumbnails to each Web Browser Control Point requires more bandwidth than is required for performing takes Th...

Страница 104: ...displayed Can be assigned to multiple Control Points Creating an Initial Set of Profiles Complete the process of creating as many profiles as your Router users will require While you can always creat...

Страница 105: ...lable Sources and Destinations are selectively assigned to Profiles Ports that are configured as Follow or Unassigned are not available to a Profile since they cannot be controlled Master Control Room...

Страница 106: ...he selections as they are presented on a control panel Those blanks will produce unused buttons on the panel This profile also has the Sources and Destinations in a different order and will be reflect...

Страница 107: ...llation Configuration and Operations Guide MCR Profile Edited to 8 x 1 This Profile has been further edited by removing a Destination The result is a Profile that allows control over only a single out...

Страница 108: ...x 6 Click Done Areas of Functionality Available for Actions Any particular Action can include Presets that use settings from one or more of the following areas of functionality Prerequisite Configurin...

Страница 109: ...displays 2 For Profile select High 3 For Level select 4 0 4 For Video Bit Rate select 8000 Kb s 5 For Audio Bit Rate select 256 Kb s 6 Along the top of the Settings Encoding page select New A New Pre...

Страница 110: ...Rate Enter the following configurations from the Settings Encoding page 1 For Profile select Main 2 For Level select 4 0 3 For Video Bit Rate select 6000 Kb s 4 For Audio Bit Rate select 192 Kb s 5 A...

Страница 111: ...elect 3 2 3 For Video Bit Rate select 2500 Kb s 4 For Audio Bit Rate select 128 Kb s 5 Along the top of the Settings Encoding page select New A New Preset dialog window displays 6 Enter a name for thi...

Страница 112: ...mple let s assume we have created Presets for PiP Efx and Clean Switch 2 Combined with the High Resolution Encoder Presets we now have three groups of Presets to work with Selecting Presets 1 Navigate...

Страница 113: ...t Encoder 720p 59 94 Setting the Colors for High and Low Tally From the Action 1 High Talley and Low Tally drop down menus select one or two colors to represent its High Tally and Low Tally state Thes...

Страница 114: ...mple of Configured Action 1 Action 1 is now configured to use selected Presets from the High Resolution Encoder PiP Efx and Clean Switch 2 Enabling Action 1 Finally with the Action 1 parameters config...

Страница 115: ...nabled Navigating to the Action Control browser interface The Action Control browser interface Action 1 indicates a High Tally Actions 2 and 3 indicate a Low Tally Enabling a Control Point s Action Bu...

Страница 116: ...in a situation in which you need to have several different on stage monitor configurations for a number of different uses with Salvos set up and configured in advance you can very efficiently switch...

Страница 117: ...want them to be for the specific Salvo you are creating including any transition options for mixing mix duration times or taking 5 Click the Capture Current Routes button A dialog box displays confir...

Страница 118: ...displays 2 Enter a name in the Name field 3 Click Edit The Salvos Editing page displays 4 At the outset of creating a new Salvo all the available Destinations are shown For each Destination select the...

Страница 119: ...yone with access to the Router meaning anyone who has an authorized Control Point with an assigned Profile can make changes to its Settings Depending on the security needs of your facility you may wis...

Страница 120: ...e configuration file is downloaded to the location where files are typically downloaded using your browser such as your desktop or a downloads directory The Clean Streaming Router configuration settin...

Страница 121: ...of the BrightEye NXT 450 s encoder and decoder Routing an SDI Signal to the Encoder When routing an SDI signal from the routing matrix to the Encoder the Encoder acts as a Destination from the perspe...

Страница 122: ...DI using your selected Output Format you can then up down cross convert the signal if needed then send it out of the Clean Streaming Router as SDI HDMI or fiber Operations Using the Front Control Pane...

Страница 123: ...tton A cross point switch is made directly without pressing Take To Enter Direct Take Panel Mode When the BrightEye NXT is not in Direct Take mode the Take button illuminates blue Double tap the blue...

Страница 124: ...t 4 Transition to Mix displays very briefly on the front panel screen The footer now purple indicates Mix CS1 AFV To Make a Mix Take The currently selected destination shortcut button illuminates brig...

Страница 125: ...ighted 5 Press the right arrow button or OK to access the next Live Video Display submenu 6 Press the up or down arrow to select either Live Video Muted or Live Video On 7 Press OK to set your selecti...

Страница 126: ...outer and Action Control Panel While performing a take is a straight forward task it can be done using more than one method To Perform a Take by Selecting a Source and a Destination 1 Select a Source...

Страница 127: ...need to press the Take button when in Direct Take mode To Perform a Direct Take 1 Press the Direct button in the upper far right area of the Router and Action Control Panel The Direct button illumina...

Страница 128: ...While performing a take is a straight forward task it can be done using more than one method To Perform a Take by Selecting a Source and a Destination 1 Select a Source by clicking one of the Source...

Страница 129: ...ke 1 Click Direct in the lower left area of the browser window The Direct button turns orange 2 Select a Destination 3 Select a Source The Source is immediately routed to the Destination The Destinati...

Страница 130: ...s you are in Gang mode To Exit Gang Mode Click Gang in the lower left area of the browser window The Gang button is now greyed out indicating that you are no longer in Gang Mode Performing Direct Gang...

Страница 131: ...or CS2 in its footer To Perform a Mix Take 1 Select the thumbnail for the destination 2 Select the thumbnail for the source The lower right corner of the web browser interface shows the Mix Duration i...

Страница 132: ...2 with the 2 key Selecting Destinations Use the shift key in combination with the number keys to select Destinations For example to select Output 4 while holding the shift key press the 4 key Perform...

Страница 133: ...ces to be routed to the selected set of destinations simultaneously according to how the Salvo was configured Salvo Keyboard Shortcuts You can use the keyboard to control the Salvo Control page Salvos...

Страница 134: ...ns Guide Display Preferences Use the Display Preferences button located in the upper right area of the browser window to customize how the thumbnail images display Sources and Destinations can be size...

Страница 135: ...urrent systems RS 232 Interface Option If requested at the time of ordering the Clean Streaming Router can include an adaptor cable that provides a 9 pin female D connector for the RS 232 interface 9...

Страница 136: ...he ASCII human readable and SMPTE ESbus binary variants of this protocol Supports only source to destination control Generic ASCII The Clean Streaming Router supports this simple human readable protoc...

Страница 137: ...col menu select the desired protocol The mapping of that protocol to Sources and Destinations will be controlled by the Profile that is assigned to the interface Any Profile can be edited to modify th...

Страница 138: ...earlier in this manual Conventions This following table describes the conventions used in this section A number followed by the letter H is a hexadecimal number E g 12H is the hexadecimal equivalent...

Страница 139: ...ted with dual SFPs that have fiber optic HDMI or SDI connectors In addition to the configurability of the ports the presentation of these inputs and outputs to a control point e g control panel web br...

Страница 140: ...nfiguring the Router s Ports from the Front Panel on page 43 Assume that we have cabled up the router so that it has 4 inputs and 2 outputs Table 1 lists the inputs and outputs connected to the router...

Страница 141: ...numbers sources and destinations beginning with the number 1 Some protocols begin numbering at zero e g the Grass Valley TEN XL ASCII Protocol and the Generic ASCII protocol We can now use these lists...

Страница 142: ...and edit Profiles refer to Creating and Editing Profiles on page 104 Configuration To control the router from an external device such as an automation system the router requires some configuration To...

Страница 143: ...Clean Streaming Router from an automation system or other external controller specific configuration choices need to be made in the External Control Editor To access the External Control Editor select...

Страница 144: ...tation of this protocol has been adapted as appropriate to reflect the features in the BrightEye NXT 450 Clean Streaming Router Protocol Requirements Sources and destinations are numbered starting at...

Страница 145: ...rce selected on the specified destination Syntax STX Dest High Dest Low ENQ STX Start character 02H Dest High High byte of destination number Valid range is 0 to 9 30H to 39H Dest Low Low byte of dest...

Страница 146: ...9 30H to 39H Dest Low Low byte of destination number Valid range is 0 to 9 30H to 39H Video Src Video source number Valid range is 0 to 9 30H to 39H Audio Src Audio source number Valid range is 0 to 9...

Страница 147: ...n Valid range is 0 to 9 30H to 39H Audio Src Audio source number Not used Always reported as 0 30H PS OK Power supply okay Not used Always reported as okay 3 33H Example Router receives a Status Reque...

Страница 148: ...imum byte count for Cmd Data is 251 bytes FBH Multiple commands may be sent within a single message All digits in messages are ASCII hex digits For example a message length specified with a high digit...

Страница 149: ...digit E g 0 to 9 or A to F Adr Low Low byte of Performer Switch 1 Address Part of the Message Header This is ignored but must be valid ASCII hex digit E g 0 to 9 or A to F Len High High byte of byte...

Страница 150: ...SCII hex digit E g 0 to 9 or A to F Dest High High byte of Destination number Any valid ASCII hex digit E g 0 to 9 or A to F Dest Low Low byte of Destination number Any valid ASCII hex digit E g 0 to...

Страница 151: ...ASCII character T identifies this as Take cmd Dest High High byte of Destination number Any valid ASCII hex digit E g 0 to 9 or A to F Dest Low Low byte of Destination number Any valid ASCII hex digi...

Страница 152: ...ir respective destinations Syntax Message Header CR Adr High Adr Low Len High Len Low Cmd Data A A ASCII character A identifies this as All Take command Example Request a Take of all the previously se...

Страница 153: ...cted characters out of range values etc result in discarding the current command There is no error reporting Parsing will not tolerate any additional characters within a command For example spaces emb...

Страница 154: ...possible responses are a simple Prompt Response or a Status Response followed by a Prompt Response These are discussed below Prompt Response This response consists of the single ASCII character 3EH Th...

Страница 155: ...9 or A to F Comma character 2CH Separates destination numbers from source numbers Src Source number No leading zeros will be used Any valid ASCII hex digits E g 0 to 9 or A to F CR ASCII carriage retu...

Страница 156: ...d slash is also used to separate multiple destination source pairs when more than one pair is specified Dest Destination number Up to 4 characters including leading zeros may be used to specify the de...

Страница 157: ...aracter 20H Identifies the start of a command X ASCII X followed by ASCII Identifies this as a Crosspoint Status command Lvl The Clean Streaming Router only supports level 0 Must be ASCII digit 0 Dest...

Страница 158: ...parates Levels from destination source pairs Forward slash is also used to separate multiple destination source pairs when more than one pair is specified Dest Destination number Up to 4 characters in...

Страница 159: ...command B ASCII B followed by ASCII 3AH Identifies this as one of the buffer commands E ASCII E Identifies this as the Execute Preset Buffer command CR ASCII carriage return character 0DH Example Exe...

Страница 160: ...Space B C CR Space ASCII 40H followed by ASCII space character 20H Identifies the start of a command B ASCII B followed by ASCII 3AH Identifies this as one of the buffer commands C ASCII C Identifies...

Страница 161: ...or device are not in conflict Check also that the cabling is correct Please see Setting Up a Web Control Point Optional on page 94 See also Establishing Additional Web Control Points and Access Authe...

Страница 162: ...olding the Reset button in its pressed in position for approximately 15 seconds then release The 5835 will reboot with factory default settings Note that the IP address and all other settings will hav...

Страница 163: ...isplays 5 From the Settings General page under the heading Software Update select the Choose File button Navigate to the software you downloaded in step 1 from the Ensemble Designs web site 6 Select U...

Страница 164: ...r 12 volts 35 watts 100 230VAC modular power supply Temperature Range 0 to 40 C ambient all specs met Relative Humidity 0 to 95 non condensing Altitude 0 to 10 000 ft BrightEye NXT 450 Clean Streaming...

Страница 165: ...hanism can be used to carry multiple program channels Aspect Ratio The ratio of the vertical and horizontal measurements of an image 4 3 is the aspect ratio for standard definition video formats and t...

Страница 166: ...R G B Checkfield A Checkfield signal is a special test signal that stresses particular aspects of serial digital transmission The performance of the Phase Locked Loops PLLs in an SDI receiver must be...

Страница 167: ...ers to power relative to 1 milliwatt and dBu refers to voltage relative to 775V RMS The original unit of measure was the Bel 10 times bigger named after Alexander Graham Bell dBFS In Digital Audio sys...

Страница 168: ...under the timing direction of the sync information contained in that video Simultaneously the memory is being read back by a timing system that is genlocked to a house reference As a result the timing...

Страница 169: ...etition rate from the original 24 frames that make up each second of film they just project each one twice IRE Video level is measured on the IRE scale where 0 IRE is black and 100 IRE is full white T...

Страница 170: ...incorrectly be called metadata when it tells us nothing at all about the pictures Oh well Multi mode Multi mode fibers have a larger diameter core than single mode fibers either 50 or 62 5 microns com...

Страница 171: ...itive or inductive elements In the real world we can only approach the ideal So our real inputs and outputs will have some capacitance and inductance This will create impedance matching errors especia...

Страница 172: ...positive offset Unfortunately there is no truly foolproof algorithm to detect the presence of Setup automatically so it s definitely a case of installer beware SDI Serial Digital Interface This term r...

Страница 173: ...cal interval as VITC and as a digital packet as DVITC Timecode is the true metadata Tri Level Sync For many many years television systems used composite black as a genlock reference source This was a...

Страница 174: ...ely audio with no video reference capability may still require Word Clock WSS Wide Screen Signaling is used in the PAL 625 video standards both in analog and digital form to convey information about t...

Отзывы: