


SOLAR PANEL TOP POLE MOUNT
ASSEMBLY INSTRUCTIONS (cont.)
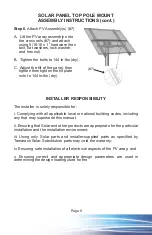
Step 6.
Attach PV Assembly(s) (#7)
A. Lift the PV array assembly onto
the cross rails (#7) and attach
using 5/16-18 x 1” hardware (hex
bolt, flat washers, lock washer,
and hex nut).
B. Tighten the bolts to 144 in-lbs (dry).
C. Adjust the tilt of the panel, then
tighten then tighten the tilt plate
nuts to 144 in-lbs (dry).
INSTALLER RESPONSIBILITY
The installer is solely responsible for:
i. Complying with all applicable local or national building codes, including
any that may supersede this manual;
ii. Ensuring that Solar and other products are appropriate for the particular
installation and the installation environment;
iii. Using only Solar parts and installer-supplied parts as specified by
Tamarack Solar. Substitution parts may void the warranty;
iv. Ensuring safe installation of all electrical aspects of the PV array; and
v. Ensuring correct and appropriate design parameters are used in
determining the design loading used for the
Page 8
(#7)


