SOLAR PANEL TOP POLE MOUNT
ASSEMBLY INSTRUCTIONS (cont.)
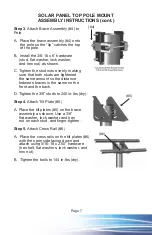
Step 3.
Attach Brace Assembly (#4) to
Pole
A. Place the brace assembly (#4) onto
the pole so the “lip” catches the top
of the pole.
B. Install the 3/8-16 x 6” hardware
(stud, flat washer, lock washer,
and hex nut) as shown.
C. Tighten the stud nuts evenly, making
sure that both studs are tightened
the same amount so the distance
between braces is the same on the
front and the back.
D. Tighten the 3/8” studs to 240 in-lbs (dry).
Step 4.
Attach Tilt Plate (#5)
A. Place the tilt plates (#5) on the brace
assembly as shown. Use a 3/8”
flat washer, lock washer and hex
nut on each stud, and finger-tighten.
Step 5.
Attach Cross Rail (#6)
A. Place the cross rails on the tilt plates (#6)
with the open side facing down and
attach using 5/16-18 x 2.50” hardware
(hex bolt, flat washers, lock washer, and
hex nut).
B. Tighten the bolts to 144 in-lbs (dry).
Page 7
(#4)
(#5)
(#6)


