background image

15

6900

EN

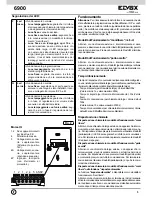
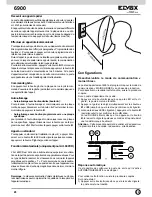
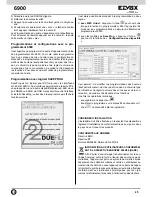
5) Release buttons 

A

 and 

C.

Important

: you will have 5 s in which to press buttons 

A

 and  

C


(as indicated in step 4). If button 

A

 and 

C

 is not pressed within 

the 5 s, steps 1, 2 and 3 must be repeated.
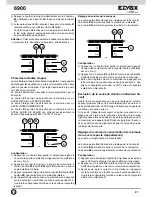
6) At this point, communication between the interphone and 

the entrance panel begins and you have 25 s to link the ID 

code of the outdoor entrance panel:

-  if using an alphanumeric entrance panel, enter the ID 

code (the same primary ID code as assigned to the 

group master interphone) and confirm with the “bell” but

-

ton.

-  if using an entrance panel with buttons, press the but-

ton you want to use for calling the interphone (the same 

button with which the group master interphone was pro-

grammed).

Important

: If the procedure described is not completed within 

the 25 s, it must be repeated from step 1.

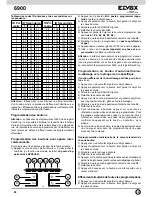
Important

: When programming the primary and secondary 

ID, the interphones undergoing programming automatically 

acquire a code that depends on the association with the button 

or code used to call the outdoor entrance panel. Correspon-

dence between the primary ID and the respective secondary 

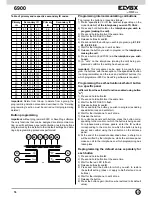
ID codes is provided in the table below.

Example

: If ID = 8 is given to a second interphone, the au

-

tomatic second interphone identification attribution procedure 

will automatically assume ID = 72 (see table).

When a call is made to ID = 8, both interphones will chime and 

you will be able to answer from both. If, on the other hand, you 

enter 72 (the ID automatically assigned by the procedure), a 

ring tone is emitted by - and you will only be able to answer 

from - the interphone for which the secondary ID assignation 

procedure was carried out.

Manual programming

Basic interphone programming is as follows:

ID programming

, performed on the interphone receiving 

the call separately or on the first in a group of interphones 

with simultaneous calls (master interphone for the group).

Secondary ID programming

, performed for interphones 

linked to a group master interphone/monitor.

Programming programmable buttons

 or changing the 

default settings of additional buttons, for auxiliary services 

or intercommunicating calls.

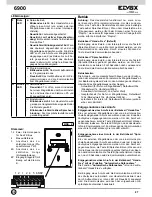
ID programming 

To program the ID, proceed as follows: 

1) Press and hold button 

B

.

2) Press and hold button 

A

 at the same time.

3) Release the buttons when the red LED flashes. 

4) Press and hold button 

C

 until you hear a “note” from the 

interphone to confirm programming is underway; this will 

be accompanied by the red LED lighting up steadily.

5) Release button 

C

.

Important

: you will have 5 s in which to press button 

C

 (as 

indicated in step 4). If button C is not pressed within the 5 s, 

steps 1, 2 and 3 must be repeated.
6) At this point, communication between the interphone and 

the entrance panel begins and you have 25 s to link the ID 

code of the outdoor entrance panel:

-  if using an alphanumeric entrance panel, enter the pri-

mary ID code and confirm with the “bell” button.

-  if using an entrance panel with buttons, press the button 

you want to use for calling the interphone.

Important

: If the procedure described is not completed within 

the 25 s, it must be repeated from step 1.

Important

: If the installation already contains an interphone/

monitor with the same associated identification code, the en

-

trance panel emits a low sound signal and the process must 

be repeated from the start in order to assign a different code.

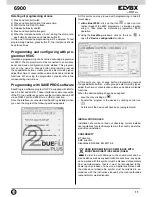
A

B

C

Secondary ID programming

To program the secondary ID, proceed as follows: 

1) Press and hold button 

B

.

2) Press and hold button 

A

 at the same time.

3) Release the buttons when the RED LED flashes.

4) Press and hold buttons 

A

 and 

C

 until you hear a “note” from 

the interphone to confirm programming is underway; this 

will be accompanied by the RED LED lighting up steadily.

Содержание 6901/D

Страница 1: ...nes Instru es Art 6901 D Art 6901 6900 Art 6901 6901 D Citofono vivavoce da parete Due Fili Due Fili wall speakerphone interphone Poste mains lbr saillie Due Fili AP Freisprech Haustelefon DueFili Por...

Страница 2: ...tandby con led rosso acceso fisso 5mA in standby con led rosso e led verde accesi 7mA corrente massima in chiamata 110mA corrente massima in conversazione per 6901 100mA corrente massima in conversazi...

Страница 3: ...nicazione Premendo nuovamente il tasto B si termina la comunicazione Modalit di Funzionamento parla ascolta All arrivo di una chiamata esterna o intercomunicante si deve premere e mantenere premuto il...

Страница 4: ...mata a un centralino portineria Per effettuare una chiamata ad un centralino portineria se presente nell impianto fare una breve pressione sul tasto B il led verde si accender con luce lampeggiante pe...

Страница 5: ...regolazione il tasto A Il tasto E5 permette di diminuire il volume della melodia Il tasto E6 permette di aumentare il volume della melodia A E5 E6 Configurazione 1 Premere il tasto A e mantenere premu...

Страница 6: ...cedura per l installazione a parete Installare il citofono lontano da fonti lu mi no se e di calore Fissare il fondo del citofono alla scatola ver ticale da incasso rettangolare o rotonda con le relat...

Страница 7: ...l citofono sono le seguenti Programmazione dell identificativo ID da effettuare sul citofono che riceve la chiamata singolarmente o sul primo citofono di un gruppo di citofoni con chiamata contempora...

Страница 8: ...iene emesso un tono acuto sul citofono mentre dalla targa viene inviata una chiamata al citofono su cui stata fatta la programmazione Riprogrammazione del valore di default singolar mente per ogni pul...

Страница 9: ...mma appare la finestra seguente A questo si pu procedere alla programmazione in due di verse due modalit 1 con 950C virtuale cliccando sull icona si apre un im magine interattiva del programmatore 950...

Страница 10: ...n standby with red and green LEDs lit 7 mA maximum in call current 110 mA maximum conversation current for 6901 100 mA maximum conversation current for 6901 D 130 mA Option of installing up to 8 inter...

Страница 11: ...tdoor entrance panel or from an intercom municating device can be answered during the chime cycle or once it has ended To answer press and hold button B speak listen during the entire communication To...

Страница 12: ...entrance panel press and release the button programmed to call that entrance panel Press button B to end the call Calling a porter switchboard To call a porter switchboard where fitted press and relea...

Страница 13: ...on E5 decreases the melody volume Button E6 increases the melody volume A E5 E6 Configuration 1 Press and hold button A until the green LED begins to flash this will be confirmed by a beep 2 Press but...

Страница 14: ...mm Wall mounting procedure Install the interphone away from sources of li g ht and heat Fix the base of the interphone to the rectan gular or round vertical back box using the corresponding screws su...

Страница 15: ...the call separately or on the first in a group of interphones with simultaneous calls master interphone for the group Secondary ID programming performed for interphones linked to a group master interp...

Страница 16: ...cribed above a sharp tone will be emitted by the interphone while the entrance panel makes a call to the interphone on which programming has taken place Reprogramming the default value separately for...

Страница 17: ...the following window appears At this point you may proceed with programming in two dif ferent ways 1 with virtual 950C click on the icon to open an inte ractive image of the 950C programmer allowing...

Страница 18: ...rouge allum e 5mA en mode veille avec led rouge et led verte allum es 7mA courant maxi en mode appel 110mA courant maxi en mode conversation pour 6901 100mA courant maxi en mode conversation pour 690...

Страница 19: ...R ponse un appel en mode de fonctionnement mains libres Lorsqu un appel arrive d une plaque de rue ou d un poste in tercommunicant il est possible de r pondre durant ou la fin du cycle de sonnerie Po...

Страница 20: ...appel appuyer sur la touche B Appel un standard Pour appeler un standard si l installation le pr voit appuyer bri v ement sur le bouton B la led verte clignote quelques secondes appuyer sur le bouton...

Страница 21: ...ton permettant d acc der au r glage est le bouton A Le bouton E5 permet de r duire le volume de la m lodie Le bouton E6 permet d augmenter le volume de la m lodie A E5 E6 Configuration 1 Appuyer sur l...

Страница 22: ...poste d appartement loin des sources lu mi neu ses et de chaleur Fixer le fond du poste d appartement sur la bo te d encastrement verticale rectangulaire ou ronde l aide des vis fournies Fig 4A 4B ou...

Страница 23: ...mmation de l identifiant ID effectuer sur le poste qui re oit l appel s par ment ou sur le premier poste d un groupe de postes pouvant recevoir un appel simultan poste principal Programmation de l ide...

Страница 24: ...3 Attendre que la led rouge clignote 4 Rel cher les boutons A et B 5 Appuyer sur la bouton qui doit reprendre sa valeur standard et garder le doigt dessus sauf boutons auto allumage et g che 6 Attendr...

Страница 25: ...a programmation de deux fa ons 1 avec 950C virtuel cliquer sur l ic ne pour ouvrir une image interactive du programmateur 950C qui permet de proc der aux programmations en simulant l utilisation du pr...

Страница 26: ...y rote und gr ne LED mit Dauerlicht 7mA max Stromaufnahme bei Anruf 110mA max Stromaufnahme w hrend des Gespr chs f r Art 6901 100mA max Stromaufnahme w hrend des Gespr chs f r Art 6901 D 130mA M glic...

Страница 27: ...gt an dass das Hauste lefon in Kommunikation ist Zum Beenden der Kommunikation erneut die Taste B dr cken die rote LED erlischt Entgegennahme eines Anrufs in der Betriebsart Spre chen H ren Ein vom ex...

Страница 28: ...ken die der anzurufenden Internsprechstelle zugeordnet wurde W hrend des Anrufs gibt das Haustelefon einen Signalton ab um da rauf hinzuweisen dass das Gespr ch aktiv ist Sobald die Internsprechstelle...

Страница 29: ...lt Mit der Taste E6 wird die Melodie leiser gestellt A E5 E6 Konfiguration 1 Die Taste A gedr ckt halten bis die gr ne LED zu blinken beginnt und zur Best tigung ein Piepton zu h ren ist 2 Je nach der...

Страница 30: ...ontage Das Haustelefon fern von Licht und W rm equellen installieren Die Grundplatte des Haustelefons mit den mitgelieferten Schrauben am senkrechten rechteckigen oder runden UP Geh use be festigen Ab...

Страница 31: ...f entgegengenommen werden Manuelle Programmierungen Die Basisprogrammierungen des Haustelefons sind Programmierung des Kenncodes ID vorzunehmen entweder an dem Haustelefon das den Anruf einzeln em pf...

Страница 32: ...e der oben beschriebenen Prozedur ert nt am Haustelefon ein lauter Signalton w hrend vom Klingel tableau das Haustelefon angerufen wird an dem die Pro grammierung vorgenommen wurde Neuprogrammierung d...

Страница 33: ...n RS232 Port Art 692I U ber einen USB Anschluss Nach Anschluss der Schnittstelle und Installation von Save Prog erscheint nach Starten des Programms das folgende Fenster Nun kann die Programmierung au...

Страница 34: ...ontestar con una serie de parpadeos Sistema manos libres con modo de comu nicaci n Hands Free Se alizaci n de puerta abierta con el encendido de un LED verde Posibilidad de activar hasta seis funcione...

Страница 35: ...pulse brevemente y suelte la tecla B Hablar Escuchar El led rojo indica que el portero autom tico est en comunicaci n Para finalizar la comunicaci n pulse de nuevo la tecla B el led rojo se apaga Resp...

Страница 36: ...zar una llamada a una centralita de conserjer a si est in cluida en el equipo pulse brevemente la tecla B durante unos se gundos se enciende el led verde con luz parpadeante y en esta fase para enviar...

Страница 37: ...cla para entrar en el ajuste es la A La tecla E5 permite bajar el volumen del tono La tecla E6 permite subir el volumen del tono A E5 E6 Configuraci n 1 Pulse la tecla A y mant ngala pulsada hasta que...

Страница 38: ...tero autom tico lejos de fuentes lu mi no sas y de calor Sujete el fondo del portero autom tico a la caja vertical de empotrar rectangular o re donda con los correspondientes tornillos suministrados F...

Страница 39: ...on las siguientes Programaci n del identificador ID a realizar en el portero autom tico que recibe la llamada de forma individual o bien en el primer portero autom tico de un grupo de porteros autom t...

Страница 40: ...tom tico emite un tono agudo mientras que desde la placa se env a una llamada al portero autom tico en el que se ha realizado la programaci n Restablecimiento del valor por defecto de forma individual...

Страница 41: ...e instalar SaveProg al abrir el programa aparece la ventana siguiente Se puede entonces proceder a la programaci n en dos modos distintos 1 con 950C virtual al hacer clic en el icono se abre una image...

Страница 42: ...Consumo em standby 2mA em standby com LED vermelho aceso fixo 5mA em standby com LED vermelho e LED verde acesos 7mA corrente m xima em chamada 110mA corrente m xima em conversa o para 6901 100mA cor...

Страница 43: ...remir brevemente e soltar a tecla B falar escutar O LED vermelho assinala que o telefone est em comunica o Para terminar a comunica o prima no vamente a tecla B o LED vermelho apaga se Resposta a uma...

Страница 44: ...ara uma central de portaria Para fazer uma chamada para uma central de portaria se pre sente na instala o prima brevemente a tecla B o LED verde acender se com uma luz intermitente durante alguns segu...

Страница 45: ...gula o a tecla A A tecla E5 permite diminuir o volume da melodia A tecla E6 permite aumentar o volume da melodia A E5 E6 Configura o 1 Prima a tecla A e mantenha a premida at o LED verde come ar a pis...

Страница 46: ...dimento para a instala o na parede Instale o telefone longe de fontes lu mi no sas e de calor Fixe a base do telefone caixa vertical de embeber rectangular ou redonda com os re spectivos parafusos for...

Страница 47: ...as seguintes Programa o do c digo identificativo ID a fazer no tele fone que recebe a chamada individualmente ou no primeiro telefone de um grupo de telefones com chamada simul t nea telefone principa...

Страница 48: ...agudo no telefone ao passo que da botoneira enviada uma chamada ao telefone em que foi feita a programa o Reprograma o do valor por defeito individual mente para cada bot o 1 Prima o bot o B e manten...

Страница 49: ...og abrindo o programa aparece a janela seguinte Pode ent o proceder se programa o de duas formas di stintas 1 com o 950C virtual clicando no cone abre se uma imagem interactiva do programador 950C que...

Страница 50: ...stelefon 6900 Art 6901 6901 D B0 Monitore der Serie Wide touch Art 7311 7321 B1 Monitore der Serie 7200 Art 7211 B2 Monitore der Serie 6600 Art 6611 661C 6711 Art 6621 662C 6721 B3 Monitore der Serie...

Страница 51: ...1 B4 B5 B2 B0 D Impianto videocitofonico mono o plurifamiliare con una targa esterna RIF SI647 Single or multi family video door entry system with one outdoor entrance panel REF SI647 Installation de...

Страница 52: ...posizionato su B per cavo Elvox o su C per cavo CAT5 con doppini ac coppiati SE E SOLO SE il BUS termina sul dispositivo stesso Va lasciato su A se si effettua l entra esci utiliz zando i morsetti 1 2...

Страница 53: ...externa ou intercomunicante K 5 2 2 1 4 1 6S 6P B A C K 2 1 1 2 A4 A4 Citofono serie 6900 Art 6901 6901 D K Pulsante di chiamata fuoriporta Q1 Rel Art 0170 101 U2 Modulo di interfacciamento pulsanti...

Страница 54: ...ta fuoriporta per due o pi citofoni in parallelo Wiring diagram for door call with two or more inter phones in parallel Sch ma de raccordement de l appel de palier pour deux ou plusieurs portiers en p...

Страница 55: ...entar elec tr nica art 860A A campainha electr nica Art 860A possui dois sons distintos de duas e tr s tonalidades entre o terminal 7 e o terminal 8 A campainha deve ser alimentada com a tens o de red...

Страница 56: ...Vimar SpA Viale Vicenza 14 36063 Marostica VI Italy Tel 39 0424 488 600 Fax Italia 0424 488 188 Fax Export 0424 488 709 www vimar com S6I 690 100 02 1407 VIMAR Marostica Italy...

Отзывы: