


162
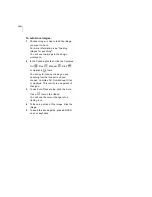
To create Satin or Fill stitches with
holes:
1
In the Punching toolbar, click the Complex
Fill
tool.
The pointer becomes a cross hair.
2
From the ribbon, click the Segment
Settings
tool.
You see the Segment Settings dialog
appear.
3
Click the Complex Fill property page.
4
In the Standard Pattern list, select a Satin
type or a Fill pattern.
5
Click OK.
6
Left-click to punch the segment.
7
Click the Auto Close
tool on the
ribbon or press
H
on your keyboard to
complete the outside of the segment.
8
Continue clicking inside the segment to
punch where you want the holes. Click
the Auto Close
tool on the ribbon or
press
H
on your keyboard again to
complete the inside of the segment.
9
Press ENTER on your keyboard.
10
To set the entry and exit points and angle
line, see the following steps:
When the pointer becomes a green
arrow with a white bead, click the
location you want the entry point
(green bead).
When the pointer becomes a red
arrow with a white bead, click the
location you want the exit point (red
triangle bead).
When the pointer becomes a small
arrow with a bead, click and drag from
left to right to place an angle line in
your segment.
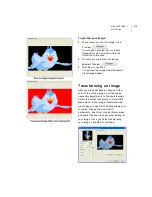
You see the Complex Fill segment with
holes created.
Содержание XPRESSIVE 2
Страница 1: ...Xpressive II User sGuide...
Страница 10: ...8 Glossary 195 Index 221...
Страница 22: ...20...
Страница 48: ...46...
Страница 62: ...60...
Страница 148: ...146...
Страница 184: ...182...
Страница 190: ...188...
Страница 196: ...194...
Страница 230: ...228...


