


138
Drawing Lines
Xpressive’s Text, Run, Complex Fill, Steil and
Appliqué tools allow you to easily toggle
between entering straight and curved points
(Quick Draw mode). You get the flexibility and
control you need to draw paths and curved
points.
Practise drawing curves by drawing basic
shapes using Xpressive.
To draw lines:
1
Do one of the following:
In the Lettering toolbar, click the Text
tool.
In the Punching toolbar, click the Run
tool, Complex Fill
tool, Steil
tool or Appliqué
tool.
2
To place a straight point, left-click the
design workspace.
3
To place a curved point, complete the
following:
While you left-click the design
workspace, press and hold
CTRL
on
your keyboard.
You will see a preview of the curve
before you place the next anchor point.
To create a corner point or to begin
creating a straight line again, release
CTRL
on your keyboard.
4
Do one of the following steps to punch an
open or closed segment:
To create an open segment, click the
design workspace to place the anchor
points and curves in your design.
To create a closed segment, click the
design workspace to place the anchor
points and curves in your design.
Click the Auto Close
tool on the
ribbon to close the segment.
5
Press ENTER on your keyboard to
complete the segment.
6
To modify the curves in your segment,
see the section on "Vertex and Point
Editing".
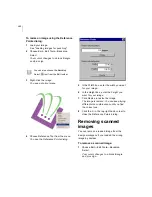
Design
Section of design
traced using
Xpressive
Curved points should be entered as a set
of 3 points that define the arc of the
curve.
You can also press
H
on your keyboard
to close the segment.
Содержание XPRESSIVE 2
Страница 1: ...Xpressive II User sGuide...
Страница 10: ...8 Glossary 195 Index 221...
Страница 22: ...20...
Страница 48: ...46...
Страница 62: ...60...
Страница 148: ...146...
Страница 184: ...182...
Страница 190: ...188...
Страница 196: ...194...
Страница 230: ...228...


