background image

MANUAL CODE: XXXXX 

PROFESSIONAL SOUS COOKER 


ISSUE DATE: 15/01/2018  vers_00_05


Rev.  00.00   WITH REFERENCE TO FIRMWARE VERSION :00_15 and more  


ELE

GEN


by Quaglia Luigi  - Via Jmre Nagy  8-8/A 42019 - Scandiano Reggio Emilia Italy- VAT No. 02018620357 

TEL.+390522859721 – FAX +390522767677 - 

VOIP Skype. eleg2002 

- Web-www.elegen.it - emai

[email protected] 


Page  8  of 16 


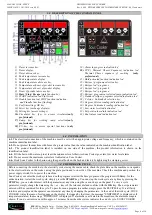
5.0   DESCRIPTION OF THE CONTROL PANEL   


1)


Timer increase key  

2)


Timer display  

3)


Timer decrease key   

4)


Tank temperature increase key  

5)


Tank temperature display  

6)


Tank temperature decrease key  

7)


Temperature at heart of product increase key    

8)


Temperature at heart of product display 

9)


Heart of product decrease key 

10)


Start / Stop / Escape


triple function key 

11)


START indication led, Start work  

12)


Double function led, STOP function indication, 

 and Standby function (flashing)  

13)


Confirm settings OK key  

14)


Select key (exchange displays)  

15)


Setting key (access settings) 

16)


Circulator  key  (key  to  access  circulator

(only 

professional) 

17)


Ramp  key  for  working  ramp  selection

(only 

professional) 

18)


FN  key,  key  to  access  special  functions 

(only 

professional) 


19)


Alarm in progress indication led  

20)


TPS  (  Thermal  Phases  Sequence)  indication  led   

Thermal  Phases  sequence  of  cooking.   

(only 

professional) 

21)


Hold activated function indication led  

22)


Recipes / programs selection key  

23)


Recipes led / program c 

24)


Recipes led / program b 

25)


Recipes led / program a 

26)


Recipes/ programs at selected ramp indication led  

27)


Standard recipes/ programs selected indication led 

28)


 Celsius /


Fahrenheit selection key 

29)


Degrees Celsius reading indication led  

30)


Degrees Fahrenheit reading indication led 

31)


Low water level indication led  

32)


Set point values dials indication led  

33)


Real values read indication led. 


6.0   INSTALLATION   

6.1

- The electrical connection of the machine must be set with an appropriate voltage and frequency, which is contained on the 

machine identification label.  

6.2

- Do not protect the machine with fuses of a greater value than the value indicated on the machine identification label. 

6.3

  -  The  product  identification  label  is  installed  on  one  side  of  the  machine,


the  product  information  is  shown  on  the 

identification label.  

6.4

 - Fill the basin with water up to at least the minimum level otherwise Sous Cooker goes into low water level alarm 

6.5

 - Do not exceed the maximum water level indicated on Sous Cooker. 

6.6 - 

Hook Sous Cooker to the basin using the special hook on the back and lock it by tightening the clamping screw. 


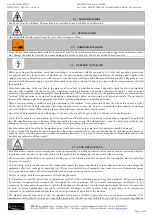
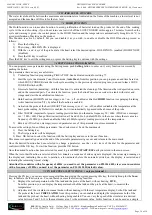
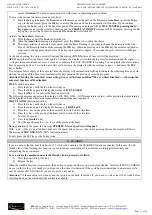
7.0   THE WORKING CYCLE  

Before connecting the machine to the electricity socket using the mains cable, check the plate data on the machine corresponds 
to the electrical data on the socket, using the plate positioned to one side of the machine. Check the machine and position the 
power supply switch On to power the machine. 
Sous Cooker  executes the work cycle based on the program selected, the base program or the program with Ramp, for the 
entire duration, to start the work cycle, simply press the 

START

 key. You can stop the work cycle at any time by pressing the 

STOP

 key, you can also interact with the parameters at any time using the various keys on the panel. To vary a cycle 

parameter, simply change the data using the + or – keys of the relevant dial and confirm with the 

OK

 key. The new parameters 

entered will be considered for the cycle. To pass from one program to another, simply press the RECIPES key. It is all fairly 
intuitive and simple and the operator can interact at any time by changing the parameters. At the end of the work cycle, SOUS 
COOKER writes the reason for stoppage on the display. If stopped by the timer, the message “ENDTIMER” is displayed or if 
temperature related, the message “ENDPROBE” is displayed. If alarms have activated in the meantime, the alarm message is 
shown. If you do not intervene within approx. 5 minutes from when the system indicates the end of cycle, SOUS COOKER 

Содержание SOUS COOKER PRO CHEF

Страница 1: ...email elegen elegen it Page 1 of 16 Operating use and maintenance manual SOUS COOKER PRO CHEF SOUS COOKER PROFESSIONAL Low temperature immersion cooking system ATTENTION This manual contains all the...

Страница 2: ..._____________________________________ 7 5 0 DESCRIPTION OF THE CONTROL PANEL _______________________________________________________________ 8 6 0 INSTALLATION_________________________________________...

Страница 3: ...y law to diffuse or duplicate totally or partially the images and information contained in this manual without the manufacturer s prior authorisation The manufacturer is the owner of the rights to thi...

Страница 4: ...tly prohibited The fuse is a protection element that is essential to proper machine operation and in preventing damage to persons or property Always disconnect the mains before carrying out the operat...

Страница 5: ...machine parts with damp or wet hands Do not pull the power cable to disconnect it from the mains Verify that the machine is connected to the electrical outlet and that the outlet is connected to groun...

Страница 6: ...oning defective worn or broken parts must be replaced immediately for proper machine operation and for safety of personnel using the machine All changes and repairs must be performed by qualified pers...

Страница 7: ...r structures of the food improving taste and prolonging the shelf life in summary vacuum cooking allows us to obtain a tasty and fragrant dish without the addition of external condiments thereby guara...

Страница 8: ...quency which is contained on the machine identification label 6 2 Do not protect the machine with fuses of a greater value than the value indicated on the machine identification label 6 3 The product...

Страница 9: ...mer proceed as follows 1 Using the Timer dial set the cooking time value using the and keys press the OK key to save the data 2 Using the Tank Temperature dial set the maximum working temperature usin...

Страница 10: ...xxx on off enables or disables the temperature at the heart probe reading by Default it is enabled but it is automatically bypassed in the absence of the probe 6 Filter 50 60Hz important for greater r...

Страница 11: ...omatically light up to indicate the remaining time on cycle start up on expiry of the time it will automatically start based on the previously selected program Attention During the Auto Start timer se...

Страница 12: ...recipes a b and c and by the basic recipe with all the leds off for both the types of recipes To select a base recipe press the Recipes key The leds a b and c will illuminate in sequence following va...

Страница 13: ...t after about 2 minutes from the end of the pre registration 8 0 DEFAULT PARAMETERS SOUS COOKER has a table inside of factory preset parameters This table can be reloaded at any time and is particular...

Страница 14: ...Under no circumstances shall Elegen recognise complaints or compensation of or other nature 10 6 Elegen is equipped with product liability insurance for which damages recognised as eligible for compe...

Страница 15: ...s technical assistance network undertake to repair the product maximum in 90 days after the reception form the customer of the acceptance of reparation and according to availability of spare parts tha...

Страница 16: ...cted to the mains 2 check that the plug has been thoroughly inserted into the socket 3 check that the voltage current and frequency of the mains are consistent with data contained on the machine plate...

Отзывы: