


Section 5 Component Teardown
5-18
Interior Components
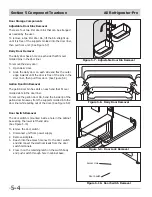
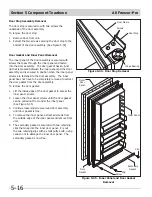
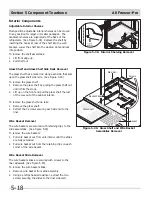
Adjustable Interior Shelves
Multi-position adjustable interior shelves can be moved
to any position for larger or smaller packages. The
cantilever shelves are supported at the back of the
refrigerator. (See Figure 5-39) Replace the shelf by
inserting the hooks at rear of the shelf into the wall
bracket. Lower the shelf into the desired slots and lock
into position.
To remove the shelf assemblies:
1. Lift front edge up.
2. Pull shelf out.
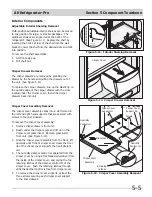
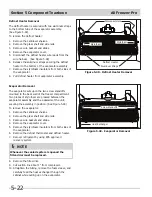
Glass Shelf and Glass Shelf Side Rails Removal
The glass shelf has a metal rod along each side that sets
upon the glass shelf side rails. (See Figure 5-40)
To remove the glass shelf:
1. Remove the glass shelf by pulling the glass shelf out
until it hits the stops.
2. Lift up on the front and pull the glass shelf the rest
of the way out of the cabinet interior.
To remove the glass shelf side rails:
1. Remove the glass shelf.
2. Extract the 3 screws securing each side rail to the
liner.
Wire Basket Removal
The wire baskets are secured with retaining clips to the
slide assemblies. (See Figure 5-40)
To remove the wire baskets:
1. Pull wire basket out from unit interior until the slides
are fully extended.
2. Pull wire basket out from the retaining clips on each
corner of the wire basket.
Wire Basket Slide Removal
The wire basket slides are secured with screws to the
liner sidewalls. (See Figure 5-40)
To remove the wire basket slides:
1. Remove wire basket from slide assembly.
2. Using a phillips head screwdriver, extract the two
screws securing the slides to the liner side wall.
Figure 5-39. Interior Shelving Removal
Side Rail
Glass Shelf
Figure 5-40. Glass Shelf and Wire Basket
Assemblies Removal
Basket Slides
Screws
Basket
All Freezer-Pro
Содержание FPUH17D7KF All Freezer Professional Series
Страница 2: ......
Страница 20: ...Section 2 Installation Information 2 12 Figure 2 20 Figure 2 21 ...
Страница 21: ...Section 2 Installation Information 2 13 Figure 2 22 Figure 2 23 ...
Страница 24: ...Section 2 Installation Information 2 16 Notes ...
Страница 26: ...Section 3 Electronic Control 3 2 Notes ...
Страница 41: ...Section 4 Refrigeration 4 15 HFC 134a CFC 12 Pressure Temperature Chart ...
Страница 44: ...Section 4 Refrigeration 4 18 Notes ...
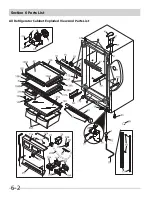
Страница 68: ...Section 6 Parts List 6 2 All Refrigerator Cabinet Exploded View And Parts List ...
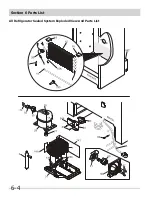
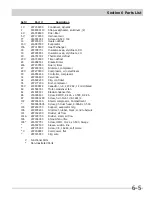
Страница 70: ...Section 6 Parts List 6 4 All Refrigerator Sealed System Exploded View And Parts List ...
Страница 72: ...Section 6 Parts List 6 6 All Freezer Door Exploded View And Parts List ...
Страница 74: ...Section 6 Parts List 6 8 All Freezer Cabinet Exploded View And Parts List ...
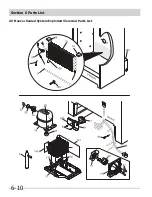
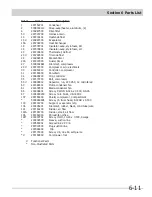
Страница 76: ...Section 6 Parts List 6 10 All Freezer Sealed System Exploded View And Parts List ...
Страница 78: ...Section 6 Parts List 6 12 Notes ...
Страница 82: ...Section 7 Troubleshooting 7 4 Notes ...
Страница 83: ...Section 8 Wiring Diagram 8 1 All Refrigerator Wiring Diagram ...
Страница 84: ...8 2 Section 8 Wiring Diagram All Freezer Wiring Diagram ...


