


Section 5 Component Teardown
5-2
Exterior Components
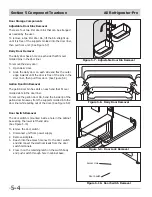
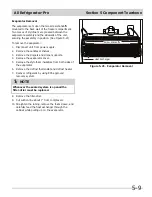
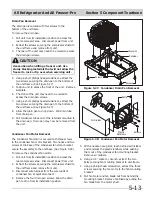
Door Handle Removal
The door handle is secured with setscrews to the
handle mounting shoulder screws that are fastened
into the front of the door assembly.
To remove the handle, use a 3/32” allen wrench and
extract the setscrew located in each handle standoff.
Pull handle assembly from door assembly.
(See Figure 5-1)
Use a 5/32” allen wrench to extract the screw
located inside the handle standoff, that secures the
handle standoff to the handle.
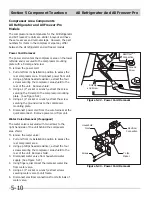
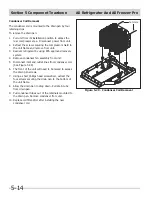
Kickplate Removal
The kickplate is secured with two screws to the lower
front of the unit.
To remove the kickplate, extract the screw from each
end of the kickplate with a phillips head screwdriver.
(See Figure 5-2)
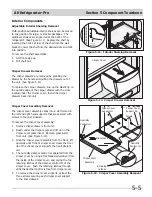
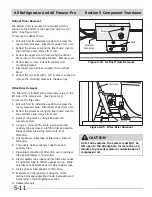
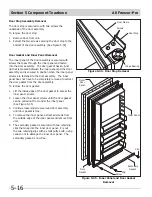
Door Hinge and Door Assembly Removal
The door assembly is secured to the unit frame by an
upper and lower hinge assembly.
To remove the door assembly:
1. Gently lay freezer on its back on a soft clean
surface.
2. Lift plastic cover off upper hinge assembly.
(See
Figure
5-3)
3. Using a 3/8” socket or wrench, extract the two bolts
securing the upper hinge to the unit frame.
4. Remove
kickplate.
5. Using a 3/8” socket or wrench, extract the two bolts
securing the lower hinge to the unit frame. Use a
phillips head screwdriver to extract the remaining
screw from the lower hinge assembly.
7. Lift the door assembly off of the unit frame.
Figure 5-2. Kickplate Removal
Kickplate
Screws
Figure 5-4. Lower Hinge Removal
Figure 5-3. Upper Hinge Removal
Bolts
Upper
Hinge
Hinge
Cover
Figure 5-1. Handle Removal
Set Screws
All Refrigerator-Pro
Содержание FPUH17D7KF All Freezer Professional Series
Страница 2: ......
Страница 20: ...Section 2 Installation Information 2 12 Figure 2 20 Figure 2 21 ...
Страница 21: ...Section 2 Installation Information 2 13 Figure 2 22 Figure 2 23 ...
Страница 24: ...Section 2 Installation Information 2 16 Notes ...
Страница 26: ...Section 3 Electronic Control 3 2 Notes ...
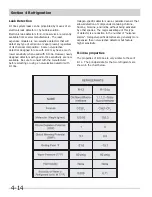
Страница 41: ...Section 4 Refrigeration 4 15 HFC 134a CFC 12 Pressure Temperature Chart ...
Страница 44: ...Section 4 Refrigeration 4 18 Notes ...
Страница 68: ...Section 6 Parts List 6 2 All Refrigerator Cabinet Exploded View And Parts List ...
Страница 70: ...Section 6 Parts List 6 4 All Refrigerator Sealed System Exploded View And Parts List ...
Страница 72: ...Section 6 Parts List 6 6 All Freezer Door Exploded View And Parts List ...
Страница 74: ...Section 6 Parts List 6 8 All Freezer Cabinet Exploded View And Parts List ...
Страница 76: ...Section 6 Parts List 6 10 All Freezer Sealed System Exploded View And Parts List ...
Страница 78: ...Section 6 Parts List 6 12 Notes ...
Страница 82: ...Section 7 Troubleshooting 7 4 Notes ...
Страница 83: ...Section 8 Wiring Diagram 8 1 All Refrigerator Wiring Diagram ...
Страница 84: ...8 2 Section 8 Wiring Diagram All Freezer Wiring Diagram ...


