


Section 5 Component Teardown
5-8
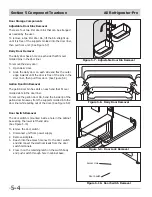
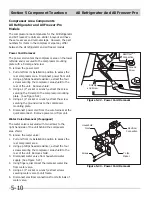
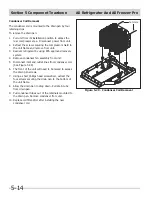
Figure 5-19. Defrost Thermostat Removal
Defrost Thermostat Removal
The defrost thermostat is secured with a retaining clip to
the upper left corner of the evaporator assembly. The
defrost thermostat and wire harness connections may be
accessed without completely removing the evaporator
cover. The top of the evaporator cover may be pulled
away from the rear of the cabinet interior enough to
remove the defrost terminator and disconnect the wire
harness connections. (See Figure 5-19)
To remove the defrost thermostat:
1. Disconnect unit from power supply.
2. Remove the cantilever shelves.
3. Remove the crispers and crisper supports.
4. Remove the evaporator cover.
5. Disconnect the defrost thermostat wire leads from
the wire harness. (See Figure 5-19)
6. Pull the defrost thermostat off of the evaporator
inlet
tubing.
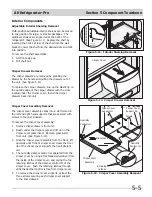
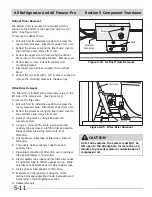
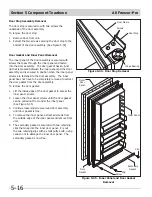
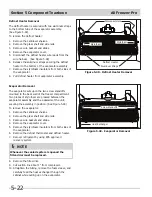
Defrost Heater Removal
The defrost heater is secured with two aluminum straps
to the bottom tube of the evaporator assembly.
To remove the defrost heater:
1. Disconnect unit from power supply.
2. Remove the cantilever shelves.
3. Remove the crispers and crisper supports.
4. Remove the evaporator cover.
5. Disconnect the defrost heater wire leads from the
wire harness. (See Figure 5-20)
6. Release the aluminum straps securing the defrost
heater to the bottom of the evaporator assembly.
7. Remove the styrofoam insulators from both sides of
the evaporator.
8. Pull defrost heater from evaporator assembly.
Disconnect Here
Defrost
Thermostat
Figure 5-20. Defrost Heater Removal
Disconnect Here
Styrofoam
Aluminum Straps
Defrost Heater
Styrofoam
All Refrigerator-Pro
Refrigerator defrost thermostat must be
installed on the evaporator inlet tube.
NOTE
Содержание FPUH17D7KF All Freezer Professional Series
Страница 2: ......
Страница 20: ...Section 2 Installation Information 2 12 Figure 2 20 Figure 2 21 ...
Страница 21: ...Section 2 Installation Information 2 13 Figure 2 22 Figure 2 23 ...
Страница 24: ...Section 2 Installation Information 2 16 Notes ...
Страница 26: ...Section 3 Electronic Control 3 2 Notes ...
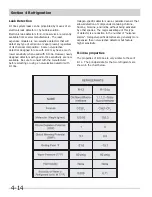
Страница 41: ...Section 4 Refrigeration 4 15 HFC 134a CFC 12 Pressure Temperature Chart ...
Страница 44: ...Section 4 Refrigeration 4 18 Notes ...
Страница 68: ...Section 6 Parts List 6 2 All Refrigerator Cabinet Exploded View And Parts List ...
Страница 70: ...Section 6 Parts List 6 4 All Refrigerator Sealed System Exploded View And Parts List ...
Страница 72: ...Section 6 Parts List 6 6 All Freezer Door Exploded View And Parts List ...
Страница 74: ...Section 6 Parts List 6 8 All Freezer Cabinet Exploded View And Parts List ...
Страница 76: ...Section 6 Parts List 6 10 All Freezer Sealed System Exploded View And Parts List ...
Страница 78: ...Section 6 Parts List 6 12 Notes ...
Страница 82: ...Section 7 Troubleshooting 7 4 Notes ...
Страница 83: ...Section 8 Wiring Diagram 8 1 All Refrigerator Wiring Diagram ...
Страница 84: ...8 2 Section 8 Wiring Diagram All Freezer Wiring Diagram ...


