background image


EDA-Z1000 - Installation and Operation Manual                                                                                                                  


2. 

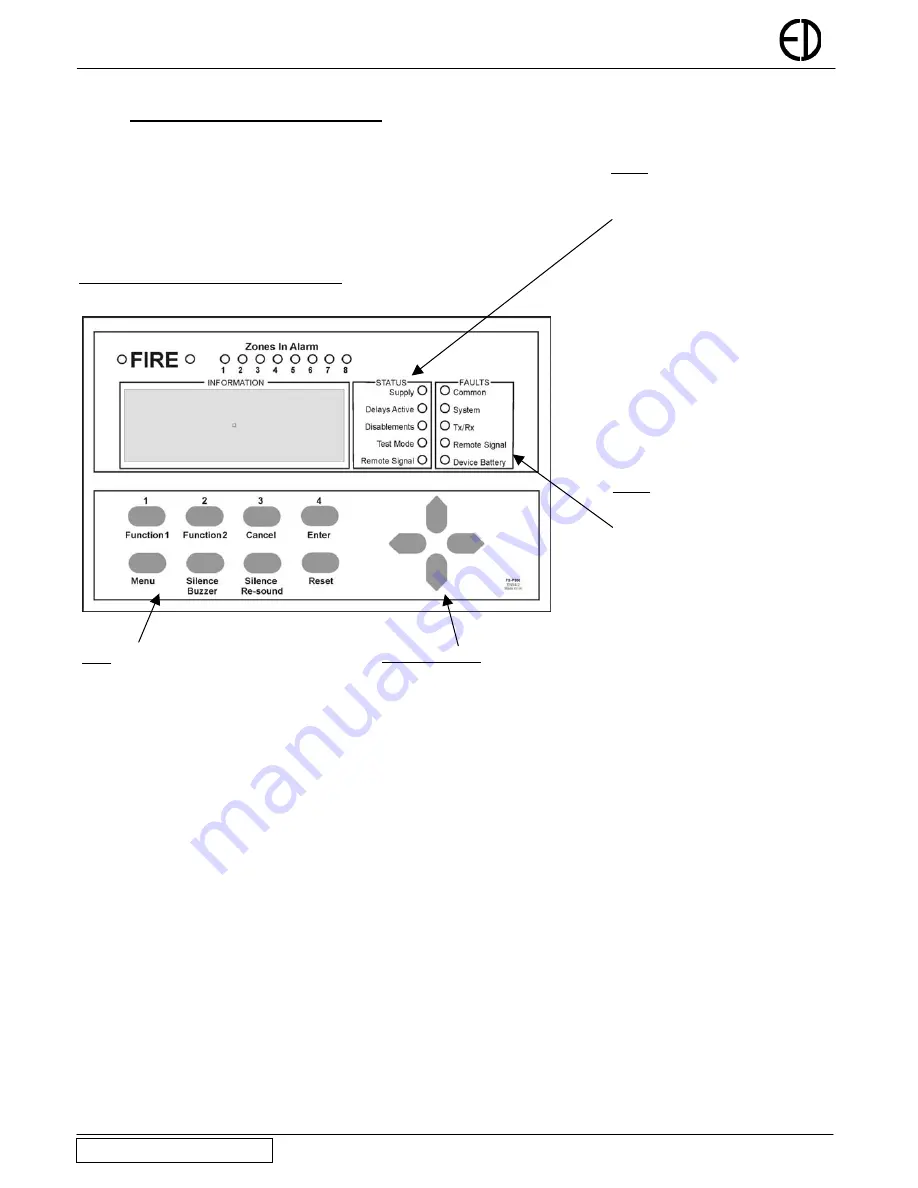
Front Panel Display and Keys 


Figure 1.1 Front Panel Display and Buttons 


Status 
Supply

 – This LED will be 

illuminated when mains is present 

Delays Active

 – Illuminated if a fire 

condition exists and delays are 
programmed. 

Disablements

-Illuminated if any 

devices or zones are isolated. 

Test Mode

-Illuminated if any test 

modes are operational. The buzzer will 
pulse and can be silenced by pressing 
‘Silence Buzzer’ 

Remote Signal

-Not implemented. 

Faults 
Common 

– Device or panel has a 

fault – see the main display for 
details. 

System

 – Not implemented. 

Tx/Rx

 – Not implemented. 

Remote Signal

 – Not implemented.

Device Battery

 – Not implemented.

Navigation Keys 

Used to navigate through the menu 
structure and programming / status 
screens. 
In a multiple fault or alarm condition, 
the up and down arrow keys allow 
the user to scroll through all the 
current events. The display will also 
scroll automatically every 6 seconds.


Keys 
Function 1 & 2

 – Programmable for use as 

Evacuate and Alert functions. 

Cancel

 - Used to return to the main screen 

from a menu or to return to the menu from a 
programming screen. 

Enter

 - This is used to accept information 

programmed into the panel. 

Menu

 – Press to enter the menu system. If 

held down for longer than 4 seconds all 
LED’s  will flash (lamp test). 

Silence Buzzer

- Silences the buzzer for all 

currently displayed faults (fault 
acknowledgement). 

Silence / Re-Sound

 - If the panel is in a fire 

condition this will silence the sounders. If 
the sounders are already silenced and the 
panel not reset, pressing this button will re-
sound the sounders using the preconfigured 
re-sound tone. 

Reset

 – Resets the panel from an alarm 

condition. Note that the system must be 
silenced before it can be reset from a fire 
condition. 


Version Z1000/V1.05 


Electro-Detectors                      

Page 

6


Содержание EDA-Z1000

Страница 1: ...tem Operation Manual Electro Detectors Ltd Electro House Edinburgh Way Harlow Essex CM20 2EG UK Tel 01279 635668 Fax 01279 450185 Email eda electrodetectors co uk Web www electrodetectors co uk Electro Detectors Version Z1000 V1 05 ...

Страница 2: ...viceable parts are contained within this panel Always refer to a qualified technician for parts and servicing This manual should be provided to the site s nominated responsible person and left on the premises for easy reference Version Z1000 V1 05 Electro Detectors Page 2 ...

Страница 3: ...na monitoring configuration added V1 02 DR 0 10 22 12 05 Must reset booster panel to ensure memory cleared All other devices should also be reset on power up Operation of fire relays when silence reset pressed V1 03 SM 0 15 13 06 06 New features for disabling faults and Double knock functions V1 04 SM 1 01 14 03 07 New menu structure Survey mode function keys and sounder circuit V1 05 SM 1 02 18 0...

Страница 4: ...To Silence Sounders 3 7 To Re sound the Sounders 3 8 To Reset an Alarm 3 9 Menu Navigation 3 10 To Change Date and Time 3 11 To Isolate a Zone 3 12 To Isolate a Device 3 13 To Enable a Zone 3 14 To Enable a Device 3 15 View System History of Events 4 0 Advanced User Operations 4 1 General 4 2 To View Access Codes 4 3 Changing Access Codes 4 4 To Select a Test Mode 4 5 To Disable a Test Mode Versio...

Страница 5: ...uld the need arise In order to log devices and program devices into the system they need to be connected via a supplied programming lead The system also stores the data programmed into each device allowing replacement devices to be easily cloned onto the system Prior to installation the building where the system is to be installed must be surveyed to ensure that each device to be fitted has a good...

Страница 6: ...n the up and down arrow keys allow the user to scroll through all the current events The display will also scroll automatically every 6 seconds Keys Function 1 2 Programmable for use as Evacuate and Alert functions Cancel Used to return to the main screen from a menu or to return to the menu from a programming screen Enter This is used to accept information programmed into the panel Menu Press to ...

Страница 7: ...er Once the Silence buzzer button has been pressed the panel assumes that the fault has been acknowledged and does not resound the buzzer If a different fault occurs the panel will sound the buzzer until the new fault has been acknowledged 3 4 To Reset a Fault Assuming the fault has been rectified pressing reset will reset the system and the system normal screen will be displayed If the fault is s...

Страница 8: ...that occurred during the alarm condition 3 9 Menu Navigation To enter the menu system press MENU and enter a valid password Main Menu will appear To scroll through the menu the or keys should be pressed In order to select a menu option the key should be pressed To return to the previous menu screen from a sub menu the should be pressed Pressing Cancel will return to the system screen where any fau...

Страница 9: ...ther Disablement conditions such as isolated devices exist Select Zone 01 Press ENTER to enable Zone 01 ENTER to continue 3 14 To Enable a Device To enable a previously isolated device press MENU and enter a valid password Select 2 Disable Enable select 2 Enable select 2 Enable Device Using the or keys select the device number to be enabled and press ENTER To enable more devices press ENTER or CAN...

Страница 10: ...n re enter the new password to confirm Press ENTER to save the new password A message will be displayed indicating that the password is being saved to the SIM and flash memory Access Level 1 Enter Current Code Enter New Code Confirm New Code Basic User ENTER to continue Hold CANCEL to exit Hold CANCEL to exit Hold CANCEL to exit 4 3 To Select Test Mode Test mode is available to an advanced user so...

Страница 11: ... It can be set in 1 hour intervals and is selected using the cursor keys A maximum of 48 hours can be set The user should now press enter to enable the test mode The Test Mode LED will illuminate Test Mode Enabled Save Test Settings YES ENTER to Continue Once test options have been selected these can now be saved for quick setup in the future Once the test screen is entered the panel will prompt t...

Страница 12: ...EDA Z1000 Installation and Operation Manual Version Z1000 V1 05 Electro Detectors Page 12 ...

Отзывы: