background image

24

24

EN

EPIR2 User Manual v.1.4

2.2.  How to remove a wireless device from the system

 IMPORTANT: 

 Before you continue, first ensure the EPIR2 is powered up and connected to 

your PC via the USB cable.

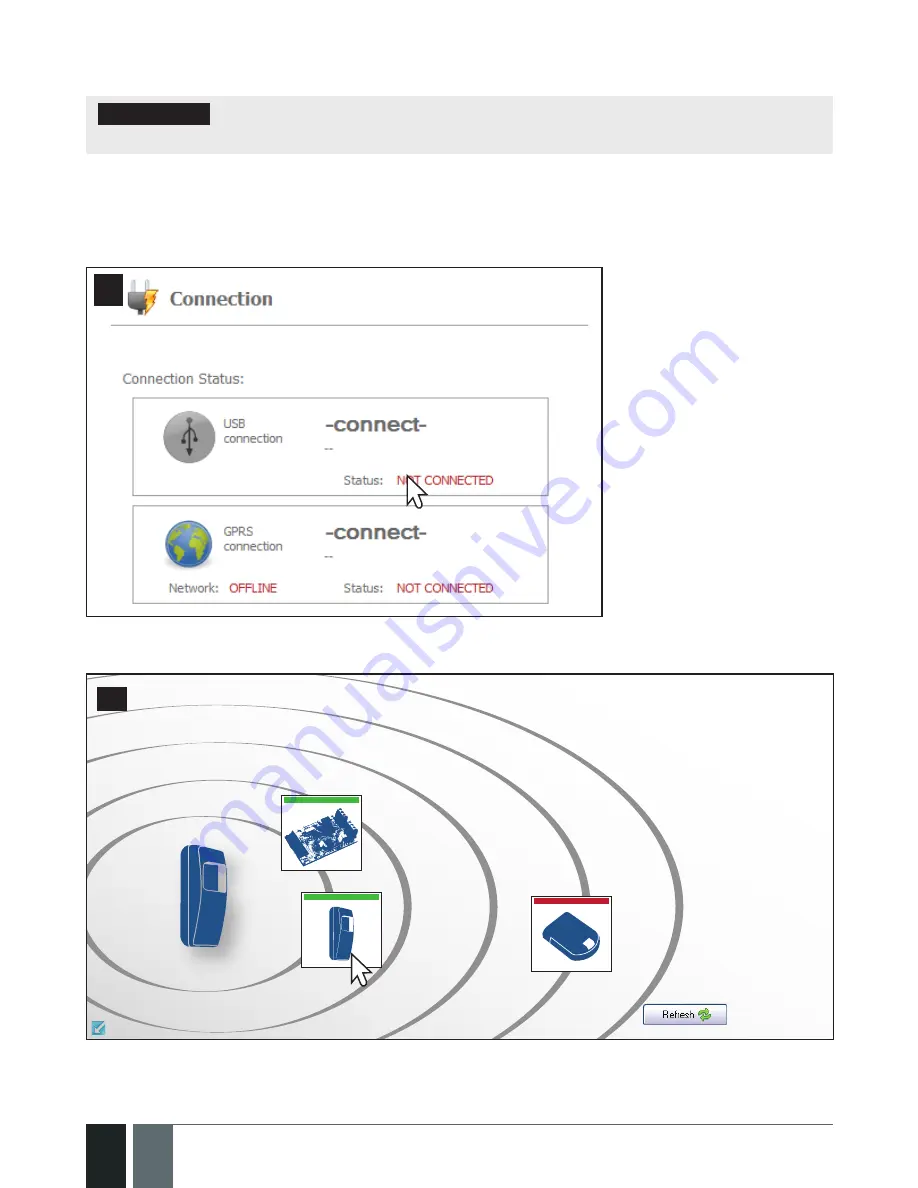
1. Turn on the wireless device by following the instructions provided in the user manual of the 

wireless device.

2. Run 

ELDES Configuration Tool

 software and left-click on the 

USB connection / -connect-

 button.

38

47

3. Open 

Wireless Devices

 section.

80%

60%

40%

20%

48

4.  In the radar diagram, left-click (highlight) on the bound wireless device icon (green stripe 

above the icon) to select it.

Содержание EPIR2

Страница 1: ...EPIR2GSM Alarm System ...

Страница 2: ...N 60950 1 standard Any additional device you connect to the system such as a com puter must also be powered by an EN 60950 1 approved supply Disconnect the mains power before installing Never install or carry out maintenance during stormy weather The electric socket that powers the system must be easily accessible In case of power cut the system is powered by a back up battery WARNING Only use the...

Страница 3: ...eless keypad overview 25 2 4 EWK1 and EWK2 wireless keyfob overview 30 3 HOW TO PROGRAM THE SYSTEM USING YOUR MOBILE PHONE 32 4 TROUBLESHOOTING 43 5 ADDITIONAL INFORMATION FOR ADVANCED USERS 44 5 1 How to connect a wired siren or a LED indicator to the wired output 44 5 2 How to connect a sensor to the wired zone 47 5 3 How to connect to the system remotely via GPRS connection 51 5 3 3 Ending the ...

Страница 4: ...urer s Warranty The system carries a 24 month manufacturer warranty from ELDES UAB The warranty begins the day the system is purchased by the user and the receipt must be retained as proof of purchase date The warranty remains valid only if the system is used as intended fol lowing all guidelines outlined in this manual and in accordance with the operating conditions specified The warranty is void...

Страница 5: ...refer to section 2 HOW TO MANAGE THE WIRELESS DEVICES IMPORTANT Please read the user manual before operating the system The user manual will show you how to install and operate the EPIR2 alarm security system safely and easily You ll find a quick start guide in section 1 To learn how to take advantage of additional functions see sections 2 3 and 4 Technical Specifications Supply voltage 11 15V 500...

Страница 6: ...ix the unit in place 8 Mini USB connector to allow programming via your PC 9 Holder for SIM card 10 GSM module 11 Back up battery in case of mains power supply failure 12 Motion detector to sense possible intruders 13 TAMPER button to alert you if anyone interferes with the unit 14 Microphone to allow you to listen in to an incident using your mobile phone 15 Wired zone for wired sensor output for...

Страница 7: ...ding wireless devices to the system If you in tend to use the wireless devices with your EPIR2 system follow the instructions for setting up the EPIR2 in this section then refer to section 2 HOW TO MANAGE THE WIRELESS DEVICES Step by step system installation 1 1 How and where to fix the holder to the wall The system should be installed indoors in stationary environment ONLY Choose a location where...

Страница 8: ...he event of insufficient credit balance on the SIM card the system would fail to make a phone call or send messages We also recommend you to disable call forwarding voice mail text message reports on missed busy calls Please contact your GSM provider for more details on these ser vices and how to disable them 1 3 How to insert the SIM card The SIM card must be prepared as described in 1 2 before b...

Страница 9: ...ice 1 5 Place the device into the holder 1 6 Insert the plug into the mains socket 1 7 How to check the detector is working 15 The system will start in 1 2 minutes To test that the sys tem is working when the red LED is switched off move your hand in front of the EPIR2 lens The system will detect the motion and the LED will light up for a few seconds If the LED indicator blinks fast a few times a ...

Страница 10: ...ould power the system for up to twenty four hours How to replace the battery 16 17 18 1 Unplug the power supply from the mains electricity socket 2 Remove the EPIR2 from its holder 3 Unplug the power supply connector 1 19 20 10 21 4 Remove the screw located on the base of the unit 5 Open the cover 6 Carefully remove the back up battery 22 23 7 With one hand holding the back up battery unplug the b...

Страница 11: ...OTE If you wish to program the EPIR2 system by SMS text message please refer to section 3 HOW TO PROGRAM THE SYSTEM USING YOUR MOBILE PHONE If not please proceed to section 1 9 1 Download ELDES Configuration Tool software 1 9 1 Download ELDES Configuration Tool software Visit www eldes lt you will find a link to the Configuration Tool under the menu option DOWNLOAD 24 Once you are at Configuration...

Страница 12: ... 1 4 26 Specify a location for setup file and left click on the Save button We recommend placing the file on your desktop 1 9 2 install ELDES Configuration Tool software 27 Double left click on the downloaded setup file to run it ...

Страница 13: ...13 13 EPIR2 User Manual v 1 4 In the newly popped up window left click on the Next button to continue 28 In the next window left click on the Next button to continue 29 ...

Страница 14: ...14 14 EN EPIR2 User Manual v 1 4 In the following window left click on the Next button to continue 30 In the next window left click on the Next button to continue 31 ...

Страница 15: ...5 15 EPIR2 User Manual v 1 4 In the following window left click on the Install button to begin the installation process 32 Wait for the installation progress to complete and do not click on any button 33 ...

Страница 16: ...ration Tool software after wards 34 NOTE You do not have to repeat the installation process the next time when you want to run ELDES Configuration Tool software again 1 9 3 Connect EPIR2 to your PC via the USB cable IMPORTANT Before connecting EPIR2 to your PC via the USB cable first ensure the EPIR2 is powered up 35 Plug the miniUSB connector into EPIR2 36 PlugtheUSB connector intoyourPC ...

Страница 17: ...re anytime you want by double left clicking on the ELDES ConfigTool shortcut located on the desktop 37 38 Once the software is up and running left click on the USB connection connect button 39 Type in 4 digit administrator password which is 1470 by default and click on the Continue button ...

Страница 18: ...e system dial the SIM card and wait until it rings once and then drops the call The system is now successfully disarmed In both cases be sure to wait until the system automatically drops your call Again in both cases the user will receive a short SMS text message each time the system is successfully armed or disarmed IMPORTANT Dialing the SIM card is free of charge as the system drops your call in...

Страница 19: ...answered after several rings predetermined by your mobile phone operator the system will hang up If the call is not picked up by User 1 the system will ring all the pre programmed numbers in order of priority starting with User 2 until a user picks up or the call expires If the first user is busy or out of radio coverage the system will also ring the next pre programmed number When a call is answe...

Страница 20: ...to request information about the system the power supply and the network quality Plus you can listen in to what s happening in the secured location through a remote microphone See section 3 for more details EPIR2 system comes equipped with built in wireless module allowing to enhance your securi ty system with the addition ELDES wireless PIRs Passive Infrared Sensors sirens magnetic door and windo...

Страница 21: ... configurable self test period Maximum wireless connection range is 150 meters in open areas within a building wireless range will be up to 30m depending on building construction 2 1 How to bind a wireless device to the system IMPORTANT Before you continue first ensure the EPIR2 is powered up and connected to your PC via the USB cable 1 Turn on the wireless device by following the instructions pro...

Страница 22: ... devices visible to EPIR2 within its wire less range 80 60 40 20 43 Unbound devices are indicated by a device icon with a red stripe above the icon Once the device is bound the stripe turns to green Wireless device bound to alarm sys tem green stripe above the icon Wireless device not bound to alarm system red stripe above the icon ...

Страница 23: ...ary to press any button on the EWK1 EWK2 keyfob several times 7 After the successful wireless device binding process the stripe above the wireless device icon will turn green In addition the following information related to the bound wireless device will appear 46 Device Type Wireless device model and connection with alarm system status CONNECTED Wireless device is bound to alarm system NOT CONNEC...

Страница 24: ... USB cable 1 Turn on the wireless device by following the instructions provided in the user manual of the wireless device 2 Run ELDES Configuration Tool software and left click on the USB connection connect button 38 47 3 Open Wireless Devices section 80 60 40 20 48 4 In the radar diagram left click highlight on the bound wireless device icon green stripe above the icon to select it ...

Страница 25: ...ess connection alive This leads to fast battery power drain on the battery powered wireless device 2 3 EKB3W wireless keypad overview ATTENTION The EKB3W commands provided in this user manual are intended for basic configuration and control of the EPIR2 system For complete configuration and control using EKB3W please refer to the latest version of EPIR2 Configuration Manual located at www eldes lt...

Страница 26: ...s of the associated EKB3W keypad Visual Indication EKB3W keys have a back light and in case of alarm the keypad back light turns on and lasts for 10 seconds by default if the violated zone or tamper is of the associated EKB3W keypad For battery power saving reasons the back light and LED light lasts for 10 seconds after the last key stroke However this duration is configurable 2 3 1 Sleep mode how...

Страница 27: ...for wired magnetic door contact connection 2 3 2 How to configure and control the system by EKB3W The system configuration and control by EKB3W keypad is carried out by entering a valid configu ration command using the number keys 0 9 key for confirmation and key to cancel the characters that are being entered Alternatively the user can wait for 10 seconds until the keypad buzzer will provide a lo...

Страница 28: ...hone number by default SMS User EPIR2 53 2 3 5 About STAY mode and how to activate it by EKB3W Stay mode allows the user to remain in the secured area after arming the system In Stay mode the system does not cause the alarm when the zones set up to operate under this mode become violated This mode is usually used when arming the system before night The ways of system arming in Stay mode are the fo...

Страница 29: ...flashing zone LED or illu minated SYSTEM LED if the violated tamper number is above 12 In both cases the mini buzzer can be silenced by disarming the system using any method For more details on EKB3W violated high number zone tamper number indication please refer to section 2 3 8 Fault messages 2 3 7 How to bypass a violated zone activate a bypassed zone by EKB3W Arming the system is disabled whil...

Страница 30: ...ed in the table below Zone LED Description 1 One or more high number tampers are violated 2 Backup battery problem 3 Main power supply problem 4 Date time not set 5 One or more high number zonesare violated 6 GSM connection problem In order to find out which particular high number zone is violated please enter command B In order to find out which particular high number tamper is violated please en...

Страница 31: ...uzzer s sound signal and red indicator on EWK2 only confirms a successfully carried out command The status of the sent command can be checked by attempting to receive the feedback signal from the alarm system This can be performed by pressing down the same button and holding it for 3 seconds 3 short sound signals indicate a suc cessfully carried out command while 1 long beep stands for failed comm...

Страница 32: ...tered the secured area Entry delay countdown is intended for user to disarm the sys tem before the alarm is caused 2 To disarm the system press 1 of 4 keyfob buttons set to disarm the system by default EWK1 EWK2 58 3 After the system is successfully disarmed it will reply with confirmation by SMS message to User 1 phone number by default SMS User EPIR2 60 Disarm the system 59 Disarm the system ...

Страница 33: ...age If you receive the message wrong syntax please check your message and try again Main Settings Function Command Value Range Comment Example Set the SMS language LL LL CZ EN EE FI FR DE GR IS LV LT RU SK ES Choose your preferred lan guage for the device before you change the pre set pass word Use the code shown in the table on page 42 to set your device to your preferred language Then send the c...

Страница 34: ... with plus The phone numbers starting with plus and an interna tional country code in the following format international code area code local num ber example for UK 4417091111111 International with 00 The phone num bers starting with 00 and an international country code in the following format 00 international code area code local number example for UK 004417091111111 Local The phone num bers star...

Страница 35: ... mi MMMM year mn month 01 12 dd day 01 31 hh hour 00 23 mi minutes 00 59 1111_2012 05 25_ 14 15 Arm the system XXXX_ARM The system will send you a text confirmation by return 1111_ARM Disarm the system XXXX_DISARM The system will send you a text confirmation by return 1111_DISARM Change the exit delay timer XXXX_ EXITDELAY YY YY 0 600 value is in seconds Whenyouexityourprotected building havingjus...

Страница 36: ...ault is 15 seconds During this time the detector will ignore any motion This period is called entry delay By default while the time out is running the LED will bling once a second 1111_ ENTRYDELAY 1 25 Disable the entry delay timer XXXX_ ENTRYDELAY Zn 0 Zn Z1 Z34 1111_ ENTRYDELAY 5 0 Check your system and zone status XXXX_STATUS The system will reply to the user who sent the SMS text message with ...

Страница 37: ...wing connection and control of various electrical appliances water pumps heating lighting blinds etc The maximum number of PGM wireless outputs which can be connected to the EPIR2 system is 32 Alarm Duration Settings Function Command Value Range Comment Example Change system alarm duration XXXX_SIREN T T 0 5 vale is in minutes 1111_SIREN 4 Check system alarm duration XXXX_SIREN The system will rep...

Страница 38: ...he system makes a phone call to the User 1 number in the event of an alarm You may wish to configure the sys tem so that a phone call is NOT made when an alarm occurs you may prefer to receive only SMS notifications 1111_CALLS OFF Enable ring from the system in case of alarm XXXX_CALLS ON 1111_CALLS ON Disable SMS text message from the system in case of alarm XXXX_SMS OFF The system sends an SMS t...

Страница 39: ...programmed user numbers simultaneously when alarm occurs 1111_SMSALL ON Disable SMS text message to all users simultane ously in case of alarm XXXX_SMSALL OFF 1111_ SMSALL OFF External Power Supply Backup Battery Status Notification Settings Function Command Value Range Comment Example Disable SMS text message regard ing the external power supply XXXX_M OFF The EPIR2 will let you know when the mai...

Страница 40: ...ation Settings Function Command Value Range Comment Example Set temperature MIN and MAX values XXXX_TEMP MIN MAX MIN minimum temperature boundary 10 40 C MAX maximum temperature bounda ry 10 40 C 1111_TEMP 10 30 System Control from Any Phone Number Settings Function Command Value Range Comment Example Unblock unknown incoming num bers XXXX_STR ON By default the EPIR2 alarm sys tem can only be acce...

Страница 41: ...phonecallintheeventofalarm willbemadeUNLESS Disablering fromthesystemincaseofalarm hasbeenselected see alarm notificationsettings above 1111_MIC Detector Sensitivity Level Settings Function Command Value Range Comment Example Change the sensitivity level of the detector XXXX_LEVEL YY YY 20 99 The greater the value the lower the sensitivity level of the detector The EPIR2 device is pre set by the m...

Страница 42: ...stem will send you a text by return with the number of available free wireless channels 1111_STATUS_FREE Get wireless de vice information XXXX_RFINFO Zn or XXXX_RFINFO YYYYYYYY Zn Z3 Z34 The system will send you a text by return with the following information wireless device battery level wireless signal level error rate number of failed data transmis sion attempts in a 10 minute period firmware v...

Страница 43: ...Range Comment Example Get Smart Security ID code XXXX_SMART_ID The system will send you a text by return with the multi character code required by Smart Security feature 1111_SMART_ID Choose your preferred language for the device before you change the pre set password Use the code shown in the table below to set your device to your preferred language Then send the code via SMS text message to the ...

Страница 44: ...ssword has not been changed The NR1 user has not been programmed in Your existing EPIR2 does not recognise an ELDES wireless device EITHER Wireless mode is disabled Please refer to ELDES Config uration Tool software to enable it OR Wireless device battery is out of energy or the device is not switched ON Some users are not getting arm disarm and or alarm notifi cations If you normally configure yo...

Страница 45: ... by a connected LED indicator NO SIM Inserted SIM card not present The LED indicator will flash if the SIM card is not present in the EPIR2 SIM PIN Enabled PIN code left enabled The LED indicator will flash with pauses if the PIN code is not disabled on the SIM card that is inserted in the EPIR2 GSM Operator Error GSM connection error The LED indicator will flash with pauses in case of this error ...

Страница 46: ...ed of the wired bell siren to BELL terminal while the GND usually black wire to BELL COM terminal GND BELL COM BELL Z2 BELL 61 The wired siren bell connected to the wired output must be piezo type and powered from 8 15V The current consumption must not exceed 150 mA 4 Screw in the terminals 64 5 Insert back the terminal block 65 63 ...

Страница 47: ...installation we recommend using EWS1 and EWS2 wireless sirens System condition indication by LED indicator 1 Remove the terminal block from the slot 66 2 Loosen the screws of the terminals using a flathead screwdriver 67 3 Connect LED indicator s anode lead longer to any of 1 kΩ nominal resistor lead and to the BELL terminal while the cathode lead shorter to BELL COM terminal BELL COM BELL Z2 66 r...

Страница 48: ...sired system conditions e g System Armed check box NOTE The resistor and the LED indicator are NOT supplied with the EPIR2 system and are NOT mandatory to use Please obtain these components from your local store if desired 5 2 How to connect a sensor to the wired zone EPIR2 system comes equipped with the wired zone therefore you may wish to connect a wired sensor to your system 5 2 1 Connecting a ...

Страница 49: ...f the wired detection device to Z2 terminal while the COM usually green wire to BELL COM terminal 4 Connect the 5 6 kΩ nominal resistor supplied with your EPIR2 system across BELL COM and Z2 terminal in parallel to the connected wires of the detection device 71 BELL COM Z2 BELL Z COM Magnet resistor 5 6 kΩ 5 Screw in the terminals 74 73 ...

Страница 50: ...e v 5 2 2 Connecting a wired sensor of NC normally closed type 1 Remove the terminal block from the slot 76 2 Loosen the screws of the terminals using a flathead screwdriver 77 3 Connect the Z wire usually yellow of the wired detection device to any terminal of the 5 6 kΩ nominal resistor supplied with your EPIR2 system while the other resistor terminal to Z2 terminal ...

Страница 51: ...ally green wire to BELL COM terminal 76 BELL COM Z2 BELL Z COM Magnet resistor 5 6 kΩ 5 Screw in the terminals 79 6 Insert back the terminal block 80 7 Set Zone Status of Z2 to Enabled under Zones On Board section in ELDES Configuration Tool software 78 ...

Страница 52: ...n session for 20 minutes An SMS reply is sent containing device IMEI number and confirming that the connection has been successfully established SMS SMS text XXXX_STCONFIG Example 1111_STCONFIG Initiate the Connection to Third Party Server In case it is necessary to establish a connection between EPIR2 system and a third party configuration server send the following SMS message SMS SMS text XXXX_S...

Страница 53: ... valid administrator password the sys tem grants access to full configuration remotely Remote Configuration Management window displays all performed configuration actions 81 82 83 84 5 3 3 Ending the configuration process Shut down the Connection with the Server After the system configuration is complete use one of the fol lowing methods to end the con figuration process Press Disconnect button an...

Страница 54: ...pgraded 5 6 How to upgrade the firmware remotely via GPRS connection FOTA EPIR2 alarm system supports FOTA firmware over the air feature This allows to upgrade the firmware remotely via GPRS connection Once the upgrade process is initiated the system connects to the specified FTP server address where the firmware file is hosted and begins downloading and re flashing the firmware The firmware file ...

Страница 55: ...hemonitoringstationbytransmittingdata messages to the monitoring station The system connects to the monitoring station when the MS Monitoring Station mode is enabled For more details please refer to EPIR2 Configuration Manual located at www eldes lt en download 5 8 SMART SECURITY EPIR2 system supports a Smart Security feature based on user friendly graphical interface that can beaccessedviawebbrow...

Страница 56: ...aracter securitynumberprovidedwitheveryEPIR2unit ThisIDnumbercanberetreivedusingELDES ConfigurationToolsoftwareorbysendingthe followingSMSmessagefromUser1 User10 phonenumber XXXX_smart_id DeviceModel selectEPIRfromthelist Afterfillinginthedevicedetails pressCreate button 86 5 8 4 Controlling your device via SMART SECURITY After adding the device to the account time you will be brought to the next ...

Страница 57: ...Press Control button to start controlling your security system and electrical appliances In the next window you can arm disarm the alarm system view battery network temperature status alarm reports and control electrical appliances 88 ...

Страница 58: ...will have to purchase a new key via PayPal Press PayPal Extend License located in the Devices in Use section of Devices window In the next window follow the instructions of the PayPal system to complete the purchasing procedure After the purchase is complete the License Key validity extends automatically for a specified device 89 ...

Страница 59: ...59 59 EPIR2 User Manual v 1 4 6 Related products EWP1 wireless PIR sensor motion detector EWD1 magnetic door contact EWS1 internal siren EWS2 external siren ...

Страница 60: ...nual v 1 4 EWK1 wireless keyfob EWF1 wireless smoke detector EW1 wireless zone and PGM output expansion module EW1B battery powered wireless zone and PGM output expansion module EKB3W wireless LED keypad EWK2 wireless keyfob ...

Страница 61: ...61 61 EPIR2 User Manual v 1 4 ...

Страница 62: ...62 62 EN EPIR2 User Manual v 1 4 ...

Страница 63: ...63 63 EPIR2 User Manual v 1 4 ...

Страница 64: ...MadeintheEuropeanUnion www eldes lt ...

Отзывы: