background image

110

A

U

T

O

A

U

T

O

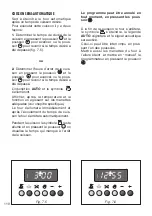
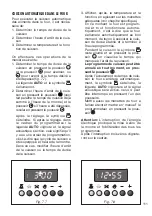
Fig. 7.5

Fig. 7.6

CUISSON SEMI-AUTOMATIQUE

Sert à éteindre le four automatique 
après un temps de cuisson désiré. 
Pour exécuter cette cuisson il y a deux 
façons : 
1. Déterminer le temps de durée de la 

cuis son en pressant le poussoir 

 et le 

poussoir 

  pour avancer, ou le pous-

soir 

 pour revenir si le temps désiré a 

été dépassé (fig.  7.5).

ou

2. Déterminer l’heure d’arrêt de la cuis-

son en pressant le poussoir 

  et le 

poussoir  

 pour avancer, ou le pous-

soir 

 pour revenir si le temps désiré a 

été dépassé. 
L’inscription 

AUTO et le symbole  


s’al lumeront. 
Afficher, après, la température et la 
fonction en agissant sur les manettes 
adéquates (voir chapitre spécifique). 
Le four s’allumera immédiatement et 
après I’écoulement du temps de cuis-
son le four s’arrêtera automatiquement.

Pendant la cuisson le symbole 

 reste 

allumé et en pressant le poussoir 

 on 

visualise le temps qui manque à I’arrêt 
de la cuisson. 

Le programme peut être annulé en 

tout moment, en pressant les pous-

soir 

.  

À la fin de la cuisson le four s’arrêtera, 
le symbole 

  s’éteindra, la légende 

AUTO clignotera et le signal acoustique 

sera activé. 
Celui-ci peut être interrompu en pres-
sant I’un des poussoirs.
Mettre aussi les manettes du four à 
I’allure éteint  et mettre en “manuel” le 
programma teur en pressant le poussoir  

.

Содержание 106 EX 870

Страница 1: ...Made in Italy H O M E A P P L I A N C E S 100 ELBAQUALITY MADE IN ITALY COOKERS CUISINIERES Instructions for the use Installation advices Mode d emploi Conseils pour l installation GB FR ...

Страница 2: ... any moment and without prior notice without jeopardising the essential functional and sa fety characteristics of the appliances Le fabricant n est pas responsable des erreurs éventuelles dues à des fautes de frappe ou d impression suscep tibles de se trouver dans cette notice Il se réserve le droit sans porter préjudice aux caractéristiques essentielles du point de vue fonctionnel et du point de ...

Страница 3: ...DISPOSAL OF THE PRODUCT IN ACCORDANCE WITH EC DIRECTIVE 2002 96 EC for European Union countries only models with electric heating elements At the end of its working life the product must not be disposed of as urban waste It must be taken to a special local authority differentiated waste collection centre or to a dealer providing this service Disposing of a household appliance separately avoids pos...

Страница 4: ...am nails pa cking straps etc should not be left around within easy reach of children as these may cause serious injuries Some appliances are supplied with a protective film on steel and aluminium parts This film must be removed before using the appliance IMPORTANT The use of suitable protective clothing gloves is recommended when handling or cleaning of this appliance Do not attempt to modify the ...

Страница 5: ...e regulations in force in your country If the appliance is to be scrapped remove the power cord After use ensure that the knobs are in the off position Children less than 8 years of age shall be kept away unless con tinuously supervised This appliance can be used by children aged from 8 years and above and persons with reduced physical sensory or mental capabilities or lack of experience and knowl...

Страница 6: ... the hob is cracked or otherwise damaged by fal ling objects etc disconnect the appliance from the electrical power supply to avoid the possibility of electric shock and call Customer Service WARNING When correctly installed your product meets all sa fety requirements laid down for this type of product category However special care should be taken around the rear or the underneath of the appliance...

Страница 7: ...g towels dishcloths or other items on the appliance or its handle as this could be a fire hazard Clean the oven regularly and do not allow fat or oils to build up in the oven base or tray Remove spillages as soon as they occur Do not stand on the cooker or on the open oven door Always stand back from the appliance when opening the oven door to allow steam and hot air to escape before removing the ...

Страница 8: ...s a safety valve system fitted the flow of gas will be stopped if and when the flame should accidentally go out Cooker Cat I 3 7 5 4 2 1 Fig 1 1b 3 6 8 CONTROL PANEL Controls description 1 Front right burner control knob 2 Rear right burner control knob 3 Central triple ring burner control knob 4 Rear left burner control knob 5 Front left burner control knob 6 Minute counter control knob 7 Gas ove...

Страница 9: ...ription 1 Front right burner control knob 2 Rear right burner control knob 3 Central fish burner control knob 4 Rear left burner control knob 5 Front left burner control knob 6 Minute counter control knob 7 Gas oven grill control knob 8 Rotisserie oven light control knob 106 EX 980 Note The electric ignition is incorporated in the knobs If the appliance has a safety valve system fitted the flow of...

Страница 10: ...knob 3 Multifunction oven thermostat knob 4 Front left burner control knob 5 Rear left burner control knob 6 Central triple ring burner control knob 7 Rear right burner control knob 8 Front right burner control knob 9 Rotisserie oven control knob Fig 1 3a 3 5 4 1 2 Fig 1 3b A U T O 1 2 3 5 6 7 8 9 4 106 EX 870 Note The electric ignition is incorporated in the knobs If the appliance has a safety va...

Страница 11: ...tifunction oven switch knob 3 Multifunction oven thermostat knob 4 Front left burner control knob 5 Rear left burner control knob 6 Central fish burner control knob 7 Rear right burner control knob 8 Front right burner control knob 9 Rotisserie oven control knob Fig 1 4b A U T O 1 2 3 5 6 7 8 9 4 106 EX 970 Note The electric ignition is incorporated in the knobs If the appliance has a safety valve...

Страница 12: ... zone Ø 145 1200 W 4 Oval cooking zone Ø 140 x 250 1800 1000 W 5 Double cooking zone Ø 140 x 250 1800 1000 W 6 Cooking zone residual heat indicators Fig 1 5b A U T O 2 1 11 3 4 6 7 8 9 5 10 CONTROL PANEL Controls description 1 Multifunction oven thermostat knob 2 Multifunction oven switch knob 3 Front left cooking zone control knob 4 Rear left cooking zone control knob 5 Central cooking zone contr...

Страница 13: ...rapid boiling of liquids whereas the min imum setting allows slower warm ing of food or maintaining simmering conditions of liquids Other intermediate operating can be achieved by positioning the control knob indicator between the maxi mum and minimum setting but not between the maximum and off posi tions N B When the cooker is not being used set the gas knobs to their closed positions and also cl...

Страница 14: ...ly makes it difficult to light the burner with the knob set to maximum set the knob to minimum and repeat the operation CHOICE OF THE BURNER On the control panel near every knob there is a diagram that indicates which burner is controlled by that knob The suitable burner must be chosen according to the diameter and the capacity used As an indication the burners and the pots must be used in the fol...

Страница 15: ...he special grid for woks rests on the grid of the triple ring burner Warning 3 Using woks without this special grid could seriously damage the burner 3 Do not use this grid with flat bottomed pans figs 2 4a 2 4b Fig 2 4a WRONG Fig 2 4b CORRECT ...

Страница 16: ...urface Check that the cooker top is clean Fig 2 6 Fig 2 5 IMPORTANT NOTE The heating elements incorporate a thermolimiter that switches ON OFF the element in all settings to protect any overheating of the ceramic glass The use of incorrect pans and or wrong pan positioning will cause the tempera ture limiter to operate more frequently resulting in a reduction of cooking per formance 3 CIRCUITS RAD...

Страница 17: ...rom 1 to 12 maximum tempera ture fig 2 7 By switching on the second element fig 2 8 and 2 9 the surface area of the rear right and central radiant zones can be extended For this purpose turn the control knob fig 2 7 fully to the right position Fig 2 7 Fig 2 9 Fig 2 8 Second element Second element OVAL ZONE DOUBLE ZONE WARNING If the surface is cracked switch off the appliance to avoid the possibil...

Страница 18: ...sotto Browning of meats roasted potatoes fried fish ome lettes and for boiling large quantities of water Fast frying grilled steaks etc Switching on the second element Double and oval radiant plate only 0 Knob setting 1 2 3 4 5 6 2 0 1 2 2 3 4 3 4 6 7 4 7 8 4 5 8 9 10 6 11 12 After a short period of use experience will teach you which setting is the right one for your needs COOKING HINTS Cooking p...

Страница 19: ... Never cook the food directly on the glass ceramic hob but in special pans or containers RESIDUAL HEAT INDICATOR The hob also features 5 warning lights which are connected to the correspond ing plates When the temperature of a cooking plate is above 60 C the relevant warn ing light will also light up to warn of heat on the surface of the hob This light also stay on after the cooking plate has been...

Страница 20: ...ceramic surface when it is hot Remember that the surface remains hot for a long time about 30 min after the cooking plate has been switched off Follow the cleaning instructions care fully Do not scratch the cooktop with cutting or sharp objects Do not use the cooktop as a work surface CLEANING Before you begin cleaning make sure that the appliance is switched off Remove spillages and other types o...

Страница 21: ...rol of the temperature is assured by a thermostatic probe posi tioned inside the oven The probe must be always kept in its housing in a clean condition as an incorrect position or encrustment may cause an alteration in the control of the temperature WARNING The door is hot use the handle THERMOSTAT The numbers 1 to 10 printed on the knob fig 3 1 indicate the increasing oven temperature value see t...

Страница 22: ...ior to repeating the igni tion 3 After lighting the burner wait a few seconds before releasing the knob until the safety valve stays open 4 Gently close the oven door and set the oven control knob to the requi red temperature If the flame extinguishes for any reason the safety valve will automatically shut off the gas supply to the burner To re light the burner first turn the oven control knob to ...

Страница 23: ...ken breasts with tomato 180 C Grilled chicken roast chicken 190 C Veal loaf 175 C Roast beef 170 C Fillet of sole 175 C Aromatic hake 170 C Beignets 160 C Ring cake 150 C Plum tart 170 C Jam tartlets 160 C Sponge cake 170 C Sweet dough 160 C Sweet puffs 170 C Plain sponge cake 170 C OVEN COOKING Before introducing the food preheat the oven to the desired temperature For a correct preheating operat...

Страница 24: ...out 1 minute prior to repeating the ignition In case of mains failure press the knob firmly and put a lighted match or taper to the pipe of the burner fig 3 6 3 After lighting the burner wait a few seconds before releasing the knob until the safety valve stays open Do not close completely the oven door The grill must always be used with the oven door slightly open fig 3 7 The oven door must always...

Страница 25: ... must always be used with the oven door slightly open and with shield A mounted fig 3 7 Mount shield A fig 3 7 which serves to protect the control panel from the heat Turn on the grill as explained in the pre ceding paragraphs and let the oven pre heat for about 5 minutes with the door ajar Introduce the food to be cooked posi tioning the rack as close to the grill as possible The dripping pan sho...

Страница 26: ...it motor collar G Fit the heat shield and switch on the grill and turnspit The rotation direction of the rotisserie can be either clokwise or counter clockwise Very important the rotisserie must always be used with the oven door ajar and with shield A mounted Attention the oven door becomes very hot during operation Keep children away It is recommended that you do not grill for longer than 30 minu...

Страница 27: ...btained in the fol lowing ways a by normal convection The heat is produced by the upper and lower heating elements b by forced convection A fan sucks in the air contained in the oven muffle which sends it through the circular heating element and then sends it back through the muffle Before the hot air is sucked back again by the fan to repeat the described cycle it envelops the food in the oven pr...

Страница 28: ...owing functions OVEN LIGHT By turning the knob onto this setting see picture aside we light the oven cavity The oven remains alight while any of the functions is on TRADITIONAL CONVECTION COOKING The upper and lower heating elements are switched on The heat is diffused by natural convection and the temperature must be regulated between 50 C and 225 C with the thermostat knob It is necessary to pre...

Страница 29: ...tin toasting etc HOT AIR COOKING The circular element and the fan are on The heat is diffused by forced convec tion and the temperature must be regu lated between 50 and 225 C with the thermostat knob It is not necessary to preheat the oven Recommended for For foods that must be well done on the outside and tender or rare on the inside i e lasagna lamb roast beef whole fish etc VENTILATED GRILL CO...

Страница 30: ...t the jars onto the dripping pan making sure they do not touch each other and the door and set the ther mostat knob to position 135 C When sterilization has begun that is when the contents of the jars start to bubble turn off the oven and let cool REGENERATION Set the switch to position and the thermostat knob to position 150 C Bread becomes fragrant again if wet with a few drops of water and put ...

Страница 31: ...ed under the rack to catch the cooking juic es and fats Grilling with the oven door closed Grilling with the oven door closed and do not for longer than 30 minutes at any one time SIMULTANEOUS COOKING OF DIFFERENT FOODS The MULTI FUNCTION oven set on position and consents a simulta neous heterogeneous cooking of differ ent foods Different foods such as fish cake and meat can be cooked together wit...

Страница 32: ...ken breasts with tomato 180 C Grilled chicken roast chicken 190 C Veal loaf 175 C Roast beef 170 C Fillet of sole 175 C Aromatic hake 170 C Beignets 160 C Ring cake 150 C Plum tart 170 C Jam tartlets 160 C Sponge cake 170 C Sweet dough 160 C Sweet puffs 170 C Plain sponge cake 170 C OVEN COOKING Before introducing the food preheat the oven to the desired temperature For a correct preheating operat...

Страница 33: ...of the oven and insert the rod support into the intermediate rack holders Put the meat to be cooked onto the rod being careful to secure it in the center with the special forks Insert the rod into the side gear open ing P fig 4 4 Remove the grip H by turning it to the left Insert completely the rotisserie sup port the shaft S must be inserted in the spit motor collar G Close the oven door and swit...

Страница 34: ... can be set for a maximum of 60 minutes The knob fig 5 1 must be rotated clock wise as far as the 60 minute position and then set to the required time by rotating it anticlockwise IMPORTANT WARNING This is only a mechanical timer Remember to turn off the oven grill man ually Fig 5 1 5 MINUTE COUNTER ...

Страница 35: ...C ALARM The alarm program consists only of a buzzer which may be set for a maxi mum period of 99 minutes To set the time push the or until you obtain the desired time in the panel Having finished the setting the symbol will be lighted and the countdown will start immediately At the end of the time the symbol will be switched off and an intermittent buzzer during 7 minutes will go off this can be s...

Страница 36: ...e numbers of all programs Turning back of the numbers of al programs and changing the frequency of the audible signal Description of the lighted symbols AUTO flashing Programmer in auto matic position but not program med AUTO always lighted Programmer in automatic position with program inserted Automatic cooking taking place Timer in operation and AUTO flashing Program error The time of day lies b...

Страница 37: ...UTO is steady lighted which means a cooking program has already been inserted by pushing the button you have the cancellation of the program and the switching to manual If the oven is switch on you must switch off manually ELECTRONIC TIMER The timer program consists only of a buzzer which may be set for a maximum period of 23 hours and 59 minutes If the AUTO flashing push the but ton To set the ti...

Страница 38: ...red time fig 7 6 AUTO and the symbol will be on Then set the temperature and the coo king program using the oven switch and thermostat knobs see specific chap ters The oven is switched on and it will be switched of automatically at the end of the desired time During cooking the symbol remains on and by pressing the button you can see the time that remains till the end of the cooking The cooking pr...

Страница 39: ... king cycle has been superimposed on the clock In this case modify the end of cooking time or the coo king time itself by following again the above mentioned instructions 3 Set the temperature and the cooking program by using the switch and ther mostat knobs of the oven see speci fic chapters Now the oven is programmed and every thing will work automatically that is the oven will turn on at the ri...

Страница 40: ...t use harsh abrasive cleaners or sharp metal scrapers to clean the oven door glass or the glass lid models with glass lid only since they can scratch the surface which may result in shattering of the glass 8 CLEANING AND MAINTENANCE WARNING When correctly installed your prod uct meets all safety requirements laid down for this type of product category However special care should be taken around th...

Страница 41: ...e the bulb with another one resist ant to high temperatures 300 C voltage 230V or 220 240V type E14 and same power check watt power as stamped in the bulb itself of the replaced bulb Note Oven bulb replacement is not cov ered by your guarantee CORRECT REPLACEMENT OF THE AUXILIARY AND SEMI RAPID BURNERS It is very important to check that the burner flame distributor F and the cap C has been correct...

Страница 42: ...42 S F C T Fig 8 2 Fig 8 5 T S Fig 8 3 A B Fig 8 4 Fig 8 1 ...

Страница 43: ...gure 8 6 Check that the electrode S fig 8 6 is always clean to ensure trouble free sparking In the models with safety device check that the probe T fig 8 6 next to each burner is always clean to ensure correct operation of the safety valves Both the probe and ignition plug must be very carefully cleaned S T ...

Страница 44: ...vered with special microporous enamel which absorbs and does away with oil and fat splashes during normal baking over 200 C If after cooking very fatty foods the panels remain dirty operate the oven idling on max temperature for about 30 minutes These panels do not require to be cleaned however it is advised to peri odically remove them from the oven at least the side panels and to wash them with ...

Страница 45: ...in the models with gas oven or electric conventional oven fig 8 9 OVEN TRAY Models with gas oven The oven tray L must be insert into the side runners fig 8 9 Model with multifunction electric oven The oven tray must be correctly placed on its wire shelf support fig 8 10 then insert into the side runners fig 8 11 Fig 8 9 F COOKER WITH MULTIFUNCTION OVEN COOKERS WITH GAS OVEN L Fig 8 11 Fig 8 10 L F...

Страница 46: ... dishwarmer compartment OVEN DOOR The internal glass panel can be easily removed for cleaning by unscrewing the 4 retaining screws fig 8 12 DISHWARMER COMPARTMENT The dishwarmer compartment is accessible through the pivoting panel fig 8 13 Fig 8 12 Fig 8 13 ...

Страница 47: ...ig 8 14b Hold the door as shown in fig 8 14 Gently close the door fig 8 14c un til left and right hinge levers A are hooked to part B of the door fig 8 14b Withdraw the hinge hooks from their location following arrow C fig 8 14d Rest the door on a soft surface To replace the door repeat the above steps in reverse order Fig 8 14 B A C Fig 8 14c Fig 8 14b Fig 8 14a Fig 8 14d ...

Страница 48: ... of adjacent furniture and walls must be capable of withstanding tempera tures in excess of 75 C If the cooker is installed adjacent to furniture which is higher than the gas hob cooktop a gap of at least 50 mm must be left between the side of the cooker and the furniture Some appliances are supplied with a protective film on steel and aluminium parts This film must be removed before using the coo...

Страница 49: ...ooker is located on a pedestal it is necessary to provide safety measures to prevent falling out Gas connection made using a rigid or flexible metal pipe n Class 2 n Subclass 1 The walls of the units must be capable of resisting temperatures of 75 C above room temperature 50 mm 500 mm 750 mm 450 mm Electric cooker 650 mm 500 mm 500 mm 50 mm afflusso d aria Fig 9 1c Fig 9 1b ...

Страница 50: ...e cooker is equipped with 4 LEVELLING FEET and may be levelled by screwing or unscrewing the feet with a spanner fig 9 2 It is important to observe the pre scriptions of figures 9 3 9 4 8 mm 8 0 mm 35 mm Fig 9 3 Fig 9 4 Fig 9 2 ...

Страница 51: ...shown in figure 9 5 and fix it by screwing the central screw B and the spacers A A B ASSEMBLING THE BACKGUARD Ceramic cooker Before installing the cooker assemble the backguard V fig 9 6 Please note that The backguard V can be found packed at the rear of the cooker Before assembling remove any protective film adhesive tape The backguard must be fixed to the cooktop using the three supports B suppl...

Страница 52: ...n fig 9 8 WARNING When moving cooker to its final position DO NOT DRAG fig 9 9 Lift feet clear of floor fig 9 7 MOVING THE COOKER WARNING When raising cooker to upright posi tion always ensure two people carry out this manoeuvre to prevent dam age to the adjustable feet fig 9 7 Fig 9 7 Fig 9 8 Fig 9 9 ...

Страница 53: ...he indications given in fig 9 10 2 Drill two 8 mm diameter holes in the wall and insert the plastic plugs supplied Important Before drilling the holes check that you will not damage any pipes or electrical wires 3 Loosely attach the anti tilt bracket with the 2 screws supplied 4 Move the cooker to the wall and adjust the height of the anti tilt bracket so that it can engage in the slot on the cook...

Страница 54: ...ctly to the outside air in which case no permanent ventilation is required For rooms with a volume greater than 10 m3 no permanent ventilation is required NB Regardless of room size all rooms containing the appliance must have direct access to the outside air via an openable window or equivalent Where there are other fuel burning appliances in the same room BS 5440 2 2000 should be consulted to de...

Страница 55: ...ns The openings should be near the floor and preferably on the side opposite the exhaust for combustion products and must be so made that they cannot be blocked from either the outside or the outside When these openings cannot be made the necessary air can come from an adjacent room which is ventilated as required as long as it is not a bed room or a danger area in compliance with applicable local...

Страница 56: ...rson in accordance with the current editions of the following Standards Regulations or those regulations appropriate to the geographical region in which they are to be installed Gas Safety Installation Use Regulations Building Regulations British Standards Regulations for Electrical Installation Installation and service of any gas product must be made by a suitably qualified and re gistered person...

Страница 57: ...ctice governing such installation of gas appliances Note It is recommended that the gas connection to the appliance is installed with a flexi ble connecting tube made to BS5386 Notes Flexible hoses can be used where the sited ambient temperature of the hose does not exceed 70 C These hoses must be manufactured in accordance with BS669 part 1 and be of the correct construction for the type of gas b...

Страница 58: ...e with two spanners fig 10 2 The unused end inlet pipe must be closed with the plug interposing the gasket After connecting to the mains check that the coupling are correctly sealed using soapy solution but never a flame Gasket Fitting the 1 2 BSP male connector The male connector is supplied with the appliance in a separate kit 1 2 BSP male Fitting the plug on the inlet pipe terminal not used Coo...

Страница 59: ...59 Rear wall 700 mm Suggested area for gas mains connection 200 mm IMPORTANT PRESCRIPTIONS FOR GAS CONNECTION Fig 10 3 ...

Страница 60: ...ly is connected at the rear of the cooker to the right or left terminal of the gas inlet pipe fig 10 4a The connection pipe must not cross the rear of the appliance The unused inlet pipe must be closed off with the plug and sealing washer supplied fig 10 4b Fig 10 4a Fig 10 4b Right or left inlet pipe Manifold male pipe fitting Sealing washer Plug 1 2 G cylindrical ISO 228 1 male 1 2 G cylindrical...

Страница 61: ...n connecting the cooker to an LPG cylinder When connecting the cooker to the gas supply with a rubber hose make sure that the hose is as short as possible without twists or kinks the hose is not longer than 750 mm or refer to applicable local regulations and does not come into contact with sharp edges corners or moving parts Use a single rubber hose only never connect the appliance with more than ...

Страница 62: ...gas supply with rigid pipes or a flexible pipe make sure that Gas connection with rubber hose holder Note if not already fitted on the inlet pipe the hose holder is supplied with the product in a separate kit if not supplied with the appliance it can be purchased by contacting the After Sales Service Important to be used ONLY IF PERMITTED by the local applicable regulations After connecting the co...

Страница 63: ...y direct exposure to flue products or by contact with hot surfaces the rigid or flexible pipe is replaced if it shows signs of wear or damage a gas pressure regulator in compliance with the applicable local regulations is installed when connecting to an LPG cylinder you inform the customer that the cylinder valve or the supply valve immediately by the appliance should be closed when the cooker is ...

Страница 64: ...n Reference value AIR VENT NECESSARY FOR GAS COMBUSTION 2 m3 h x kW BURNERS Air necessary for combustion m3 h Auxiliary A 2 00 Semi rapid SR 3 50 Rapid R 6 00 Triple ring TR 7 00 Fish burner FB 5 90 Oven 12 40 Grill 9 30 LUBRICATION OF THE GAS TAPS In case of difficulty in the gas taps operation call Service IMPORTANT All intervention regarding installation maintenance of the appliance must be ful...

Страница 65: ...e kind of gas for which it is to be used The burners are conceived in such a way so as not to require the regulation of the primary air ADJUSTING OF THE MINIMUM OF THE TOP BURNERS In the minimum position the flame must have a length of about 4 mm and must remain lit even with a quick turn from the maximum position to that of minimum The flame adjustment is done in the fol lowing way Turn on the bu...

Страница 66: ... Withdraw the burner in the manner shown in figure 10 10 and rest it in side the oven Take care not to dam age the wire to the ignition electrode and the safety valve probe Using a 10 mm box spanner unscrew the injector indicated by the arrow in fig 10 10 and replace with a new in jector selected in accordance with the Table for the choice of the injectors then replace the burner repeating the abo...

Страница 67: ...the manner shown in figure 10 12 Take care not to damage the wire to the ignition electrode and the safety valve probe Using a 10 mm box spanner unscrew the injector indicated by the arrow in fig 10 12 and replace with a new injector selected in accordance with the Injector Table then replace the burner repeating the above steps in reverse order ...

Страница 68: ...cross head screwdriver slacken the screw Q securing the air flow reg ulation collar P fig 10 13 and 10 14 and move the collar forward or back ward to increase or reduce the air aper ture in accordance with gas type and the indications in the Injector Table Light the burner and check the flame Q P ...

Страница 69: ...river Ø 3 mm blade 100 mm length through the panel opening re mount the knob and let the oven heat up for about 10 minutes then bring the knob to position 1 minimum to operate the thermostat by pass after having removed the knob again and being very careful not to turn the tap rod slowly screw the by pass screws G fig 10 15 until you obtain a flame of 3 4 mm in height N B For G30 G31 the by pass s...

Страница 70: ...specified on the plate The appliance is supplied without a power supply plug and therefore if you are not connecting directly to the mains a standardized plug suit able for the load must be fitted The plug must be connected to an earthed socket in compliance with safety standards The appliance can be connected di rectly to the mains placing an omnip olar switch with minimum opening between the con...

Страница 71: ...res to the terminal block B as shown in the diagram in figure 11 3 Take up any slack in the cable and secure with the cable clamp D Replace the cover A FEEDER CABLE SPECIFICATIONS TYPE H05RR F mod 106 EX 880 106 EX 980 230 or 220 240 V 3 X 0 75 mm2 mod 106 EX 870 106 EX 970 230 or 220 240 V 3 X 1 5 mm2 Connection possible with plug and outlet Connection with wall box connection 230 V L1 N L2 PE Fi...

Страница 72: ... er it is necessary to Remove the two screws that hold shield A behind the cooker fig 11 4 Open completely the cable clamp D Fitted with a 5 pole terminal block position the U bolts onto terminal block B fig 11 4 according to the diagrams in figs 11 5 11 6 Feed the supply cable through the cable clamp D The supply cable must be of a suitable size for the current require ments of the appliance see ...

Страница 73: ...73 2 3 4 5 1 2 3 4 5 1 2 3 4 5 1 2 3 4 5 1 PE L1 L2 L3 230V 240V 230V 3 240V 3 400V 2N 415V 2N L1 L2 L3 N PE 400V 3N 415V 3N N L2 PE L1 L1 L2 N PE Fig 11 6 ...

Страница 74: ...74 ...

Страница 75: ... fabriquée et mise sur le marché en conformité avec les Prescriptions relatives à la sécurité de la Directive Gaz 2009 142 CE Prescriptions relatives à la sécurité de la Directive Basse Tension 2006 95 CE Prescriptions relatives à la protection de la Directive EMC 2004 108 CE Prescriptions de la Directive 93 68 CEE GB FR AVERTISSEMENTS POUR L ÉLIMINATION CORRECTE DU PRODUIT AUX TERMES DE LA DIRECT...

Страница 76: ...plastique mousse clous feuillards etc doivent être laissés hors de portée des enfants car ils constituent une source potentielle de danger Certains appareils sont livrés avec un film de protection recouvrant l acier et les pièces en aluminium Ce film doit être retiré avant l utilisation de la cuisinière IMPORTANT L utilisation de vêtements et de gants de protection est recommandée lors de la manut...

Страница 77: ...rebut en suivant les prescriptions locales pour l élimi nation des déchets Rendre l appareil inutilisable couper le câble d alimentation Après avoir utilisé l appareil vérifier que les manettes de com mande sont sur la position de fermeture Les enfants de moins de 8 ans doivent être tenus à distance ou être surveillés en permanence Cet appareil peut être utilisé par des enfants de 8 ans minimum et...

Страница 78: ...TISSEMENT Risque d incendie n entreposez rien sur les surfaces de cuisson Ne posez pas ou ne laissez pas de casseroles vides sur la table de cuisson en vitrocéramique Ne pas laisser tomber sur la table de cuisson en vitrocéramique d objets lourds ou pointus Ne pas gratter la table de cuisson avec des objets coupants ou pointus Ne pas utiliser la table en vitrocéramique comme plan d appui AVERTISSE...

Страница 79: ...flammable dans le four ou dans le compartiment de rangement Utilisez des gants de cuisinier ou autre protection pour manipuler des surfaces brûlantes telles que les grilles du four ou les plats Risque d incendie Ne pas accrocher des serviettes torchons ou autres objets sur l appareil ou sur sa poignée Nettoyer le four régulièrement ne pas permettre l accumulation de graisses ou d huiles sur la sol...

Страница 80: ...pé d un système de sécurité la sortie du gaz est bloquée si la flamme venait à s éteindre acciden tellement Cuisinière Cat I 3 DESCRIPTION DES COMMANDES 1 Manette commande brûleur avant droite 2 Manette commande brûleur arrière droite 3 Manette commande brûleur centrale triple couronne TC 4 Manette commande brûleur arrière gauche 5 Manette commande brûleur avant gauche 6 Manette commande minuteur ...

Страница 81: ...te 3 Manette commande brûleur centrale poissonnière PS 4 Manette commande brûleur arrière gauche 5 Manette commande brûleur avant gauche 6 Manette commande minuteur sonore 60 7 Manette commande four gaz grilloir 8 Manette commande éclairage tournebroche four gaz 106 EX 980 Remarque L appareil est équi pé d allumage élec tronique incorporé dans les manettes L appareil est équi pé d un système de sé...

Страница 82: ...brûleur avant gauche 5 Manette commande brûleur arrière gauche 6 Manette commande brûleur centrale triple couronne 7 Manette commande brûleur arrière droite 8 Manette commande brûleur avant droite 9 Manette commande tournebroche four multifonctions Fig 1 3a 106 EX 870 Remarque L appareil est équi pé d allumage élec tronique incorporé dans les manettes L appareil est équi pé d un système de sécurit...

Страница 83: ...t four multifonctions 4 Manette commande brûleur avant gauche 5 Manette commande brûleur arrière gauche 6 Manette commande brûleur centrale poissonnière 7 Manette commande brûleur arrière droite 8 Manette commande brûleur avant droite 9 Manette commande tournebroche four multifonctions 106 EX 970 Remarque L appareil est équi pé d allumage élec tronique incorporé dans les manettes L appareil est éq...

Страница 84: ... 140 x 250 1800 1000 W 5 Zone de cuisson double circulaire Ø 140 x 250 1800 1000 W 6 Témoins lumineux de chaleur résiduelle DESCRIPTION DES COMMANDES 1 Manette commande sélecteur de fonctions four multifonctions 2 Manette commande thermostat four multifonctions 3 Manette commande zone de cuisson avant gauche 4 Manette commande zone de cuisson arrière gauche 5 Manette commande zone de cuisson centr...

Страница 85: ...Le débit maximum sert à obtenir I ébullition tandis que le ralenti per met de mijoter les aliments ou de maintenir I ébullition Toute position de fonctionnement doit être choisie entre les positions maxi mum et minimum jamais entre celles du maximum et de la fermeture N B Lorsque la table de travail de la cuisinière n est plus utilisée tournez les manettes en position fermée e fermez également le ...

Страница 86: ...ption de chaleur de la masse liquide reste toujours la même en rapport avec son volume et la surface de la casserole Fig 2 2 Fig 2 3 ALLUMAGE DES BRULEURS 1 Pour allumer le brûleur appuyer sur la manette et la faire tourner jusqu à la position de débit maxi mum grande flamme puis continuer à appuyer sur la manette jusqu à ce que l allumage se fasse En cas de coupure de courant élec trique approche...

Страница 87: ...tes WOK se pose sur la grille du brûleur à couronne triple ATTENTION L utilisation de marmites WOK sans cette grille spéciale peut causer de graves ano malies au brûleur Ne pas utiliser cette grille spéciale avec des marmites à fond plat figs 2 4a 2 4b Fig 2 4a INEXACT Fig 2 4b EXACT ...

Страница 88: ... Fig 2 6 Fig 2 5 REMARQUE IMPORTANTE Les éléments de chauffage incorporent un limiteur de température qui com mute sur ON OFF MARCHE ARRET l élément dans tous les réglages afin de protéger contre toute surchauffe la vitrocéramique L emploi de marmites impropres et ou de mauvais positionnement de la marmite provoquera une intervention plus fréquente du limiteur de tempéra ture ayant pour résultat u...

Страница 89: ... les surfaces des zones de cuisson arrière droite et central peuvent être élargies Pour cela tourner le bouton de réglage complètement vers la droite position Avant l allumage de la table vérifier qu il soit propre Fig 2 7 Fig 2 9 Fig 2 8 Second élément Second élément ZONE OVALE ZONE DOUBLE ATTENTION Dès que l on remarque une fente sur la surface débrancher immédiate ment l appareil pour éviter la...

Страница 90: ...nds volumes Grillades express Fritures frites steaks beignets Allumant une deuxième zone de cuisson Seulement double ou ovale zones radiantes 0 Position manette 1 2 3 4 5 6 2 0 1 2 2 3 4 3 4 6 7 4 7 8 4 5 8 9 10 6 11 12 Après une brève période d utilisation l expérience vous indiquera quel est le réglage qui répond le mieux à vos besoins EXEMPLES DE CUISSON Zone de cuisson commandé par un commutat...

Страница 91: ...aliments directement sur la table vitrocera mique mais dans des marmites ou des récipients adaptés TEMOINS D INDICATION DE LA CHALEUR RESIDUELLE Dans la partie avant du plan de travail se trouvent 5 témoins d indication cha cun relié à une zone de cuisson Lorsque la température de la zone de cuisson est supérieure à 60 C la lampe témoin s allume également pour signaler que la plaque est chaude Ce ...

Страница 92: ...t l appareil et appeler le Service Après Vente Ne jamais cuisiner directement sur les plaques électriques mais dans des marmites ou des récipients Ne pas gratter la table de cuisson avec des objets coupants ou pointus Ne pas utiliser le gril comme plan d appui NETTOYAGE Avant de procéder au nettoyage de la plaque s assurer que I appareil soit éteint Enlever les éventuelles incrustations de nourrit...

Страница 93: ...intenir constante la température du four Ceci se fait par un bulbe qui ne doit pas être déplacé et qui doit être toujours maintenu bien propre Une mauvaise position ou un éventuel dépôt sur le bulbe peut influencer le degré de tem pérature choisi ATTENTION La porte est chaude utiliser la poi gnée TERMOSTAT GRADE TABLE Position manette Temperature thermostat du four 1 150 C 2 165 C 3 180 C 4 195 C ...

Страница 94: ...her une flamme du brû leur A comme indiqué sur la fig 3 4 3 Attendez environ 10 secondes après que le brûleur ait été allumé avant de relâcher la manette délai d acti vation de la vanne 4 Fermer la porte du four doucement et régler le thermostat selon la puis sance désirée Si la flamme du brûleur devait manquer pour une raison quelconque la vanne de sécurité coupera automatiquement l alimentation ...

Страница 95: ...ppropriés pour la cuisson au four et de modifier la température pendant la cuis son si cela est nécessaire PLATS TEMPERATURE Lasagnes au four 190 C Pâtes au four 190 C Pizza 220 C Riz à la créole 190 C Oignons au four 190 C Crêpes aux épinards 185 C Pommes de terre au lait 185 C Tomates farcies 180 C Souffé au fromage 170 C Rôti de veau 180 C Côtes de veau au grill 210 C Blanc de poulet à la tomat...

Страница 96: ...r approcher une flamme au tuyau du brû leur comme indiqué sur la fig 3 6 2 3 secondes après ouverture du thermos tat 3 Attendez environ 10 secondes après que le brûleur ait été allumé avant de relâcher la manette délai d activation de la vanne Fermer la porte du four doucement et régler le thermostat selon la puissance désirée La porte du four doit toujours être tenue entr ouverte et avec le défle...

Страница 97: ... ou l inverse UTILISATION GRILLOIR A GAZ Trés important à effectuer toujours à porte entr ouverte fig 3 7 et avec le déflecteur montée Mettre en place l écran A fig 3 7 qui sert à protéger le tableau de bord contre la chaleur Allumer le grill comme expliqué dans le paragraphe précédent et laisser pré chauffer pendant 5 minutes avec la porte entr ouverte Introduire les aliments de façon à ce qu ils...

Страница 98: ...a tige Le sens de rotation du tourne broche peut être indifféremment de gauche à droite ou l inverse Trés important à effectuer toujours à porte entr ouverte fig 3 7 et avec le déflecteur montée Les parties accessibles peuvent être chaudes quand le grilloir est utilisé Eloigner les jeunes enfants La cuisson avec le grilloir ne doit jamais dépasse 30 min ECLAIRAGE La cuisinière est équipée d une la...

Страница 99: ...lle La chaleur est produite par les élé ments chauffants de sole et de voûte b par convection forcée Une turbine aspire l air contenu dans le moufle du four le fait passer à tra vers des spires incandescentes d une résistance électrique circulaire et le renvoie dans le moufle L air chaud avant être à nouveau aspiré par la tur bine pour répéter le cycle ci dessus enveloppe les aliments déposés dans...

Страница 100: ...ette en sens horaire pour choisir une des fonctions décrites ECLAIRAGE FOUR En tournant la manette sur cette position on allume la lampe du four Le four reste allumé toujours lorsque l une des fonc tions est affichée CUISSON TRADITIONNELLE A CONVECTION Fonctionnement des éléments chauf fants de sole et de voûte La chaleur se répand par convection naturelle et la température doit être réglée de 50 ...

Страница 101: ...gratiner griller etc CUISSON A L AIR CHAUDE Fonctionnement de la résistance cir culaire et de la turbine La chaleur se répand par convection forcée et la température doit être réglée de 50 à 225 C par la manette du thermostat Il n est pas nécessaire de préchauffer le four Utilisation conseillée Pour mets nécessitant d être bien cuits à I extérieur et doux ou roses à I intérieur Exemple lasagne agn...

Страница 102: ...ur maintenir les aliments chauds après n importe qu elle cuisson Pour réchauffer lentement des aliments déjà cuits AMELIORATION Positionner le commutateur à l allure et le thermostat à l allure 150 C Le pain retrouve sa fraîcheur et son par fum si on l humidifie au moyen d un peu d eau mis dans le four pendant environ 10 minutes CONSEILS DE CUISSON STERILISATION La stérilisation d aliments à conse...

Страница 103: ...on pour obtenir l effet doré du gratin La cuisson avec le grilloir ne doit jamais dépasse 30 min Attention la porte est chaude pen dant le fonctionnement Eloigner les jeunes enfants ROTIR Pour obtenir un rôti classique cuit à point dans son entier il suffit de noter qu il est conseillé de maintenir la tem pérature entre 180 et 200 C que le temps de cuisson dépend de la quantité et de la qualité de...

Страница 104: ...ppropriés pour la cuisson au four et de modifier la température pendant la cuis son si cela est nécessaire PLATS TEMPERATURE Lasagnes au four 190 C Pâtes au four 190 C Pizza 220 C Riz à la créole 190 C Oignons au four 190 C Crêpes aux épinards 185 C Pommes de terre au lait 185 C Tomates farcies 180 C Souffé au fromage 170 C Rôti de veau 180 C Côtes de veau au grill 210 C Blanc de poulet à la tomat...

Страница 105: ...emment de gauche à droite ou l inverse Très important Laisser toujours la porte du four fermée pendant la cuis son Les parties accessibles peuvent être chaudes quand le grilloir est utilisé Eloigner les jeunes enfants La cuisson avec le grilloir ne doit jamais dépasse 30 min TOURNEBROCHE fig 4 4 Celui ci sert à cuire les mets à la broche en utilisant le grilloir Cet accessoire se compose de un mot...

Страница 106: ...assant pas 60 minutes Le bouton de réglage fig 5 1 doit être tourné dans le sens horaire jusqu à la position 60 minutes pius placé sur le temps désiré en tournant dans le sens contraire AVERTISSEMENT IMPORTANT Il s agit seulement d une minuterie mécanique Rappelez vous d éteindre manuellement le four gril 5 MINUTEUR MECANIQUE Fig 5 1 ...

Страница 107: ...ALARME ELECTRONIQUE Le programme de l alarme ne comporte qu une sonnerie qui peut être réglée pour une période maximale de 99 minutes Pour régler le temps appuyer sur ou jusqu à obtention du temps désiré à l affichage Lorsque le réglage est terminé le sym bole s éclaire et le compte à rebours commence immédiatement Lorsque le temps est écoulé le symbole s éteint et une sonnerie intermittente se fa...

Страница 108: ...fonctions Description des symboles lumineux AUTO clignotant Programmateur en automatique mais non program mé on ne peut allumer le four AUTO allumé sans clignotant Programmateur en automatique ou semi automatique avec pro gramme inséré Programmateur en manuel ou cuisson automatique en cours Minuterie en marche et AUTO clignotants et signal sonore Erreur de programmation le temps de cuisson dépasse...

Страница 109: ...fig 9 2 Une autre façon d opérer consiste à appuyer en même temps sur les deux touches tout en appuyant sur la touche ou Remarque Le réglage de l heure com porte l annulation de programmes éventuels en cours ou programmés MINUTEUR ELECTRONIQUE fig 7 4 La fonction minuteur se compose unique ment d un avertisseur acoustique qui peut être réglé pour une période maximale de 23h 59min Si la légende AUT...

Страница 110: ...le s al lumeront Afficher après la température et la fonction en agissant sur les manettes adéquates voir chapitre spécifique Le four s allumera immédiatement et après I écoulement du temps de cuis son le four s arrêtera automatiquement Pendant la cuisson le symbole reste allumé et en pressant le poussoir on visualise le temps qui manque à I arrêt de la cuisson Le programme peut être annulé en tou...

Страница 111: ...uisson a été superposé à I heure de la montre Dans ce cas modifier l heure d arrêt de la cuisson ou le temps de durée de la cuisson 3 Afficher après la température et la fonction en agissant sur les manettes adéquates voir chapitre spécifique En ce moment le four est program mé et tout fonctionnera automa tiquement c est à dire que le four s allumera automatiquement au bon moment de façon à exécut...

Страница 112: ...peur parce que de l humidité peut pénétrer dans l appareil et le rendre dangereux N utilisez jamais de produits de nettoyage agressifs ou abrasifs ou de grattoirs en métal tranchant pour nettoyer la vitre de la porte du four ou le couvercle en verre modèles avec couvercle en verre ceci risquerait en effet de rayer la surface ce qui pourrait faire éclater le verre AVERTISSEMENT Lorsqu il est correc...

Страница 113: ...ontact de l émail l attaquent ou le rende opaque ROBINETS DE GAZ En cas de mauvais fonctionnement des robinets de gaz appeler le Service Après Vente SUBSTITUTION DE LA LAMPE DU FOUR Débrancher la fiche électrique Dévisser la lampe et la substituer par une autre résistante à la température de 300 degrés C tension 230V ou 220 240V E 14 et la même puissance contrôlez la puissance en watt imprimé dans...

Страница 114: ...114 S F C T Fig 8 2 Fig 8 5 T S Fig 8 3 A B Fig 8 4 Fig 8 1 ...

Страница 115: ...rode S fig 8 6 soit toujours bien propre afin de permettre le jaillis sement régulier des étincelles Dans les modèles avec vanne de sécurité vérifier que la sonde T fig 8 6 près du brû leur soit toujours propre de façon à permettre le fonctionnement normal du système de sécurité La sonde et la bougie doivent être nettoyées avec beaucoup de précaution S T ...

Страница 116: ...MENT Les panneaux auto dégraissants sont revêtus d un émail spécial microporeux qui absorbe et élimine les projections de graisse pendant la cuisson normale en sus des 200 C Si après la cuisson d aliments très gras les panneaux restent sales il faut faire marcher le four à vide pendant 30 minutes à la températures maximale Ces panneaux ne nécessitent pas d être nettoyés toutefois il est conseillé ...

Страница 117: ...our à gaz fig 8 9 LECHEFRITE Modèles avec four à gaz La lèchefrite L est introduite directe ment dans les guides des châssis laté raux fig 8 9 Modèles avec four électrique multi fonctions La lèchefrite doit être positionnée cor rectement sur le châssis spécial de sup port fig 8 10 puis introduite dans les guides des châssis latéraux fig 8 11 Fig 8 9 F CUISINIERES AVEC FOUR ELECTRIQUE MULTIFONCTION...

Страница 118: ...uffe plats il pourrait prendre feu pendant le fonction nement PORTE DU FOUR Le verre intérieur peut être aisément enlevé pour le nettoyer en dévissant les 4 vis de fixation fig 8 12 ESPACE CHAUFFE PLATS Il est possible d accéder à l espace chauffe plats en ouvrant le panneau rabattable fig 8 13 ...

Страница 119: ... fig 8 14b Tenez la porte fig 8 14 Refermez doucement la porte fig 8 14c jusqu à ce que les leviers A des charnieres gauche et droite s accrochent sur la partie B de la porte fig 8 14b Retirez les crochets de charniere de leur emplacement en suivant la fleche C fig 8 14d Déposer la porte sur une surface douce Effectuer les opérations en sens in verse pour remonter la porte B A C Fig 8 14c Fig 8 14...

Страница 120: ...i la cuisinière est installée près d un meuble qui est plus haut que le dessus de la table de travail de la cuisinière un espace d au moins 50 mm doit être aménagé entre le côté de la cuisinière et le meuble Certains appareils sont livrés avec un film de protection recouvrant l acier et les pièces en aluminium Ce film doit être retiré avant l utilisation de la cuisinière Conseils à l installateur ...

Страница 121: ...n socle il faut prendre des mesures pour éviter que l appareil ne glisse du socle Branchement gaz réalisé à l aide d un tube métallique rigide ou flexible n Classe 2 n Sous classe 1 Les parois des meubles doivent pouvoir à une température de 75 C supérieure à la température ambiante 50 mm 500 mm 750 mm 450 mm Cuisinières avec table de cuisson vitrocéramique et four électrique 650 mm 500 mm 500 mm ...

Страница 122: ...inière est fournie avec 4 pieds réglables pour la mise à niveau en VISSANT ou DEVISSANT les pieds avec une clé fig 9 2 Important Suivre scrupuleusement les indications illustrée dans le figures 9 3 et 9 4 8 mm 8 0 mm 35 mm Fig 9 3 Fig 9 4 Fig 9 2 ...

Страница 123: ...rpo sants les entretoises A MONTAGE DU DOSSERET Modèle en vitrocéramique Avant d installer la cuisinière assembler la protection arrière V fig 9 6 Prendre note que On peut trouver la protection arrière V empaquetée à l ar rière de la cuisinière Avant de l assembler reti rer tout film protecteur ruban adhésif La protection arrière doit être fixée au haut de la cuisinière à l aide des trois supports...

Страница 124: ...ectuer cette manoeuvre afin d éviter d endomma ger les pieds réglables fig 9 7 AVERTISSEMENT Attention NE PAS SOULEVER la cui sinière par la poignée de la porte pour la mettre dans la position verticale fig 9 8 AVERTISSEMENT Pour déplacer la cuisinière dans sa position définitive NE PAS LA TRAINER fig 9 9 Soulever les pieds du sol fig 9 7 ...

Страница 125: ... fig 9 10 2 Percez deux trous de 8 mm de diamètre dans le mur et introduisez les chevilles en plastique fournies Important Avant de percer assurez vous de n endommager aucun tuyau ou fil électrique 3 Fixez l équerre anti basculement à l aide des 2 vis fournies mais sans les serrer 4 Déplacez la cuisinière près du mur et ajustez la hauteur de l équerre anti basculement de sorte qu elle puisse entre...

Страница 126: ...ormes locales en vigueur Les ouvertures devraient être positionnées à proximité du sol et de préférence du côté opposé par rapport à l évacuation des produits de combustion elles doivent être construites de façon à ne pas pouvoir être bouchées tant de l intérieur que de l extérieur Lorsqu il n est pas possible de pratiquer les ouvertures nécessaires l air peut provenir d une pièce adjacente avec v...

Страница 127: ...clamation Cet appareil est réglé en usine pour fonctionner au GPL Cat I 3 G30 G31 28 30 37 mbar voir étiquette appliquée sur l appareil RACCORDEMENT AU GAZ Le raccordement doit être effectué par un technicien spécialisé conformément aux normes locales en vigueur Assurer une ventilation adaptée au milieu d installation de la cuisinière conformément aux normes en vigueur afin de garantir un fonction...

Страница 128: ...on utilisé Extrémité de raccordement gauche ou droite Raccord de tuyau mâle Rondelle d étanchéité Bouchon 1 2 G cylindrique ISO 228 1 mâle 1 2 G cylindrique ISO 228 1 femelle Déjà monté dans l extremité de raccordement gauche ou droite Fig 10 1b Fig 10 1a Bouchon ...

Страница 129: ...rvices Après Ven te accompagné d un joint par tube souple suivant XP D 36 110 d un diamètre intérieur de 6 mm destiné aux gaz distribués par bouteille ou réservoir fig 10 3 le tube souple doit être enfoncé suffisamment pour permettre son maintien par un collier de serrage non fourni UNIQUEMENT POUR LE BUTANE PROPANE DISTRIBUE PAR RECI PIENTS MOBILES OU POUR LES INSTALLATIONS EXISTANTES soit un tuy...

Страница 130: ...n France utilisez un tube ou tuyau portant l estampille NF GAZ Après le branchement vérifier l étan chéité des connexions avec une so lution savonneuse jamais avec une flamme Appareils incorporables classe 2 1 Pour le butane propane distribué par bouteille ou réservoir le raccordement s effectue soit un tuyau rigide avec écrou soit par tuyau flexible métallique onduleux suivant NF D 36 125 fig 10 ...

Страница 131: ...e doit pas être en contact avec des arêtes vives coins ou des pièces mobiles Utiliser toujours un seul tuyau ne jamais utiliser plus d un tuyau pour le branchement au gaz le tuyau n est pas sous tension tordu plié ou trop serré alors que l appareil est en cours d utilisation ou s il est connecté ou déconnecté le tuyau n entre pas en contact avec une partie quelconque de l appareil ayant une tempér...

Страница 132: ...bes métalliques rigides ne doit pas provoquer de sollicita tions ou de pression sur les conduites de gaz About gaz pour GPL Collier de serrage non fourni GPL Si elle n est pas déjà installée sur l extrémité de raccordement elle est fournie avec l appareil dans un kit séparé Extrémité de raccordement gauche ou droite Raccord de tuyau mâle Rondelle d étanchéité 1 2 G cylindrique ISO 228 1 mâle 1 2 G...

Страница 133: ...es en vigueur est installé si la cuisinière est branchée à une bouteille de GPL vous informez l utilisateur qu il est préférable de fermer le robinet d arrivée de gaz lorsque la cuisinière n est pas utilisée vous informez l utilisateur que le tuyau rigide ou flexible ne doit pas être exposé à des agents de nettoyage pour éviter possible corrosion Après le branchement gaz de la cuisinière assurez v...

Страница 134: ...JECTEURS Cat I 3 BRULEURS Débit nominal kW Débit réduit kW GPL G30 28 30 mbar G31 37 mbar Ø injecteur 1 100 mm Ouverture bague mm Auxiliaire A 1 00 0 30 50 Semi rapide SR 1 75 0 45 65 Rapide R 3 00 0 75 85 Triple couronne TC 3 50 1 50 95 Poissonnière PS 2 95 1 50 85 Four 6 20 1 30 120 Tout ouverte Grilloir 4 65 107 Tout ouverte Valeur de référence APPORT D AIR NÉCESSAIRE A LA COMBUSTION DU GAZ 2 m...

Страница 135: ... d une clé plate remplacer les injecteurs J figs 10 8a 10 8b par ceux qui conviennent au gaz que l on va utiliser voir Tableau des injecteurs Les brûleurs sont conçus de manière à ne pas nécessiter le réglage de l air primaire REGLAGE DU DEBIT REDUIT DES BRU LEURS DE LA TABLE Une flamme correcte au débit réduit doit être d environ 4 mm le passage brusque du maximum au ralenti ne doit jamais causer...

Страница 136: ...et enlever la vis A qui bloque le brûleur fig 10 10 Desserrer la vis B fig 10 10 Enlever le brûleur comme le montre la figure 10 8 et le déposer à l intérieur du four sans le retirer complètement Faire particulièrement attention à ne pas endommager le fil de la bougie de l allumage électrique et le bulbe de la vanne de sécurité Avec une clé tube de 10 remplacer l injecteur U indiqué par la flèche ...

Страница 137: ...leur comme le montre la figure 10 13 Faire particulièrement attention à ne pas endommager le fil de la bougie de l allumage électrique et le bulbe de la vanne de sécurité Avec une clé tube de 10 remplacer l injecteur V indiqué par la flèche fig 10 13 conformément au Tableau injecteurs et remonter le brûleur en effectuant les opérations en sens inverse V ...

Страница 138: ...E L AIR PRIMAIRE DU FOUR ET DU GRILLOIR Avec un tournevis cruciforme desserrer la vis Q fig 10 14 et suivant le gaz utilisé tourner la bague P fig 10 15 de manière à ouvrir ou fermer le pas sage de l air Allumer les brûleurs pour vérifier les flammes Q P ...

Страница 139: ...me avec excès d air primaire REGLAGE DU DEBIT REDUIT DES BRULEURS DU FOUR Il s effectue en agissant sur le thermos tat comme suit allumer le brûleur et placer la manette sur la position 10 enlever la manette et avec un tourne vis dévisser d environ 3 tours la vis bypass G fig 10 16 en passant à travers l ouverture du tableau de bord remettre la manette et laisser chauffer le four pendant 10 minute...

Страница 140: ...e ayant une ouverture de 3 mm au moins entre les contacts Le câble d alimentation ne doit pas être en contact avec des parties chaudes et doit être mis de façon à ne dépasser en aucun point la tem pérature de 75 degrés C La prise et l interrupteur doivent être accessibles quand l appareil est ins tallé Si le câble d alimentation est endom magé il doit être remplacé pour un câble approprié disponib...

Страница 141: ... collier de serrage D fig 11 2 Reliez les fils à la borne serre fils B comme illustré dans le schéma de la figure 11 3 Tendre le câble d alimentation et le fixer avec le serre fil D Remonter la protection A SECTION DES CABLES D ALIMENTATION TYPE H05RR F mod 106 EX 880 106 EX 980 230 ou 220 240 V 3 X 0 75 mm2 mod 106 EX 870 106 EX 970 230 ou 220 240 V 3 X 1 5 mm2 Raccordement possible par fiche de ...

Страница 142: ...e fixation de la pro tection A située derrière la cuisinière fig 11 4 Placez le câble d alimentation à travers du collier de serrage D fig 11 4 Reliez les fils à la borne serre fils B comme illustré dans les schémas de les figures 11 5 et 11 6 Placez le câble d alimentation à travers du collier de serrage D fig 11 4 Le câble d alimentation doit présen ter une dimension adaptée aux carac téristique...

Страница 143: ...143 2 3 4 5 1 2 3 4 5 1 2 3 4 5 1 2 3 4 5 1 PE L1 L2 L3 230V 240V 230V 3 240V 3 400V 2N 415V 2N L1 L2 L3 N PE 400V 3N 415V 3N N L2 PE L1 L1 L2 N PE Fig 11 6 ...

Страница 144: ...H O M E A P P L I A N C E S Made in Italy Cod 1104285 ß2 Made in Italy www elba cookers it ...

Отзывы: