background image

31

Chapter4TouchPanelSettings(Windows8.1/Windows8/Windows7)

2. 

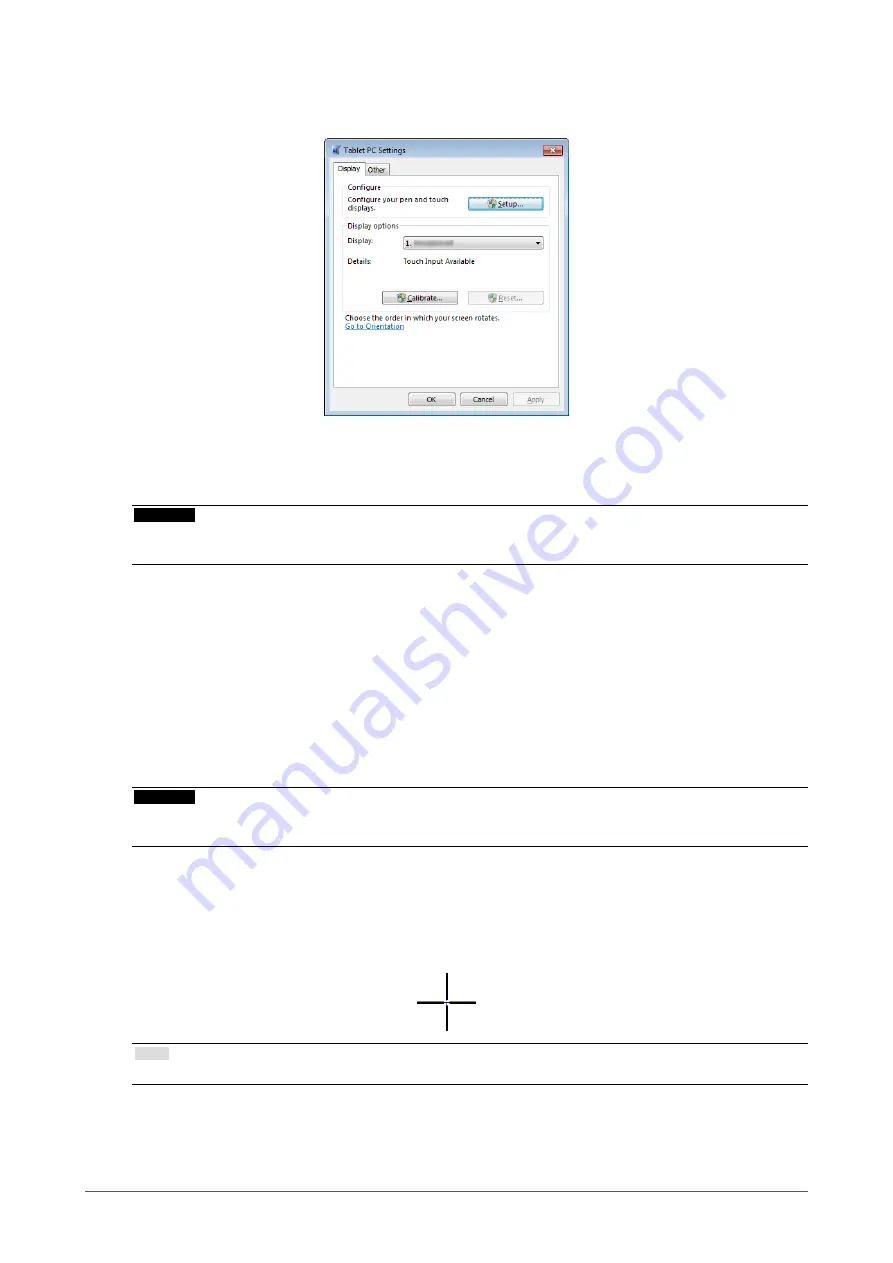
Click “Hardware and Sound” - “Tablet PC Settings”.

The “Tablet PC Settings” window appears.

3. 

Click “Setup” in the “Display” tab.

A touchscreen specification screen with a white background is displayed.

Attention

•  If using the monitor in a multiple monitor environment, specify the touchscreen according to the message displayed on 

screen.

4. 

Touch the screen with your finger.

The touched screen is recognized as a touchscreen.

5. 

Press “Enter” on the keyboard.

The “Tablet PC Settings” window reappears.

6. 

Click “Calibrate”.

A calibration screen with a white background is displayed.

Attention

•  If using the monitor in a multiple monitor environment, select the monitor for calibration from the “Display” pulldown 

menu and then click “Calibrate”.

7. 

Touch the calibration target (cross) for a few seconds with your finger and 

release.

The calibration target appears on the screen 16 times, starting from the top left to top right and then down to 
the bottom left to bottom right.

Note

•  For second or subsequent calibrations, the calibration target appears 4 times.

8. 

After completing calibration, click “Yes” to save the calibration data.

9. 

Click “OK” to close the window.

Содержание FlexScan T2381W

Страница 1: ...volume carefully to familiarize yourself with safe and effective usage Please refer to the Setup Guide for basic information ranging from connection of the monitor to a PC to using the monitor The la...

Страница 2: ...ansmitted in any form or by any means electronic mechanical or otherwise without the prior written permission of EIZO Corporation EIZO Corporation is under no obligation to hold any submitted material...

Страница 3: ...n saver or power save function to avoid displaying the same image for extended periods of time Periodic cleaning is recommended to keep the monitor looking new and to prolong its operation lifetime re...

Страница 4: ...ich may damage the cabinet or panel Do not allow liquid to enter the clearance between the panel and the panel frame The stains on the cabinet and panel surface can be removed by using the provided cl...

Страница 5: ...Selecting sound source while using the DisplayPort signal input 26 3 3 Enabling Disabling DDC CI communication 26 3 4 Locking Operation Buttons 27 3 5 Showing and hiding the EIZO logo 27 3 6 Changing...

Страница 6: ...imensions 50 Accessories 50 7 6 Preset Timing 51 Chapter 8 Glossary 52 Appendix 54 Trademark 54 License Copyright 54 FCC Declaration of Conformity 55 LIMITED WARRANTY 56 Recycling Information 65 China...

Страница 7: ...e monitor can be readily moved and its position adjusted LaidBack Stand allows the monitor to be freely adjusted to a wide range of tilt angles Employs a free stop non step system that allows flexible...

Страница 8: ...nnects the power cord 9 Security lock slot Complies with Kensington s MicroSaver security system 10 Stand with cable holder Used to adjust the angle of the monitor screen 11 Speaker Outputs audio sour...

Страница 9: ...ng the touch pen holder Note The touch pen holder is supplied with the touch pen Accessories page 50 1 Align the touch pen holder over either the left or right attachment hole 2 Attach with the screw...

Страница 10: ...ment pattern files Used when adjusting the image of analog signal input manually Touch panel driver Driver software for the touch panel 1 Windows XP TPOffset Software for adjusting the sensitivity of...

Страница 11: ...djust set with and then press The Sub menu appears 2 Choose an item to adjust set with and then press The adjustment setting menu appears 3 Adjust set the selected item with and then press 3 Exiting 1...

Страница 12: ...5 Enabling Disabling Auto Power OFF page 36 Monitor Settings Input Signal To set input signal selection page 45 Power Indicator 5 2 Setting Power Indicator page 35 Language 3 7 Setting Language page...

Страница 13: ...uency Dot Clock 640 480 VGA 60 Hz 148 5 MHz Max 720 400 VGA TEXT 70 Hz 800 600 VESA 60 Hz 1024 768 VESA 60 Hz 1280 720 CEA 861 60 Hz 1280 960 VESA 60 Hz 1280 1024 VESA 60 Hz 1680 1050 VESA CVT VESA CV...

Страница 14: ...6 Click the OK button 7 When a confirmation dialog box is displayed click Keep changes Windows XP 1 Right click the mouse anywhere on the desktop except for icons 2 From the displayed menu click Prope...

Страница 15: ...a such as books and documents Movie Suitable for playing back animated images The mode menu appears Procedure 1 Press The mode menu appears at the bottom left of the screen 2 The mode among the list i...

Страница 16: ...g the mouse and keyboard of your PC Refer to Chapter 4 Color Adjustment in the User s Manual for ScreenManager Pro for LCD DDC CI Adjustable settings in each mode The adjustable settings depend on the...

Страница 17: ...perature Color temperature can be adjusted The color temperature is normally used to express the hue of White and or Black by a numerical value The value is expressed in degrees K Kelvin The screen be...

Страница 18: ...ess to exit Note If Paper is selected in the FineContrast mode the gamma value is displayed for Paper The setting Paper is specially meant to get the displayed image look like it is printed on paper T...

Страница 19: ...the use of the monitor You can reduce Image lags by setting it to Enhanced when displaying animated images Adjustable range Enhanced Standard Off Procedure 1 Choose Color in the Setting menu and press...

Страница 20: ...tting menu and press 2 Choose Advanced Settings in the Color menu and press 3 Choose Gain in the Advanced Settings menu and press The Gain menu appears 4 Adjust gain with or for each of red green and...

Страница 21: ...annot work properly in some graphic boards The monitor screen adjustment is used to suppress flickering of the screen or adjust screen position and screen size correctly according to the PC to be used...

Страница 22: ...tment menu and press 5 Select Yes with or and press Flickering screen position and screen size are corrected by the auto adjustment function If the screen is not displayed correctly even after perform...

Страница 23: ...n Attention Flickering or blurring may not be eliminated depending on your PC or graphics board To correct the screen position Note Since the number of pixels and the pixel positions are fixed on the...

Страница 24: ...g Adjustment menu and press 5 Select Yes with or and press The output range is set automatically 6 Close Pattern 2 6 Modify blurred characters or lines To modify blurred characters lines When an image...

Страница 25: ...te Normal Displays images with the specified resolution Example Image size 1024 768 Full Screen Enlarged Normal 1920 1080 1440 1080 1024 768 Procedure 1 Choose Screen in the Setting menu and press 2 C...

Страница 26: ...playPort Procedure 1 Choose Sound in the Setting menu and press 2 Choose Source in the Sound menu and press The Source menu appears 3 Select Stereo Mini Jack or DisplayPort with or 4 Press to exit Not...

Страница 27: ...EIZO logo appears on the screen You can choose to show or hide the display of the EIZO logo Procedure 1 Choose Monitor Settings in the Setting menu and press 2 Choose Menu Settings in the Monitor Sett...

Страница 28: ...r messages Selectable languages English German French Spanish Italian Swedish Japanese Simplified Chinese Traditional Chinese Procedure 1 Choose Monitor Settings in the Setting menu and press 2 Choose...

Страница 29: ...e currently selected mode to the default settings Procedure 1 Choose Color in the Setting menu and press 2 Choose Color Reset in the Color menu and press 3 Select Yes with or 4 Press The color adjustm...

Страница 30: ...tal close to the screen because the screen is susceptible to electrical conductors If a User Account Control dialog box is displayed during operation proceed according to the displayed instructions 1...

Страница 31: ...he keyboard The Tablet PC Settings window reappears 6 Click Calibrate A calibration screen with a white background is displayed Attention If using the monitor in a multiple monitor environment select...

Страница 32: ...method for opening the Control Panel differs depending on the OS see page 30 2 Click Hardware and Sound Pen and Touch Pen and Touch window appears Configure the touch panel operation settings in the P...

Страница 33: ...ontrol Panel The method for opening the Control Panel differs depending on the OS see page 30 2 Click Hardware and Sound Sound Change System Sounds Sound window appears 3 Select Start Navigation from...

Страница 34: ...nges to the power saving mode about 15 seconds after the signal input ceases to be detected Procedure 1 Choose PowerManager in the Setting menu and press 2 Choose Power Save in the PowerManager menu a...

Страница 35: ...ess The Power Indicator menu appears 3 Select On or Off with or 4 Press to exit 5 3 Enabling Disabling Automatic Brightness Adjustment Using the EcoView Optimizer 2 function automatically adjusts the...

Страница 36: ...quantity of CO2 emissions reduced when using the monitor for 1 hour The numeric value is a result of a calculation based on a default setting 0 000555 t CO2 kWh determined by a Japanese ministerial or...

Страница 37: ...the PC is turned on Depending on the PC and graphics board the input signal is not detected and the monitor does not recover from the power saving mode If the screen is not displayed even after movin...

Страница 38: ...lurred Check whether the PC is configured to meet the resolution and vertical scan frequency requirements of the monitor see 2 1 Compatible Resolutions page 13 When an image is displayed with a resolu...

Страница 39: ...e screen position page 23 If the problem persists use the graphics board s utility if available to change the display position 2 Vertical bars appear on the screen or a part of the image is flickering...

Страница 40: ...panel for 5 seconds after the PC starts up after turning on the monitor or after connecting the USB cable Touching the touch panel too soon may cause incorrect cursor positioning or disable touch ope...

Страница 41: ...erly when an image is displayed only on a part of the screen command prompt window for example or when a black background wallpaper etc is in use This function does not work correctly with some graphi...

Страница 42: ...the monitor When using an arm or stand attach it to meet the following tilt angles of the monitor Up 90 down 5 landscape display turned 90 clockwise to portrait display When setting the monitor to th...

Страница 43: ...om of the monitor according to the following procedure 1 Remove the foot covers 2 Remove the screw that secures each foot to the monitor 3 Slide each foot toward the edge of the monitor and remove the...

Страница 44: ...P200 Signal cable supplied FD C39 DVI D connector Digital DVI Digital DisplayPort To PC 1 To PC 2 DisplayPort connector DisplayPort connector D Sub connector Signal cable supplied MD C87 Analog D Sub...

Страница 45: ...l The monitor detects only the PC s signals currently displaying automatically Select the input signal for display using the operation button Procedure 1 Choose Monitor Settings from the Adjustment me...

Страница 46: ...he monitor is in power saving mode devices connected to the USB downstream port will still work Therefore power consumption of the monitor varies with connected devices even in the power saving mode W...

Страница 47: ...display the model name serial number usage time resolution and input signal Procedure 1 Choose Information in the Setting menu and press The Information menu appears Attention When you turn on the mon...

Страница 48: ...tal DVI 59 61 Hz non interlace VGA TEXT 69 71 Hz DisplayPort 59 61 Hz non interlace VGA TEXT 69 71 Hz Resolution 1920 Dots 1080 Lines Max Dot Clock Analog 148 5 MHz Digital DVI 148 5 MHz DisplayPort 1...

Страница 49: ...l Conditions Temperature Operating 5 C to 35 C 41 F to 95 F Transportation Storage 20 C to 60 C 4 F to 140 F Humidity Operating 20 to 80 R H no condensation Transportation Storage 10 to 90 R H no cond...

Страница 50: ...22 5 556 7 25 54 89 62 87 100 8 353 9 216 3 15 345 9 401 3 143 9 115 91 22 5 288 7 28 21 6 339 2 360 7 70 382 6 5 190 2 17 6 Accessories Touch pen TP5 Signal cable PP200 For the latest information ab...

Страница 51: ...tive 640 480 VESA 31 50 37 86 72 81 Negative Negative 640 480 VESA 31 50 37 50 75 00 Negative Negative 720 400 VGA TEXT 28 32 31 47 70 09 Negative Positive 800 600 VESA 36 00 35 16 56 25 Positive Posi...

Страница 52: ...PM DVI Digital Monitor Power Management DVI DMPM is a digital interface power saving function The Monitor ON operating mode and Active Off power saving mode are indispensable for DVI DMPM as the monit...

Страница 53: ...xels and 1080 vertical pixels At a resolution of 1920 1080 all pixels are illuminated as a full screen 1 1 sRGB Standard RGB International standard for color reproduction and color space among periphe...

Страница 54: ...orporation PC 9801 and PC 9821 are trademarks of NEC Corporation NextWindow is a registered trademark of NextWindow Ltd Intel Intel Core and Pentium are registered trademarks of Intel Corporation in t...

Страница 55: ...ful interference to radio communications However there is no guarantee that interference will not occur in a particular installation If this equipment does cause harmful interference to radio or telev...

Страница 56: ...ioration of display performance caused by the deterioration of expendable parts such as the LCD panel and or backlight etc e g changes in brightness changes in brightness uniformity changes in color c...

Страница 57: ...Helligkeitsverteilung Ver nderungen von Farbe oder Farbverteilung Pixeldefekte einschlie lich von durchgebrannten Pixeln usw e Produktdefekte die durch externe Ger te verursacht werden f Jeglicher De...

Страница 58: ...le des changements de luminosit des changements de l uniformit de la luminosit des modifi cations de couleur des changements de l uniformit des couleurs des d fectuosit s de pixels y compris des pixel...

Страница 59: ...illo cambios de color cambios de uniformidad del color defectos de p xeles incluyendo p xeles muertos etc e Cualquier defecto del Producto causado por un equipo externo f Cualquier defecto del Product...

Страница 60: ...come il pannello LCD e o la retroilluminazione ecc per esempio i cambiamenti di luminosit cambiamenti di uniformit della luminosit i cambiamenti di colore i cambiamenti di uniformit del colore i difet...

Страница 61: ...e pixlar etc e Alla defekter hos Produkten som orsakats av extern utrustning f Alla defekter hos Produkten p vilken det ursprungliga serienumret har ndrats eller avl gsnats g All normal f rs mring av...

Страница 62: ...62 Appendix EIZO Corporation EIZO EIZO EIZO EIZO 3 EIZO EIZO 7 EIZO EIZO EIZO LCD pixel pixel LCD EIZO EIZO EIZO EIZO EIZO EIZO...

Страница 63: ...63 Appendix EIZO Corporation EIZO EIZO EIZO EIZO 3 EIZO EIZO 7 EIZO QC EIZO EIZO EIZO EIZO EIZO EIZO EIZO EIZO...

Страница 64: ...64 Appendix EIZO Corporation EIZO EIZO EIZO EIZO 3 EIZO 7 EIZO EIZO EIZO a EIZO b c d LCD e f g h LCD EIZO EIZO EIZO EIZO EIZO EIZO...

Страница 65: ...r ou une soci t affi li e de votre pays Les adresses des distributeurs sont r pertori es sur le site Web EIZO ci dessous http www eizo com Pour les clients en Suisse veuillez consulter le site Web sui...

Страница 66: ...rug Dette produkt forventes ved bortskaffelse at blive indsamlet og genbrugt i overensstemmelse med lovgivningen i dit land for at reducere belastningen af milj et N r du bortskaffer denne produkt ska...

Страница 67: ...to za recikliranje v skladu z okoljevarstveno zakonodajo va e dr ave Prosimo da se pri odstranjevanju izdelka obrnete na lokalnega distributerja ali podru nico Kontaktni naslovi so objavljeni na spoda...

Страница 68: ...n distribuitor sau un afi liat al rii respective Adresele de contact le g si i pe pagina de web al EIZO http www eizo com Geri D n m Bilgisi Bu r n n at laca zaman lkenizin evre kirlili inin azalt lma...

Страница 69: ...69 Appendix China Measures for RoHS Compliance in ChinaRoHS Pb Hg Cd Cr VI PBB PBDE SJ T 11363 2006 SJ T 11363 2006...

Страница 70: ...3rd Edition January 2014 03V24484C1 U M T2381W Copyright 2013 2014 EIZO Corporation All rights reserved...

Отзывы: