background image

 2.4  Establishing the Network Connection

A wired LAN connection is required for the initial setup. 
This also applies to the WiFi capable WLAN models, as 
the wireless connection’s login data needs to be 
entered before WiFi can be used.
Therefore, please connect Querx to your network or 
directly to the computer you intend to use to configure 
the device, using a network cable.

 2.5  Power Supply

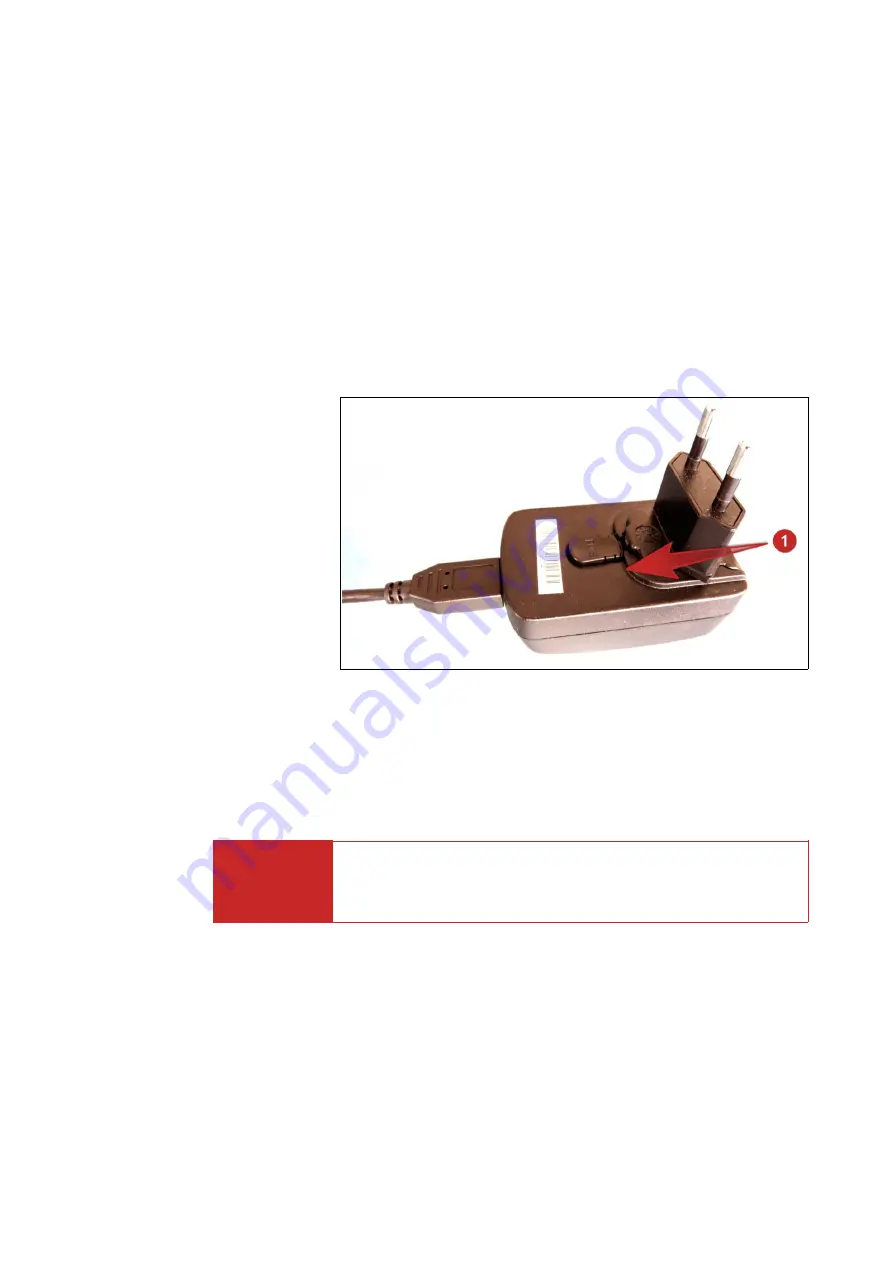
1.

Prepare the power adapter by inserting the plug that 
is used in your country. An audible click indicates that
the connection has been made.

Now connect Querx to the power adapter using a micro-
USB cable and plug the power supply into a socket. The 
Querx status-LED will now light up yellow.

Danger

Never use the device with a defective power adapter! 
Risk of death from electrical shock!

Querx can alternatively be connected to a free USB-
Port, if no free power outlet is available.

15

Содержание EGN600114

Страница 1: ...egnite Querx Network thermometer hygrometer barometer and data logger User Guide Querx TH Querx WLAN TH Querx THP Querx WLAN THP Querx PT Querx WLAN PT Handbook version 5 4 1 Firmware version 4 4...

Страница 2: ...4 The Email Interface 37 4 1 Managing Email Accounts 37 4 2 Managing Email Recipients 40 4 3 Email Templates 45 4 4 Event Descriptions 46 5 Accessing Data via the Web Interface 47 5 1 Current Values...

Страница 3: ...1 Reboot 98 11 2 Saving the Configuration 99 11 3 Resetting the Configuration 100 11 4 Firmware Updates 102 11 5 Changing the Battery 105 11 6 Resetting the Internal Memory 107 11 7 Adjustment and Cal...

Страница 4: ...make this data available via various interfaces Any other use of the devices is considered contrary to the designated use The manufacturer takes no responsibility for consequences resulting out of an...

Страница 5: ...ls The following symbols will be used throughout this manual Danger Indicates possible danger of injuries Attention Indicates issues that can damage the device i Information Points out helpful hints a...

Страница 6: ...n interactive graph that can be viewed in any web browser Furthermore data can be accessed manually or automatically in various formats and via multiple interfaces such as HTTP SNMP or Modbus TCP This...

Страница 7: ...Reset button 2 Status LED 3 Sensor cable 4 Micro USB socket for power supply 5 Link LED 6 RJ45 socket for Ethernet connection 7 Network activity LED 4 egnite Querx TH egnite Querx THP egnite Querx PT...

Страница 8: ...without function 3 Status LED 4 Reset button 5 Sensor cable 6 Micro USB socket for power supply 7 Link LED 8 RJ45 socket for Ethernet connection 9 Network activity LED 5 egnite Querx WLAN TH egnite Qu...

Страница 9: ...ber EGN601216 Like egnite Querx THP item number EGN601116 but additionally includes USB power adapter with micro USB cable and interchangeable plugs for UK EU US and AU outlets Ethernet patch cable eg...

Страница 10: ...s USB power adapter with micro USB cable and interchangeable plugs for UK EU US and AU outlets Ethernet patch cable egnite Querx WLAN THP item number EGN 602217 egnite Querx THP with integrated temper...

Страница 11: ...d AU outlets Ethernet patch cable egnite Querx WLAN PT1000 item number EGN601715 egnite Querx WLAN PT 1000 WiFi antenna Simple Pt1000 sensor without pocket sleeve egnite Querx WLAN PT1000 Set item num...

Страница 12: ...m the manufacturer egnite WiFi antenna Ethernet cable Micro USB cable USB power adapter with interchangeable plugs for UK EU US and AU outlets DakkS German Accreditation Body or ISO calibration certif...

Страница 13: ...o inaccurate measurements 2 2 Mounting the Sensor Querx sensors can be mounted using the latches on the case They can alternatively be mounted using zip ties to tie them to piping for instance Please...

Страница 14: ...cases please refer to the manufacturer s data sheet The spring loaded terminals of older models were replaced with screw terminals in version 1 1 2 3 1 Connecting a Sensor to Screw Terminals You will...

Страница 15: ...oceed to connect the individual cable cores to the terminals as displayed in the images 4 In order to connect a core first loosen the corresponding screw by turning it anti clockwise 5 Insert the core...

Страница 16: ...tool with a fine tip e g a fine screwdriver or a pair of tweezers A biro Possibly a magnifying glass Two DIP switches located above the terminals for the cable cores are used to select whether the sen...

Страница 17: ...ary use a magnifying glass Proceed to connect the individual cable cores to the terminals as displayed in the images 1 Depress the fixture corresponding with the terminal to which you want to connect...

Страница 18: ...ure the device using a network cable 2 5 Power Supply 1 Prepare the power adapter by inserting the plug that is used in your country An audible click indicates that the connection has been made Now co...

Страница 19: ...r defective Should the problems persist please contact your network administrator or connect the device directly to the computer you intend to use for its configuration and continue with the following...

Страница 20: ...red manually with a static IP address i Information The steps detailed in this section are not necessary for most users Please continue with chapter 2 7 Accessing the Web Interface 2 6 2 1 Installing...

Страница 21: ...igure and click Configure in the drop down menu 2 Activate the checkbox Manual configuration 3 Enter the IP address the IP mask and the IP gate 4 Save the changes by clicking OK Querx will apply the s...

Страница 22: ...on process Boot a web browser on your PC and enter the IP address of your Querx into the address bar if you know it Alternatively Querx is accessible via its system name if your PC supports Multicast...

Страница 23: ...dvanced System Configuration Querx can be accessed directly from the Safari web browser using the Bonjour menu 2 8 Accessing the Configuration Area 1 Click the button Configuration in the upper right...

Страница 24: ...area lets you change the corresponding settings 3 Help section The section on the right of the screen displays short explanations of all the parameters that can be found on each page 2 9 Initial Conf...

Страница 25: ...elect German Click Save to activate the selected language Further information about the settings on this page can be found in chapter 8 1 General Settings 2 9 2 Setting Date and Time Querx requires th...

Страница 26: ...on DST B If your country uses daylight saving time but the time does not change on the last Sundays of March and October please deactivate auto in the section DST You will need to select whether summe...

Страница 27: ...that date and time are displayed correctly If this is not the case a problem occurred with the automatic update In this case click Set time manually 1 The values can be entered into the fields Date an...

Страница 28: ...nance Reset 1 Click the button Delete sensor data A confirmation window opens 2 Confirm that you wish to delete all data saved on the device by activating the button labelled Are you sure 3 Click Yes...

Страница 29: ...els additionally support the following alerts Humidity above upper limit value Humidity below lower limit value Humidity rising too quickly Humidity falling too quickly Dew point above upper limit val...

Страница 30: ...the example depicted above the minimum temperature is set to 15 C The dead band is set to 5 C An alert is triggered if the temperature falls below the minimum temperature 1 If the temperature falls be...

Страница 31: ...of two minutes is configured The limit value is exceeded at 1 30 1 The device however only triggers an alert once the value is exceeded for the entirety of the configured delay In this case that valu...

Страница 32: ...rising temperatures The graph displayed above shows how Querx reacts to a window being opened The maximal rate at which the temperature may drop is set to 5 C and the timespan is set to 30 minutes The...

Страница 33: ...seconds after which an alert is triggered in the input field Alert delay if you wish to allow for short term transgressions 2 Enter the Lower limit that will trigger an alert if values drop below thi...

Страница 34: ...1 First activate variation alerts by clicking Enable 2 Enter the maximal Value by which the temperature is permitted to drop 3 Enter the maximal Time within which the temperature is permitted to drop...

Страница 35: ...s triggered in the input field Alert delay if you wish to allow for short term transgressions 2 Enter the Lower limit that will trigger an alert if values drop below it 3 Enter the Upper limit that wi...

Страница 36: ...activate variation alerts by clicking Enable 2 Enter the maximal Value by which the humidity is permitted to drop 3 Enter the maximal Time within which the humidity is permitted to drop by the value s...

Страница 37: ...urrent temperature and the dew point instead of the absolute dew point 4 Please enter the number of seconds after which an alert is triggered in the input field Alert delay if you wish to allow for sh...

Страница 38: ...rts 1 Please enter the number of seconds after which an alert is triggered in the input field Alert delay if you wish to allow for short term transgressions 2 Enter the Lower limit that will trigger a...

Страница 39: ...irst activate variation alerts by clicking Enable 2 Enter the maxiamal Value by which the humidity is permitted to drop 3 Enter the maximal Time within which the humidity is permitted to drop by the p...

Страница 40: ...ls alerts Setting a further account up makes sense if you wish to have a backup account in case a mail server is not accessible or your network setup features an integrated mail server and distinguish...

Страница 41: ...e in the input field User name and the password in the input field Password 7 Click the button Test to check your settings If the test is successful the button will turn green If any entries are fault...

Страница 42: ...required changes on the following page 3 Click the button Test to check your settings If the test is successful the button will turn green If any entries are faulty the corresponding field will be hig...

Страница 43: ...e account by clicking Yes 4 2 Managing Email Recipients The configured email servers can be used to send email notifications to up to four recipients You can select which events each recipient is noti...

Страница 44: ...al mail servers for instance because you distinguish internal and external emails please only activate the required mail server 4 Select which alerts the recipient is notified of in the Notify on sect...

Страница 45: ...to apply your changes Open the page Interfaces Email in the configuration area 1 In the Recipients section click the Edit symbol next to the entry for the account you wish to edit 2 Make the required...

Страница 46: ...age Interfaces Email in the configuration area 1 In the Recipients section click the Remove symbol next to the entry for the account you wish to delete 1 Confirm that you want to remove the recipient...

Страница 47: ...holders in the notifications subject and main body The placeholders are automatically replaced by the current values when notifications are sent N Name of the system that triggered the alert S Name of...

Страница 48: ...ent that values fall below the lower limit 2 Enter a description for the event that values rise above the upper limit 3 Enter a description for the event that values return to their normal state 4 Ent...

Страница 49: ...urrent values are displayed in the right column of the main page s sidebar A corresponding message is displayed above the measurement if an alert is active 5 1 2 Values in the Configuration Area The c...

Страница 50: ...error 5 2 Viewing Logged Data The chart on the home page displays the tracked data You can select between two display modes Line Chart 1 and Heatmap 2 5 2 1 Line Chart If you move the cursor along th...

Страница 51: ...ull color show the logged average values The lighter areas around the lines represent the minimum and maximum values recorded in the specific timeframe The horizontal bars represent the limit values a...

Страница 52: ...ast year The bar 1 below the graph corresponds to the selected display period You can move the slider controls 2 with your cursor to increase or decrease the time frame If the slider controls are set...

Страница 53: ...cursor over a date 1 displays the maximal minimal and median values 2 for the selected day in the sidebar The heatmap s color settings can be customized above the slider 3 at the screen s lower edge T...

Страница 54: ...the two arrows 5 2 2 Customizing the Layout The home page s layout can be customized via two buttons 1 The left button toggles the side bar on and off if the browser window s width is 900 pixels or m...

Страница 55: ...second section displays the time that has elapsed between the first and last entries in the data logger as well as the percentage of its memory that has been used It also shows the system s time of o...

Страница 56: ...In default settings the events are displayed in English and correspond to the texts specified for emails as described in chapter 4 4 Event Descriptions 53...

Страница 57: ...ssing data in various applications JSON JSON is a file format that is based on JavaScript It has been gaining significance especially with regard to the Internet of Things Open the Querx Web interface...

Страница 58: ...The exported files include the specified time frame s date and starting time the average minimum and maximum values as well as a timestamp for each measurement of the selected time frame 55...

Страница 59: ...an be used to embed the graph from the Querx home page into any other site for instance on your local network Open the Querx home page 1 Click Export 2 Copy the displayed HTML source code to the clipb...

Страница 60: ...SON format fname Filename Sets the returned file s name Example Exporting current values in the XML format Querx PT URL http 192 168 1 100 tpl document cgi tpl j current tpl format xml Output xml vers...

Страница 61: ...sorid sensor_2 name value value 29 trend 0 entry sensorid sensor_3 name value value 23 7 trend 0 record data querx Example Exporting current values in the JSON format Querx TH URL http 192 168 1 100 t...

Страница 62: ...uplim 85 0 lolim 40 0 sensor id sensor_1 name Humidity unit RH status 0 uplim 100 lolim 0 sensor id sensor_1 name Dew point unit deg C status 0 uplim 26 0 lolim 0 0 data record timestamp 1461675290 d...

Страница 63: ...ument cgi tpl j datalogger tpl URL parameters format xml Returns logged values in the XML format json Returns logged values in the JSON format csv Returns logged values in the CSV format fname Filenam...

Страница 64: ...t csv start 86400 step 7200 Output Date Time Temperature low Temperature avg Temperature high Humidity low Humidity avg Humidity high 13 04 2016 18 00 00 23 6 23 9 24 0 31 32 32 13 04 2016 20 00 00 24...

Страница 65: ...5 3 entry sensorid sensor_1 name average value 25 4 entry sensorid sensor_1 name maximum value 25 5 record record timestamp 1459861200 date 05 04 2016 time 14 00 00 entry sensorid sensor_1 name minimu...

Страница 66: ...as the TLS initialization only needs to be performed once URL https IP login cgi POST Parameters login_user Username login_pass Password Example User registration URL https 192 168 1 100 login cgi Pos...

Страница 67: ...racked by Querx Read data Read config The user can read the data tracked by Querx and the device s settings Read data Write config The user can read the data tracked by Querx and the device s settings...

Страница 68: ...settings 1 Click the Add button next to an empty line in the section Users 2 On the following page enter a user name into the input field User name and a password into the input field Password 3 Assig...

Страница 69: ...s in the configuration area 1 Click the Edit symbol in the section Users 2 Make the required changes 3 Click Save to apply your changes i Information The access rights can only be edited if at least o...

Страница 70: ...uration area 1 Click the Remove button next to the user you wish to remove 2 Confirm that you wish to remove this user by clicking Yes i Information A user with access rights can only be removed if at...

Страница 71: ...ly To do this open the page System Users in the configuration area 1 Click the Edit button next to the user Anonymous 2 In order to restrict anonymous access to Querx entirely assign the group of acce...

Страница 72: ...will first need to log into the device The buttons that let you log in and access the configuration area are located in upper right corner of the home page 1 Click Login 2 Enter the user name into the...

Страница 73: ...date format field is used to select the format in which calendar dates are displayed in the web interface and in exported files 1 The system name identifies the device whenever it sends alert notific...

Страница 74: ...equires this data in order to track measurements It is usually updated automatically via the net or a local time server Querx also features an internal clock that enables the device to continue tracki...

Страница 75: ...ctive manually 3 Click Save in order to apply your changes If the device is not connected to the internet or an internal NTP server is available on the network it is advisable to configure time and da...

Страница 76: ...connection in order to activate the wired network interface If no Ethernet connection is detected or an existing one is disrupted Querx WLAN will activate the WiFi interface 8 3 1 Ethernet Interface...

Страница 77: ...k the Edit symbol next to the entry Ethernet to access the settings for this interface 2 Select Obtain IP address automatically 3 Choose whether you want to A Obtain the DNS server automatically or B...

Страница 78: ...twork A Enter your network s SSID manually in the input field SSID or B click the button Select network to select the network from a list of available wireless networks 3 Select the method of encrypti...

Страница 79: ...e Ethernet interface If no wired connection is detected or an existing connection is disrupted the device will activate the WiFi interface The device needs to reboot in order to change the active netw...

Страница 80: ...models Peak minimum and average pressure values Querx THP can save up to 36 864 entries Querx TH and PT have a capacity of 73 728 entries The WLAN models can record 4 million entries This means that...

Страница 81: ...uired number of minutes in the input field Logging interval 2 If required activate data Compression 3 Click Save to apply your changes i Information Data compression can lead to noncritical display er...

Страница 82: ...e sensor in the input field Sensor type 2 PT Models Set the Filter to the mains frequency used in your country In Europe this is 50 Hz 3 Select the physical Unit that you want Querx to use 4 Activate...

Страница 83: ...ctivate Extended Resolution in order to extend the display measurements by one decimal place Keep in mind that this does not increase the accuracy of measurements and that data will still be logged wi...

Страница 84: ...ou want Querx to use 2 Querx usually displays the absolute air pressure at its location If you need to monitor the relative air pressure you will require the location s elevation above sea level 3 Cli...

Страница 85: ...play measurements by one decimal place This does not increase the measurements accuracy 2 If you activate Dew point spread Querx will display the difference between the current temperature and the cal...

Страница 86: ...n the configuration area 1 Enter the rate at which the dynamic values e g the temperature are to be updated in the web interface in the Refresh rate input field 2 Enter the time after which an inactiv...

Страница 87: ...m to let Querx automatically adjust the displayed range to the tracked values B Alternatively static Minimal and Maximal values can be assigned to the displayed value range 3 TH and THP models Repeat...

Страница 88: ...tructures and file formats JSON XML CSV 10 2 1 Generating Templates Any text editor can be used to generate template files A tutorial is available at egnite de Alternatively you can also download read...

Страница 89: ...e Template filename that is specified in the previously installed template s header line 5 Enter the URL for the HTTP endpoint of the cloud service to which you want to transfer your data This is usua...

Страница 90: ...iguration area 1 Activate Modbus TCP by clicking the checkbox Enable 2 If you want to allow changes to the Modbus TCP configuration uncheck the checkbox Write protection 3 Click Save to apply your cha...

Страница 91: ...int16 Upper temperature limit Fahrenheit 10 40026 25 int16 Temperature dead band Fahrenheit 10 40027 26 int16 Lower temperature limit Kelvin 10 40028 27 int16 Upper temperature limit Kelvin 10 40031...

Страница 92: ...on the product page at egnite de 10 4 1 General Data Open the page System General in the configuration area to enter the data concerning the device s system name contact person and location 10 4 2 Ac...

Страница 93: ...he IP address or hostname for the host who is to receive the SNMP traps in the input field Trap receiver in the SNMP section 2 Check the Trap community and make any required changes 3 Select which eve...

Страница 94: ...vice for a complete list Open the page Interfaces SNMP in the configuration area 1 Click the Download button next to MIB in the SNMP agent section to download the Management Information Database 10 5...

Страница 95: ...egnite Querx blinks under normal conditions 2 WLAN models Select the LED s Brightness under normal conditions 3 WLAN models Select the LED s Brightness when signaling an alert 4 Select the LED s Color...

Страница 96: ...93...

Страница 97: ...lect an Alert signal sound 3 Specify whether the signal for alerts is to be Repeated 4 Select a sound to signal that the values are Back to normal 5 If desired specify a personalized signal sound usin...

Страница 98: ...boot 11 1 1 Soft Boot It is sometimes required to reboot the device after changing settings Open the page Maintenance Reset in the configuration area 1 Click the button Reboot system 2 Confirm the so...

Страница 99: ...Backup in the configuration area 1 Click the Download link labelled Configuration in the Configuration backup section 2 Save the file by clicking OK 11 2 2 Restoring the Configuration Open the page M...

Страница 100: ...n be used if any changes to the configuration require a reboot When the configuration is reset via the reset button all settings including the network configuration are reset and the device is returne...

Страница 101: ...a biro egnite Querx TH THP PT egnite Querx WLAN TH THP PT 1 Use the biro to press the reset switch while the device is turned on see image The status LED will start to flash red 2 Keep the switch pre...

Страница 102: ...tion area The firmware that your device is currently running is displayed in the Firmware field of the Version section An update may be advisable if this version of the firmware is older than the one...

Страница 103: ...rx will now copy the buffer s contents into its internal memory and then reboot Attention Do not disconnect Querx from the power supply while a firmware image is being activated If an image is copied...

Страница 104: ...be loaded into the internal memory once you release the button The device will then reboot with the changed firmware Attention Do not use a pencil to reset the configuration as the pencil lead might b...

Страница 105: ...recommend sending the device in for maintenance i Information egnite Querx is operational without a battery The battery does not need to be changed if the device is in ongoing operation under normal...

Страница 106: ...ewdriver Then remove the back cover of the casing 2 A second screw is located inside the casing It is marked red in the image Undo this screw using the PH1 screwdriver 3 Carefully lift the circuit boa...

Страница 107: ...104...

Страница 108: ...ata according to the basic settings you have configured Open the page Maintenance Reset 1 Click the button Delete sensor data 2 Confirm that you wish to delete the data by clicking the checkbox Are yo...

Страница 109: ...ing them if required In common practice it may occur that Querx does not display the true current values but diverges from them within certain limits The feature Adjustment and Calibration serves to c...

Страница 110: ...and Gain In addition to adjusting the offset a second parameter gain can be set While the offset is a fixed value that is added to every measurement the gain is a multiplication factor It describes t...

Страница 111: ...d Offset 2 Enter the calculated value into the input field Gain 3 Leave the input field Annotation empty 4 Click Save to apply the offset and gain to all future measurements 11 7 3 Automatic Adjustmen...

Страница 112: ...Save to apply the offset and gain to all future measurements The Querx PT and Querx WLAN PT models can be calibrated without a reference device if they are fitted with a waterproof sensor The freezing...

Страница 113: ...ng any string of text into the input field Annotation before clicking Save Since Querx can only save the data of up to 30 calibration processes and it can not be deleted once saved it is recommended t...

Страница 114: ...Or Reset the network settings 11 3 NTP Email Cloud not working Ensure that you have configured a valid DNS server 8 3 2 I need to log into the web interface regularly to configure the device Increase...

Страница 115: ...alibration Factory calibrated DakkS certificate available German Accreditation Body Sensor heater Integrated Ethernet 10 100 Mbit RJ45 HP Auto MDIX Static or dynamic IP DHCP client Operating system Nu...

Страница 116: ...35 g Sockets RJ45 Ethernet Micro USB Mounting Wall mounting Conformity European Union CE compliant UL USA Canada UL94V 0 Protection class IP20 12 1 2 egnite Querx THP Specifications Temperature sensor...

Страница 117: ...25 days 1 entry min to 4 2 years 1 entry h Web interface Interactive diagram live update HTML5 CSS3 JSON und SVG Security StartTLS TLS password protection user management 3 users 3 groups Email Up to...

Страница 118: ...Sockets RJ45 Ethernet Micro USB Mounting Wall mounting Conformity European Union CE compliant UL USA Canada UL94V 0 Protection class IP20 115...

Страница 119: ...icate available German Accreditation Body Sensor heater Integrated Ethernet 10 100 Mbit RJ45 HP Auto MDIX Static or dynamic IP DHCP client WiFi 2 4 GHz IEEE 802 11 b g n WiFi encryption WEP WPA WPA2 O...

Страница 120: ...rage 40 C to 85 C max 95 rF 40 F to 185 F max 95 rF Mechanical data Casing material ABS plastic Casing color Black RAL 9011 Casing dimensions 2 6 x 2 x 0 8 in 66 3 x 50 x 20 mm Sensor cable length 13...

Страница 121: ...gging interval Configurable M2M HTTP XML CSV JSON Syslog Modbus TCP SNMP Web interface Interactive diagram live update HTML5 CSS3 JSON and SVG Security StartTLS TLS password protection user management...

Страница 122: ...net 10 100 Mbit RJ45 HP Auto MDIX Static or dynamic IP DHCP client WiFi 2 4 GHz IEEE 802 11 b g n WiFi encryption WEP WPA WPA2 Operating system Nut OS 5 Firmware updates Via web interface rescue funct...

Страница 123: ...imensions 2 6 x 2 x 0 8 in 66 3 x 50 x 20 mm Sensor cable length 13 8 in 340 mm Weight 0 2 lb 63 g Sockets RJ45 Ethernet Micro USB Mounting Wall mounting Conformity European Union CE compliant UL USA...

Страница 124: ...12 1 6 2 THP Models Temperature Sensor Measuring range Typical Unit Accuracy 25 0 5 C 0 65 1 0 C 121...

Страница 125: ...tration Long term stability 0 25 year 12 1 6 4 THP Models Humidity Sensor Measuring range Typical Unit Accuracy 20 80 3 rH Long term stability at 10 90 rH 25 C 0 5 rH year 12 1 6 5 THP Models Pressure...

Страница 126: ...such as high temperatures high aridity or high humidity the sensor film can become too dry or too moist This will lead to a temporary inaccuracy in the humidity and dew point values 12 3 Dew Point Ca...

Страница 127: ...s ETSI EN300 328 Ver 1 8 1 EN301 489 17 The EC conformity declaration can be requested from the manufacturer Technical changes reserved 12 5 Technical Support If you encounter any problems with one of...

Страница 128: ...files 12 6 Notes on Storage Do not store the devices in polyethylene bags The emitted gasses can harm the sensor Substances that contain bleach hydrogen peroxide or ammonia can also be harmful 12 7 E...

Страница 129: ...12 8 Drill Templates 126 egnite Querx TH egnite Querx THP egnite Querx PT egnite Querx WLAN TH egnite Querx WLAN THP egnite Querx WLAN PT...

Страница 130: ...1256 Fax 49 0 2305 441487 www egnite de 12 10 Disclaimer egnite can not be held responsible for technical or typographical mistakes We reserve the right to alter the documentation without further anno...

Отзывы: