background image


29

Transparency 

y

  The Transparency menu will allow you to alpha-blending of OSD menu on the monitor. Transparency is the quality that an 

object or substance has when you can see through it. 

y

  Transparency range is between 

0 and 100

, with a larger number representing can see through it. (default 0) 

y

  While pressing (+) or (-) button, a target value increases or decreases by 10 units.   


4.3.2 Main 

Monitor 

y

  Please click (


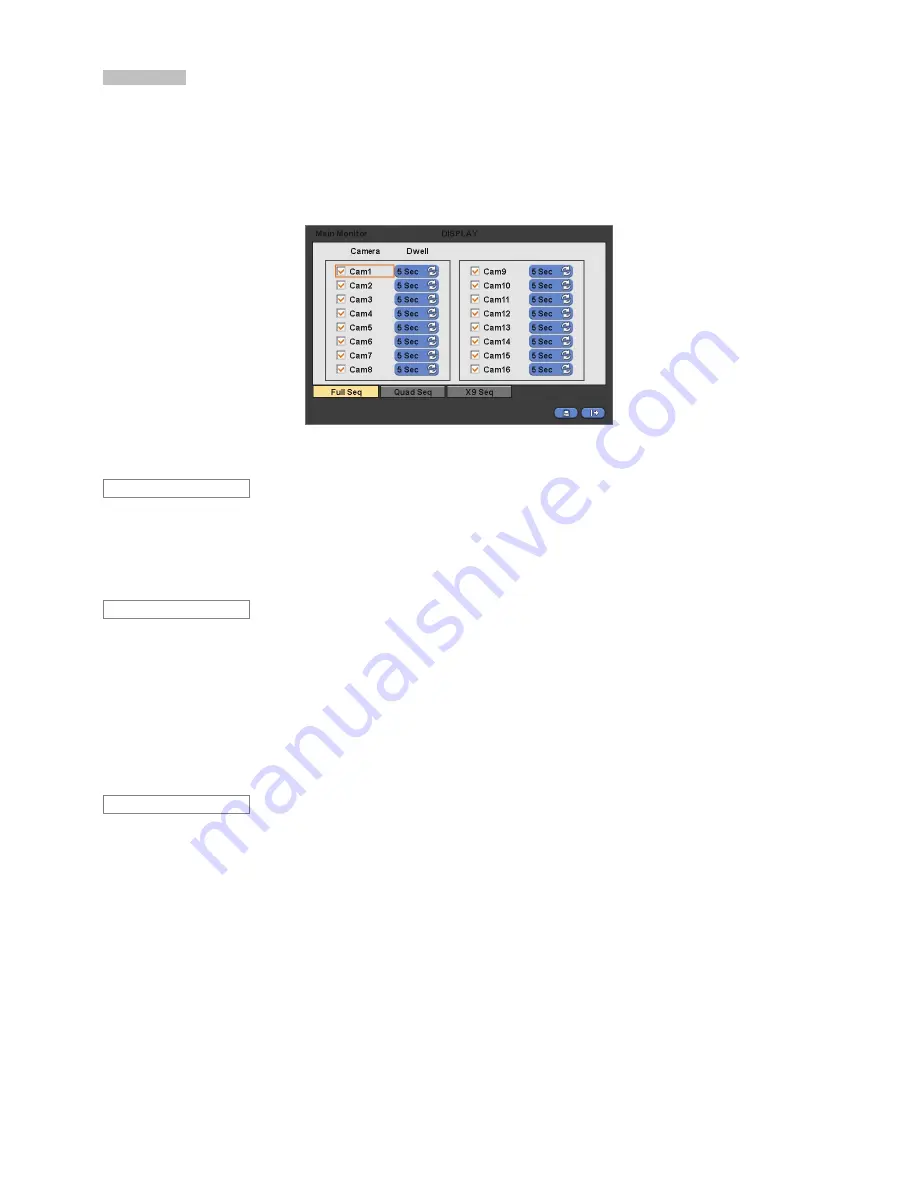
) DISPLAY>Main Monitor and the following screen will appear.   


y

  The Main Monitor menu will allow you to adjust channel sequencing interval of Main monitor.   


y

  Adjust interval for ‘Full screen sequencing’. 

y

 Check 

5

 check box next to the camera you want to include in sequencing. Any camera with unchecked check box will be 

excluded from channel sequencing. 

y

  Adjust the rotation interval of camera by clicking Dwell column. The rotation interval changes to 

3>5>10>15>30>60 

seconds

 by each press. 


y

  Use only with 8 / 16 channel DVRs. 

y

  Adjust interval for ‘X4 Split Screen sequencing’. 

y

 Check 

5

 check box next to the camera you want to include in sequencing. Any camera with unchecked check box will be 

excluded from channel sequencing. 

y

  Adjust the rotation interval of camera by clicking Dwell column. The rotation interval changes to 

3>5>10>15>30>60 

seconds

 by each press. 

y

  ‘4 Split Screen sequencing’ is disabled in the following modes. 


8 channel DVR:

 3x3 Mode 


16 channel DVR:

 4x4 Mode 


y

  Use only with 16 channel DVR.   

y

  Adjust interval for ‘X9 Split Screen sequencing’. 

y

 Check 

5

 check box next to the camera you want to include in sequencing. Any camera with unchecked check box will be 

excluded from channel sequencing. 

y

  Adjust the rotation interval of camera by clicking Dwell column. The rotation interval changes to 

3>5>10>15>30>60 

seconds

 by each press. 

y

  ‘9 Split Screen sequencing’ is disabled in 4X4 Mode. 


4.3.3 Spot 

Monitor 

y

  Please click (


) DISPLAY>Spot Monitor and the following screen will appear.   


X9 Seq 

Quad Seq 

Full Seq 

Содержание E0824

Страница 1: ...1 REALTIME DVR 4 8 16 Channel Models User s Manual Stand Alone Digital Video Recorder EKFQ3_V2 08 o199 This document contains preliminary information and is subject to change without notice...

Страница 2: ...ation and servicing should be performed only by qualified and experienced personnel Power off the DVR when connecting cameras audio or sensor cables The manufacturer is not responsible for any damage...

Страница 3: ...t with water 6 Accessories Do not place this equipment on an unstable cart stand or table The equipment may fall causing serious injury to a child or adult and serious damage to the equipment Wall or...

Страница 4: ...e technician to perform safety checks to determine that the equipment is in proper operating condition 16 Field Installation This installation should be made by a qualified service person and should c...

Страница 5: ...4 DVR Set A Type 4CH 8CH 16CH B Type 4CH 8CH 16CH CD Software Manual Remote Controller Manual Screws Data Cable SATA Cable HDD Brackets Optional Power Cable THE LIST OF CONFIGURATION...

Страница 6: ...Status Setup Default HDD format HDD format is done by SETUP SYSTEM Admin Storage Format If there are more than two HDDs each must be formatted separately When the format is completed DVR will auto reb...

Страница 7: ...use 15 3 6 Screen Icons 16 4 Setup 17 4 1 Login Logout 17 4 2 SYSTEM 18 4 2 1 Information 18 4 2 2 Admin 20 4 2 3 Account 24 4 2 4 System Log 26 4 2 5 Exit 26 4 2 6 Shutdown 27 4 3 DISPLAY 27 4 3 1 OS...

Страница 8: ...Operating Status 64 8 6 Remote Setting 64 9 Search Mode 66 9 1 Search Screen 66 9 2 Remote Search 66 9 3 Local Search 67 9 4 Event Search 67 9 5 Playback 68 9 5 1 Playback Control Button 68 9 5 2 Pri...

Страница 9: ...Adapter DC 12V 5A and Power Supply Cable B Type Power Supply Adapter DC 12V 6 67A and Power Supply Cable Remote Control With 2 AAA batteries Installation CD CMS Software User s Manual 1 2 Service y I...

Страница 10: ...9 B Type 4 8 16 Channel Series DVR...

Страница 11: ...le and power supply cable other than ones we provide Otherwise it may cause damage to the hard disk CAUTION y For installation addition replacement Removal of HDD DVD RW make sure that DVR is turned o...

Страница 12: ...use only Crossover cable 2 2 5 Alarm Connections y Connect Alarm Input Sensor to AI 1 AI 4 AI 16 connectors and connect Sensor Common to G connector y Connect Alarm Output buzzer siren etc to AO 1 AO...

Страница 13: ...power source Adapter input voltage is a free volt 100 VAC 240 VAC Please do not use any different power supply adapter because it may cause the DVR to malfunction 2 2 11 Connections Guideline y Video...

Страница 14: ...trol mode on off MENU Enter the Main Menu Setup mode REW Fast reverse playback changes to x16 x32 with each press Zoom Out in PTZ mode BACKWARD Frame by frame reverse still image playback Zoom In in P...

Страница 15: ...press key and use 1 9 key Select Camera No 10 16 press key and use 1 6 key B Type model y Below shows how to select camera channel for 4 8 16channel DVR y Below shows how to select camera channel for...

Страница 16: ...n easier access to adjustment Refer to below for proper use y Left mouse button functions the same as Enter key on the front panel of DVR y Right mouse button displays the following Function keys on y...

Страница 17: ...recording Event recording mode Alarm In Motion 4 CMS access indication No of accesses up to 4 In recording In channel sequencing PTZ registration PTZ mode Lock Remote Controller Setup in HDD Overwrit...

Страница 18: ...approach by the login window See 4 2 3 Account y At Setup System Account menu if you add a user that user s ID will appear and you can login as its general ID y After login successfully following scre...

Страница 19: ...Please click direction keys on the right hand side of the System ID frame to set the ID of DVR Take any whole number between 1 and 255 y While pressing or button the System ID value increases or decr...

Страница 20: ...ge box will show its success or failure y When you complete Status data input please click Version and the following screen will appear Version Upgrade y You may upgrade DVR software y Please follow t...

Страница 21: ...are from 50 100 Alarm Out The Alarm out will happen at the used amount of HDD which is specified at Used Beep Check 5 the warning sound will happen at the used amount of HDD which is specified at Used...

Страница 22: ...live in a region to observe DST please check it i e 5 y If DST is observed please click Period and the following screen will appear y Adjust the dates of beginning Begin and end End of DST by Month We...

Страница 23: ...Input IP address of NTP server Interval y Set clock update interval from NTP Server Normally you can adjust 1 hour up to 24 hours System Clock y Display DVR clock Server Clock y Display NTP Server s...

Страница 24: ...ne S M A R T y Click the frame on S M A R T column and temperature and HDD damage will show S M A R T Setup y Please click S M A R T Setup and the following screen will appear y Check the square box 5...

Страница 25: ...2 3 Account y Please click SYSTEM Account and the following screen will appear y Please click New Group and the following screen will appear y Click keyboard icon on the right hand side of Group Name...

Страница 26: ...haracteristics up to 8 characteristics on the virtual keyboard y Input Password and Confirm y Choose OK to confirm the setting Then lists of Group and User will show as follows y Click 6 to delete the...

Страница 27: ...oard 4 2 4 System Log y Please click SYSTEM System Log and the following screen will appear y System Log System Log displays diverse events Setup Menu Enter Exit Playback Mode Enter Exit Network Acces...

Страница 28: ...help you safely turn off DVR Please use the proper shut down procedure to avoid damaging to our DVR system Do not remove the power during shut down y Click SYSTEM Shutdown and then choose OK on the d...

Страница 29: ...to change margin between both ends of the monitor on horizontal side and OSD Margin range is between 0 and 50 with a larger number representing greater margin y Adjust Vertical to change margin betwe...

Страница 30: ...5 10 15 30 60 seconds by each press y Use only with 8 16 channel DVRs y Adjust interval for X4 Split Screen sequencing y Check 5 check box next to the camera you want to include in sequencing Any came...

Страница 31: ...tor control on display mode y Every click of the SPOT menu item on mouse right click menu will indicate SP and SP1 on the right bottom of main monitor y After SP1 the it shows nothing And system gets...

Страница 32: ...each frame y In DHCP IP Address Subnet Mask Gateway and DNS Server will have input automatically DNS Server y When you set Network Type to DHCP DNS server will be inputted automatically y When you set...

Страница 33: ...tting y Please click Port and the following screen will appear y Transfer Speed is used for setting a mean transfer speed per unit of time between a client and a DVR y Set a proper Transfer Speed for...

Страница 34: ...ight hand side of Add E Mail item then the virtual keyboard will appear Please register E Mail address E Mail address should contain y When an event occurs user can send an email to a designated mail...

Страница 35: ...r and Pattern help you to use OSD function of PTZ camera PTZ camera itself supports OSD menu use the setup value to more easily enter and use the OSD menu even in DVR If OSD enter command is 95 PSET f...

Страница 36: ...t hand side of each frame on Title column and the virtual keyboard will appear Then please register the title of Alarm input y When you check 5 a check box on No column a corresponding Alarm starts op...

Страница 37: ...MERGENCY key 4 5 1 Settings y The Continuous menu will allow you to set recording mode y Each frame on Title column shows camera title registered in DEVICES Camera PTZ You cannot change camera titles...

Страница 38: ...50 16 Channel DVR 480 400 240 200 120 100 240 200 120 100 60 50 y Click each frame on Quality column to select recording quality of a corresponding camera You may select one of Super High and Std y Cl...

Страница 39: ...ect Camera No 1 y Please set the recording mode as follows Check a check box next to your desired recording mode i e Continuous Alarm Motion and PreAlarm If you want to stop recording please clear all...

Страница 40: ...era Network Setting Dual Streaming Disabled Dual Streaming Enabled NTSC PAL 360x240 720x240 720x480 360x240 720x240 720x480 4 Channel DVR 120 100 120 100 60 50 120 100 120 100 60 50 8 Channel DVR 240...

Страница 41: ...to confirm the setting 4 5 5 Holiday y Please click RECORD Holiday and the following screen will appear y The Holiday menu will allow you to register holidays Please follow the registration procedure...

Страница 42: ...notification when Alarm In 1 is on Please check 5 a check box under Link Notification More than two E mail addresses can be set Repeat the above procedure for Alarm In 2 Alarm In 16 y Choose OK to co...

Страница 43: ...heck 5 a check box under Link Alarm Out More than two alarm outputs can be set Select E mail addresses for notification when Video Loss 1 is on Please check 5 a check box under Link Notification More...

Страница 44: ...ct a popup or beep sound for warning or have a particular channel of interest to pop up on Spot Screen y Please follow the setup procedures below Select camera Popup Please Check 5 a check box under m...

Страница 45: ...disk usage will show by y On the left low side of the screen icon will show as the progress y At the normal state HDD Overwrite mode is on and icon shows y When Overwrite mode is off see 4 2 1 Inform...

Страница 46: ...een Please do not use the digital zoom function in split screen format channel sequencing mode or PIP mode 5 1 4 Freeze Live Image y Press FREEZE key while viewing live image to pause the image y The...

Страница 47: ...the camera itself you should set them in Camera OSD Once you complete the setup close the Camera OSD menu You can conveniently use Tour and Pattern functions simply by clicking Tour and Pattern button...

Страница 48: ...following Search menu will appear y There are three ways to search video i e by date time and by calendar Date Time Search search by inputting date time Calendar Search search by using calendar Event...

Страница 49: ...en will show selected date time Click button for selecting cameras Selected camera will show the time bar 0 60 and It will be marked on 2 5minutes basis during selected time zone Use and keys to move...

Страница 50: ...creen will appear y There are three ways to search video i e by date time and by calendar Date Time Search search by inputting date time Calendar Search search by using calendar Event Search search by...

Страница 51: ...ess Goto End I Goto end of recorded data y Press SEARCH key to stop playing back video 5 4 One touch Playback y Press the PLAY PAUSE key or click the mouse wheel central button in the viewing mode The...

Страница 52: ...It is important not to detach storage device until DVR displays Archive Success message If the storage is done properly Archive Success message will pop up Please choose OK to confirm If the storage f...

Страница 53: ...ust display poison y If you want every camera to have the same mode please click Copy to All Camera y Choose OK to confirm the setting 5 7 Alarm Out Control yPlease click Color Alarm in SEARCH popup m...

Страница 54: ...53 CMS Central Monitoring Station User s Manual Stand Alone Digital Video Recorder V2 08 o199 This document contains preliminary information and is subject to change without notice...

Страница 55: ...000 SP4 or Windows XP only 6 2 Program Installation Method y Please follow the program installation procedures below If an old version of CMS program was installed completely remove or delete the old...

Страница 56: ...s click Install When the following screen appears click Finish to complete the installation 6 3 Login y After you install CMS software CMS icon below appears on your desktop y Please double click on t...

Страница 57: ...Setting DVR Setting ARCHIVE Archive Moving Image Playback Image Archive E MAP View E map image DVR Name DVR Activation DVR Select REMOTE CONNECT DVR Connection Network Connection REMOTE DISCONNECT DVR...

Страница 58: ...C and Network setup 8 2 1 System Setup y This menu is for CMS PC setup y CMS VERSION displays current version of CMS y Time Format displays current time and allow user to set date and time y Display O...

Страница 59: ...sy to distinguish IP Address Domain Name input IP address or Domain Name of DVR check with SETUP DEVICES Network in your DVR Command Port input Administrator s number among port numbers set in DVR che...

Страница 60: ...thout saving by clicking Cancel y Remote Site Login Setup input ID and Password Please do not input ID and Password if you want a popup window for logon ID and password to appear at the time of connec...

Страница 61: ...e lists DVR sites being currently connected to the CMS y This is Live video of the connected DVR y You can connect maximum 16 sites simultaneously y If you click Remote Disconnect interface with a sit...

Страница 62: ...d click the button 5 8 quad screen will display Similarly if you select Channel No 16 13 16 quad screen will display y 9 Split Screen Mode Click on 9 SPLIT button and 9 split screen will display The 9...

Страница 63: ...mera of Remote Site to any screen Then the camera will display 8 3 4 Screen Color Adjustment y Adjust color of the screen using three bars Brightness Contrast Saturation Selecting a channel and draggi...

Страница 64: ...en in an area where the DVR is installed 8 3 8 One Touch Recording y Click on INSTANT RECORD button to save video of every channel in HDD of Local System PC with CMS installation 8 4 PTZ Control y Thi...

Страница 65: ...is function allows you to check operating status of each unit in DVR connected to CMS y Click on Health Check button in Watch mode and the following screen will appear y The list below describes funct...

Страница 66: ...4 y HDD has an error 8 5 3 Recording Status y In recording y Recording is stopped y Above the maximum number of cameras allowed 8 5 4 Motion Recording Status y In motion recording y No motion recordin...

Страница 67: ...e and the following SETUP menu same as DVR s will appear on CMS screen y The setup procedure is same as that of DVR y When the setup is completed do not click Exit button on the SETUP screen but click...

Страница 68: ...ate Time LED 4 Site Tree DVR and Channels 5 Calendar 6 IMAGE PRINT button 7 IMAGE SAVE button 8 Playback control button 9 Time Select Bar 10 Fast Forward Backward Playback Click to increase the speed...

Страница 69: ...Select Bar 6 Start Time Time for starting playback y When Date Time search is completed please click Playback control button to begin playback 9 3 Local Search y The LOCAL SEARCH button allows you to...

Страница 70: ...kward Play Fast Forward Play Play Stop I Go to the First Image I Go to the Last Image I Go to the Previous Image I I Go to the Next Image 9 5 2 Print y This is for printing a selected image within the...

Страница 71: ...ute Save 9 5 4 Archive y This is to back up the DVR s moving image data to EXE file in PC CMS y Work only in playback mode y Press STOP button first to make sure the playback is stopped and then press...

Страница 72: ...71 Designate Archive end time Designate file name Select camera video to save Click on Start button to begin Archive...

Страница 73: ...e PAUSE BACKWARD Frame by frame backward still image playback FORWARD Frame by frame forward still image playback REW Fast reverse playback FF I Fast forward playback DEINTERLACE Deinterlace On Off 10...

Страница 74: ...select remote site tab and the following screen will appear y Please click on file open button and select the E Map file to load y Please click on OK button to exit program y Click button and you can...

Страница 75: ...disk size you use y After setting FPS per channel video size video quality click button Then the maximum recording days and data size will show 10 5 EXE to AVI Converter y Users are able to convert Ar...

Страница 76: ...75 Keyboard Controller CP1200A User s Manual Keyboard Controller V2 08 o199 This document contains preliminary information and is subject to change without notice...

Страница 77: ...iguration Diagram I Single System Configuration 1 Camera 1 DVR 11 1 2 Configuration Diagram II Multiple System Configuration Multi Cameras 1 DVR Tx Tx Rx Rx DVR 1 RS485 RS485 Tx1 Tx1 Tx2 Tx2 Tx3 Tx3 T...

Страница 78: ...m ID and define the ID of DVR yWhen user connects more than two DVRs then each DVR has to have a different ID yThen move to Setup Device Camera PTZ Keyboard and select CP1200A yThen choose PTZ protoco...

Страница 79: ...DVR Control Mode y In DVR control mode all buttons are operated according to texts written underneath of each button The functions are same as Front buttons of DVR as follows DISPLAY change channel s...

Страница 80: ...R button 11 4 3 PTZ Control Mode y Push once to exit DVR mode and turn PTZ mode y Press number keys ENT Hold for a while until double beep sounds key to change to Camera ID that wish to control If the...

Страница 81: ...80 Serial In POS ATM User s Manual Serial In POS ATM V2 08 o199 This document contains preliminary information and is subject to change without notice...

Страница 82: ...p to 4 serial in devices by using the converter yApplicable converters as follows FTDI chipset included converter Prolific PL2303 PL2303X PL2303HX chipset included converter Winchiphead chipset includ...

Страница 83: ...Select Link Alarm Out item to run alarm output when the serial in events occur y Designate the E Mail address or IP Domain name at Link Notification box when the serial in events occur y Set other PO...

Страница 84: ...wish to activate ATM POS function on schedule y It is possible to activate all the time by clicking top right side of table y Click OK to save the schedules 12 5 Setup y Please click System Devices S...

Страница 85: ...reen They have 4 menus as followings None displays nothing on the OSD screen Live displays incoming information from the serial port in real time on the OSD screen Playback displays the saved informat...

Страница 86: ...a serial device End Pattern Indicates the end of the data when designated data are received from a serial device Discard Pattern Does not show the designated data on OSD screen Sets up in order to des...

Страница 87: ...t a certain repeated string to Line Delimiter y Decide the number of minimum characters in MCPL item to hide data under the designated number of characters y Input the pattern of dummy data to Discard...

Страница 88: ...in and adjust data to remove missed dummy data 12 6 Search y Using event search function y Please click the Search Event Search menu on the pop up menu of the wallpaper then you will see the following...

Страница 89: ...88 CMS Web Client User s Manual V2 08 o199 This document contains preliminary information and is subject to change without notice CMS Web Client...

Страница 90: ...ic ActiveX installation y Click the message above in the screen then following menu box will appear y Click Install ActiveX Control and start installation y Installation box will appears and click Ins...

Страница 91: ...reeze Pause current display Resume Resume paused display Quit Finish program and close browser 3 PTZ controller Must complete the control setting on its DVR and Cameras first Pan Tilt direction button...

Страница 92: ...e in calendar then recorded data will be showed up in Time bar Start Time Setting start time Camera Choosing camera number from 1 16 individually or all channels 4 Play functions for playback Fast Bac...

Страница 93: ...92 Mobile CMS User s Manual V2 08 o199 This document contains preliminary information and is subject to change without notice Mobile CMS...

Страница 94: ...PC Available download at following link http www microsoft com downloads details aspx FamilyID 9e641c34 6f7f 404d a04b dc09f8141141 DisplayLang en ActiveSync enable users manage documents calendars co...

Страница 95: ...agreement then click Finish button y Installation box will appear y Click OK to start installation y When installation completed following pop up will appear y Click OK y If following message appeare...

Страница 96: ...to check whether CMS has installed 14 3 Site configuration y Start CMS following screen will appear Note Depending on mobile device successful installation message may not appear Click OK when licens...

Страница 97: ...IP Domain Insert the IP address or Domain name of the site ID Input the registered ID of the site Password Input the password of the registered ID Command Port Insert Command Port of the site Stream P...

Страница 98: ...97 y Select a site and click Edit then following screen will appear y Correct items then click Save y Select a site and click Del y Confirmation message will pop up Delete Edit...

Страница 99: ...n of the site will appear if it is successfully connected y Users are able to select a camera by clicking camera button y Click Disconnect then live display screen will be closed and Site list box wil...

Страница 100: ...99 y Choose MobileCMS on the list and click Remove y Confirmation message will pop up y Click Yes to complete uninstall then program will be removed...

Отзывы: