background image

Eaton ConnectUPS Web/SNMP Card Quick Start Instructions 164950185—Rev D 21

6.

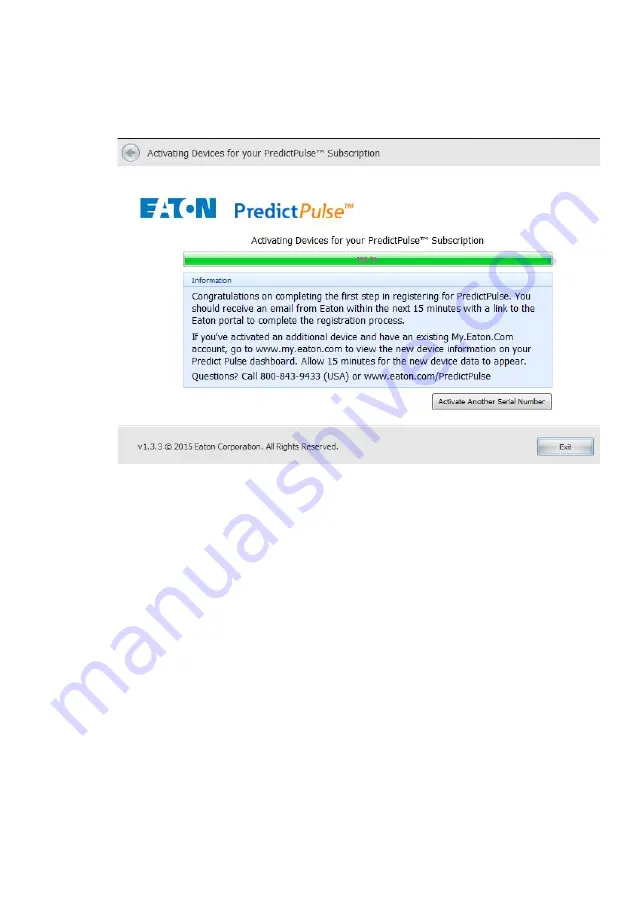
When this stage of registration completes, an information window explains 
the next step (see Figure 13). Click 

Activate Another Serial Number

 to 

register multiple devices or click

 Exit

 to continue.

Figure 13. Example of First Step E-mail

Содержание ConnectUPS Web/SNMP Card

Страница 1: ... Instructions Package Contents l ConnectUPS Web SNMP l USB Cable l Quick Start Instructions COM 1 2 3 4 ConnectUPS X Web SNMP xHub Card RESET 100 10 POWER STATUS Uplink COM 2 1 3 4 ON 1 2 ConnectUPS BD SNMP WEB Adapter RESET ON 1 2 COM NETWORK ...

Страница 2: ...rademark of Google Inc Linux is a registered trademark of Linus Torvalds Microsoft Internet Explorer and Windows are registered trademarks of Microsoft Corporation in the United States and in other countries Mozilla and Firefox are registered trademarks of the Mozilla Foundation All other trademarks are property of their respective companies Copyright 2015 Eaton Corporation Raleigh NC USA All righ...

Страница 3: ...hecklist 4 Section 2 Install the Card 5 Section 3 Connect the Card to the Computer 7 Section 4 Initialize the Card Configuration 9 Section 5 Obtain a DHCP assigned IP Address 12 Section 6 Assign an IP Address Manually 15 Section 7 Disable Browser Compatibility Mode 17 Section 8 Register a PredictPulse Subscription 19 ...

Страница 4: ...de any of the settings listed below contact your local network administrator for the settings In the table below check the DHCP check box or enter the values for manual configuration You will reference this data later in the procedure 4 If you need e mail functionality obtain the SMTP mail server s IP address or host name If using the SMTP host name verify that you also have the Name Server IP add...

Страница 5: ...nnectUPS Web SNMP card in a DHCP environment set DIP switch 2 to the 1 or ON position which is flipped down 2 If not already done record the MAC address from the label on the card for future reference see Step 2 in the Installation Checklist NOTE If another card is already installed with an attached communication cable disconnect the cable and then remove the card 3 To prevent electrostatic discha...

Страница 6: ...Eaton ConnectUPS Web SNMP Card Quick Start Instructions 164950185 Rev D 6 Figure 2 Installing the Card UPS BD Card Shown ConnectUPS BD SNMP WEB Adapter RESET ON 1 2 COM NETWORK ...

Страница 7: ...mal mode NOTE If you are not sure how to know if the UPS is in normal mode refer to the User s Guide for your UPS 2 Plug the RJ 45 end of the supplied serial configuration cable into the COM port on the card 3 Plug the other end of the serial cable into the serial COM port on the computer Depending on your laptop you may need an adapter for this step See Figure 3 and Figure 4 4 Connect an active E...

Страница 8: ...950185 Rev D 8 Figure 4 Connecting the Card UPS BD Model Shown 5 Wait approximately two minutes until the green UPS Data LED flashes regularly indicating normal operation ConnectUPS BD SNMP WEB Adapter RESET ON 1 2 COM NETWORK Ethernet Cable Configuration Cable ...

Страница 9: ...t bar Type Device in the search box Select Device Manager in the list above the search box The Device Manager opens 3 Locate Ports COM LPT in the list and click the adjacent plus box to expand the selection Make a note of the COM port you are using 4 Open HyperTerminal 5 Respond Yes or No to the message asking if you want to make HyperTerminal your default terminal emulation program The New Connec...

Страница 10: ...nter the password default is admin NOTE If the Password prompt does not appear press Enter again If it still does not appear check the following conditions l Verify the serial line is set to 9600 baud no parity 8 data bits 1 stop bit and no flow control l If the serial line settings are correct check the cabling to verify all connections are secure l Verify that your terminal program is set to the...

Страница 11: ...ctUPS Web SNMP Card Main Menu 14 Determine the IP address for the card To do this either obtain a DHCP assigned IP address or manually enter a fixed IP address l To obtain the IP address assigned through DHCP continue to Obtain a DHCP assigned IP Address on page 12 l To manually enter a static fixed IP address for the card s network connection continue to Assign an IP Address Manually on page 15 ...

Страница 12: ... you can use the terminal emulation program of your choice such as HyperTerminal 1 From the ConnectUPS Web SNMP main menu type 1 at the prompt and press ENTER for Web SNMP settings menu 2 Type 2 for setting the Web SNMP Card Control Group and press ENTER The current settings display see Figure 7 3 Is the DHCP value enabled l If yes type 0 and press ENTER to return to the main menu l If no the valu...

Страница 13: ... menu displays 6 Type 1 to see the current setting for the IP address and press Enter 7 The DHCP assigned IP address displays Make a note of this address 8 Type 0 and press Enter to return to the main menu 9 Verify network communication a Open a browser enter the IP address in the Address bar and click Go If the assigned IP address is working you are prompted to log on b Log on as administrator Th...

Страница 14: ...ck Start Instructions 164950185 Rev D 14 NOTE For detailed information refer to the Eaton ConnectUPS Web SNMPCard For X BD and E User s Guide which is available through a link on the Documentation tab on the ConnectUPS product Web site ...

Страница 15: ...o set the IP address and press Enter The Web SNMP settings menu displays see Figure 9 Figure 9 Modifying the Network Settings 2 Follow the instructions on the screen and enter the fixed IP parameters Refer to the data you logged in the Installation Checklist on page 4 3 Type 3 at the prompt and press Enter to restart the card from the main menu to take into account the new configuration The screen...

Страница 16: ...ress in the Address bar and click Go If the assigned IP address is working you are prompted to log on b Log on as administrator The default user name and default password are admin c When the ConnectUPS Web SNMP card Web page displays you know that the card is communicating with the network NOTE For detailed information refer to the Eaton ConnectUPS Web SNMPCard For X BD and E User s Guide which i...

Страница 17: ...r versions to display properly If data does not display properly on your ConnectUPS Web SNMP card Web page the browser compatibility mode should be disabled To disable the compatibility mode 1 Open your Web browser 2 In the menu bar select Tools Compatibility View Settings The Compatibility View Settings window opens see Figure 11 Figure 11 Compatibility View Settings Window ...

Страница 18: ... Quick Start Instructions 164950185 Rev D 18 3 Uncheck disable the Display all websites in Compatibility View checkbox to disable compatibility mode and click Close NOTE Close and re open your browser so that the changes take effect ...

Страница 19: ...formation go to www eaton com predictpulse NOTE Contact your Eaton service representative for availability of PredictPulse in your region Use the universal PredictPulse Subscription Wizard to configure your profile and register the Eaton UPS devices monitored by PredictPulse To begin the subscription registration download the universal PredictPulse Wizard from the PredictPulse web site and enter t...

Страница 20: ... PredictPulse Subscription 3 Enter the IP address for the installed ConnectUPS Web SNMP card and click Find My Serial Number NOTE If the serial number does not display click Start Over and manually enter the serial number 4 Complete the following fields l Contact Name First and last name of the contact person l Contact Email E mail address of the contact person for event data l Confirm Email E mai...

Страница 21: ...ns 164950185 Rev D 21 6 When this stage of registration completes an information window explains the next step see Figure 13 Click Activate Another Serial Number to register multiple devices or click Exit to continue Figure 13 Example of First Step E mail ...

Страница 22: ... receive a confirmation e mail see Figure 14 Figure 14 Example Confirmation E mail 8 Click Activate PredictPulse to proceed NOTE If you try to register a device that has already been registered you will receive an error message e mail from the PredictPulse support team with instructions about the problem 9 A profile e mail displays with your profile data see Figure 15 ...

Страница 23: ...Eaton ConnectUPS Web SNMP Card Quick Start Instructions 164950185 Rev D 23 Figure 15 Example Profile Page 10 Click Continue to finish the registration see Figure 16 ...

Страница 24: ...Eaton ConnectUPS Web SNMP Card Quick Start Instructions 164950185 Rev D 24 Figure 16 Example Completion E mail ...

Страница 25: ......

Страница 26: ...164950239 164940185 D ...

Отзывы: