EarthQuake 18493 Скачать руководство пользователя страница 2

2

Owner’s Manual

CHIPPER SHREDDER

Get parts online at  

www.GetEarthquake.com 

or Call 

800-345-6007 

M-F 8-5 CST

INTRODUCTION

Thank you for purchasing your product from Earthquake®. We have worked to ensure that this product meets the highest stan-

dards for usability and durability. With proper care, your purchase will provide many years of service. 

Please read this entire manual before installation and use. Earthquake® reserves the right to change, alter or improve the product 

and this document at any time without prior notice. Due to continuous product improvements, product images may not be exact. 

Some assembly may be required. 

Read and keep this manual for future reference. This manual contains important information regarding safety, assembly, operation 

and maintenance. The owner must be certain that all the product information is included with the unit. This information includes 

the manual, the replacement parts and the warranties. This information must be included to make sure state laws and other laws 

are followed. All persons to whom rent/loan this unit must have access to and understand this information. This manual should 

remain with the product even if it is resold. 

CONTENTS

Introduction/Contents ..................................................................................................................................................................................................................2
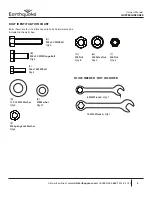
Bolt Identification Chart ................................................................................................................................................................................................................3
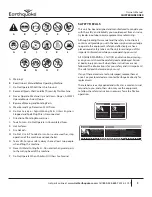
Warnings and Safety Precautions ..........................................................................................................................................................................................4-9
Features ............................................................................................................................................................................................................................................10
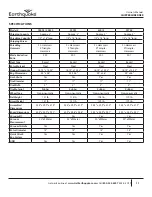
Specifications ..................................................................................................................................................................................................................................11
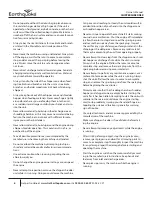
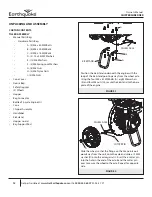
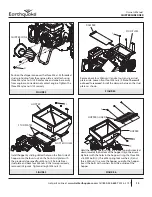
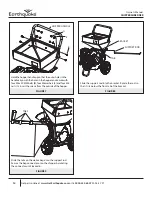
Unpacking and Assembly ...................................................................................................................................................................................................12-14
Operation ..................................................................................................................................................................................................................................15-16
Maintenance and Storage ...................................................................................................................................................................................................17-19
Troubleshooting and Repair ...............................................................................................................................................................................................20-22

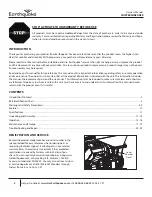
STOP! ACTIVATE YOUR WARRANTY BEFORE USE

All products must be registered

 within 30 days

 from the date of purchase in order to be covered under  

warranty. For more information regarding Warranty and Registration please review the Warranty and Regis-

tration terms and conditions expressed in the warranty insert. 

REGISTRATION AND SERVICE

Record the product model number and serial number in the 

space provided for easy reference when ordering parts or 

requesting technical support.  Excluding emissions-related 

warranty items, the warranty is valid only if the completed 

registration is received by Ardisam within 30 days of pur-

chase.  You can register your warranty online by visiting www.

GetEarthquake.com, or by mailing it to: Ardisam, 1160 8th 

Avenue, Cumberland, WI 54829.  You may also call our Custom-

er Service department at (800) 345-6007 Mondays through 

Fridays from 8 a.m. to 5 p.m. CST.

Serial

Number 

Decal

Содержание 18493

Страница 1: ...TIO 50 1 Get parts or technical assistance online at www GetEarthquake com or call 800 345 6007 2018 Ardisam All Rights Reserved P N 32409 REV 1 08 29 2018 THIS INSTRUCTION BOOKLET CONTAINS IMPORTANT...

Страница 2: ...nit must have access to and understand this information This manual should remain with the product even if it is resold CONTENTS Introduction Contents 2 Bolt Identification Chart 3 Warnings and Safety...

Страница 3: ...n are for size reference only Extra hardware may be included in the parts bag TOOLS NEEDED NOT INCLUDED A M8 x 40 MM Bolt Qty 4 B M8 x 20 MM Flange Bolt Qty 4 C M6 x 16 MM Bolt Qty 3 F M6 Spring Lock...

Страница 4: ...nstructions in this manual before attempting to operate this equipment BEFORE OPERATING EQUIPMENT Please read this section carefully Read entire operating and maintenance instructions for this product...

Страница 5: ...r other safety protective devices in place Do not put hands or feet near or under rotating parts or at inlet or discharge openings Thoroughly inspect where equipment is to be used and remove all forei...

Страница 6: ...engine Never attempt to reposition or move the chipper shredder unit while it is running Doing so could cause the machine to tip over and reaching to steady the unit could result in accidental insert...

Страница 7: ...lls surround your working area Never run engine in an enclosed or partially enclosed area Examples include buildings that are enclosed on one or more sides under tents car ports or basements Always ru...

Страница 8: ...tank and never allow children to fill the engine Never allow an adult or anyone under the influence of drugs or alcohol to fill engine When storing gasoline or equipment with fuel in the tank store aw...

Страница 9: ...dren Or Others Are Around A H G D C B E K J I M N O P F L SAFETY DECALS This unit has been designed and manufactured to provide you with the safety and reliability you would expect from an indus try l...

Страница 10: ...R CONE SHREDDER HOPPER Chipper Cone The chipper cone is located on the front of the unit next to the engine Insert branches and tree limbs up to approximately 3 7 6 cm in diameter into the chipper con...

Страница 11: ...r Dimensions 16 75 x 13 25 16 75 x 13 25 16 75 x 13 25 16 75 x 13 25 Bag Dimensions 24 x 36 24 x 36 24 x 36 24 x 36 Limb Chute Yes Yes Yes Yes Tire Diameter 11 11 11 11 Tire Width 2 2 2 2 Tire Materia...

Страница 12: ...Cone Chipper Assembly Handlebar Kickstand Hopper Guard Bag Support Rod Slide the wheel so that the flange on the tire points out ward away from the unit onto the axle and slide a 12 MM washer D onto...

Страница 13: ...the stud plates as shown FIGURE 4 STUD PLATE DAMPER I Install hopper by sliding slotted holes on the front side of hopper onto the four studs on the front stud plate with the previously loosened four...

Страница 14: ...ur M8 x 20 MM bolts B four M8 washers E and four M8 nuts G Insert the screws from the outside of the hopper FIGURE 7 Slide the support rod into the bracket Rotate the rod so that it sits below the fro...

Страница 15: ...and hose assembly may be used The strength of the Vacuum may be changed using the rotating sleeve on the nozzle The optional Tazz vacuum kit and can be ordered by contacting Earthquake customer servic...

Страница 16: ...nd dry material to prevent the discharge from becoming plugged Never use any object to force material into the shredding chamber It could get caught in the shredding hammers and damage the unit OPERAT...

Страница 17: ...lways follow the engine manual instructions for proper start up procedures when returning the unit to service Never store the unit or fuel container inside where there is an open flame or pilot light...

Страница 18: ...air shroud intake air filter and muffler Every 100 hours remove the engine air shroud and clean out any debris from the engine cooling fins SEE FIGURE 10 We recommend having this service performed by...

Страница 19: ...tor into position so the blades can be seen To sharpen or replace the chipper knives see the Trouble shooting and Repair section CHECK CHANGE ENGINE AIR CLEANER Service Interval Every 25 hours The eng...

Страница 20: ...er 7 See your authorized service center Engine exhaust is black 1 Dirty air filter 2 Choke closed 1 Replace air filter See engine manual 2 Open choke Engine runs but no material is discharged 1 Discha...

Страница 21: ...s of the shredding hammers may eventually wear out requiring rotation of the hammer or replacement if all cutting edges have been dulled NOTE Triangular hammers can be rotated twice after the first ed...

Страница 22: ...fe is sitting squarely against the stop that has been formed into the rotor If it is not sitting square the knives will perform as if they are ex tremely dully Always use a new lock plate when install...

Страница 23: ...23 Owner s Manual CHIPPER SHREDDER Get parts online at www GetEarthquake com or Call 800 345 6007 M F 8 5 CST NOTES...

Страница 24: ...ARDISAM INC 1160 Eighth Avenue PO Box 755 Cumberland WI 54829 Phone 800 345 6007 Fax 715 822 2124 www GetEarthquake com...

Отзывы: