


18
Owner’s Manual
CHIPPER SHREDDER
Get parts online at
www.GetEarthquake.com
or Call
800-345-6007
M-F 8-5 CST
CHECK FOR LOOSE HARDWARE
Service Interval: Every 5 hours; every spring and fall.
Inspect the unit, checking for loose hardware or components.
Pay special attention to the hardware attaching the chipper
cone, hopper, axle, and front leg.
CHECK SAFETY LABELS
Service Interval: Every spring and fall.
Check that the safety labels are in place and undamaged.
Replace any damaged or missing decals.
INSPECT CONE, HOPPER AND GUARDS
Service Interval: Every spring and fall.
Check that the chipper cone, shredder hopper, and discharge
guards are in place, undamaged, and secure. Replace any
damaged or missing parts.
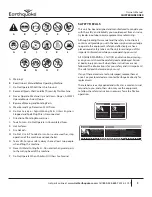
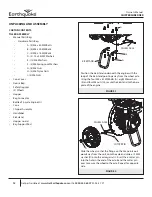
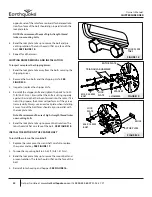
CLEAN DEBRIS FROM ENGINE AND CHIPPER
Service Interval: Before each use and every 100 hours.
The engine requires air flow to cool itself and for combustion.
Before each use, clean any debris from the unit especially from
around the air shroud intake, air filter, and muffler. Every 100
hours, remove the engine air shroud and clean out any debris
from the engine cooling fins SEE FIGURE 10. We recommend
having this service performed by an authorized repair center.
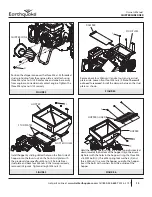
INSPECT / ROTATE SHREDDING HAMMERS
Service Interval: Every 25 Hours, or As Necessary
The shredding hammers of this unit can be rotated to provide
a new cutting surface as required. The triangular hammers
can be rotated twice, then flipped over for a total of 6 sharp
cutting surfaces. The J-hammers can be flipped over once. To
inspect the shredding hammers:
1. Disconnect the spark plug wire and secure it away from
the spark plug. SEE FIGURE 14
(on page 19).
2. Remove the small circular access panel (B) from the back
of the shredder housing. SEE FIGURE 11.
3. Inspect the cutting edges of the triangular hammers (A)
and J-hammers (A). SEE FIGURES 11 AND 12.
To rotate or replace the shredding hammers, see the Trouble-
shooting and Repair section.
FIGURE 10
FIGURE 11
FIGURE 12
J-HAMMER
WEAR AREA
ACCESS PANEL
TRIANGULAR-HAMMER
WEAR AREA
MUFFLER
AIR
SHROUD
INTAKE/
AIR FILTER
DEBRIS OFTEN GATHERS IN
THIS AREA
COOLING FINS


