13
STEP 3
Positioning the Posts
1] Determine the approach angle for the lift.
Note
: It can be helpful to pull a vehicle into the bay prior to installation, to give you a general idea
of where you want to place your posts. Mark and use these locations when chalking more specific
lines.
2] Determine where the power unit will be located. The
POWER SIDE
post has the power unit
mounting bracket attached to the side. This post can be positioned on either side.
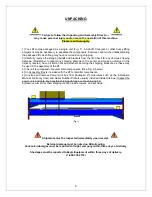
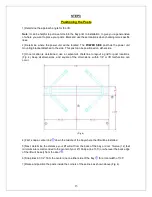
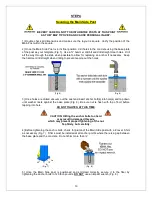
3] Once location is determined, use a carpenter’s chalk line to layout a grid for post locations.
(Fig. 4) Keep all dimensions, and square of the dimensions, within 1/8” or lift malfunction can
occur.
(Fig. 4)
4] First, snap a center line
down the middle of the bay where the lift will be installed.
5] Next, determine the distance your lift will sit from the back of the bay or door. Twelve (12) feet
minimum are recommended to the center of your lift. Snap a line 135” (or wherever the back edge
of the lift will be set) from the door
.
6] Snap lines 67-1/2” from the center-line on either side of the bay
for a total width of 135”.
7] Raise and position the posts inside the corners of these lines as shown above (Fig. 4).


