10
INSTALLATION
NOTE: Installation is the Customer’s Responsibility.
It is the responsibility of the purchaser to ensure proper installation of this lift. Automotive lifts are
pieces of heavy machinery and precision equipment, so their installation is extremely important.
In preparing for the installation, it is necessary to procure the correct tools and choose the right
site. Work-space, floor-strength, ceiling height & overhead clearance, and a sufficient & reliable
power source should all be considered well in advance. Any questions about floor capacity should
be resolved prior to beginning the installation.
A professional lift installer is suggested. Whoever installs the lift should read this manual
thoroughly and familiarize themselves with its content.
A certified electrician is required for the final connection of the lift’s power unit; and all local codes
and requirements should be followed.
Always wear the proper clothing, safety-gear and Personal Protection Equipment (PPI) when
installing or servicing this lift.
TOOLS REQUIRED
25’ Measuring Tape
Chalk Line
Marker or Floor Crayon
Rotary Hammer Drill
¾” (19mm) dia. Masonry Drill Bit
4lbs. Hammer
SAE Wrenches & Ratchet Set
Metric Wrenches & Ratchet Set
Torque Wrench
2’ Level
4’ Level
Pry Bar
12’ Step Ladder
Side Cutters
Vise Grips
Screwdriver Set
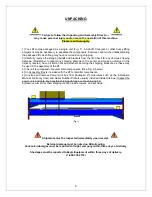
4” x 4” Wooden Blocks (to assist in unpacking)
Floor-Jack or Dollies (to assist in unpacking)
4 gal. AW-32 Hydraulic Oil
Funnel
White Lithium Spray


