background image

Designing a Label


7

Now that you have created and saved your label, the following sections will introduce additional 
features you can use to customize your labels.

Additional Formatting Features

To further customize your labels, you can add borders, symbols, graphics, barcodes, and even date 
and time stamps. You can also choose to print the label vertically.

Adding Borders

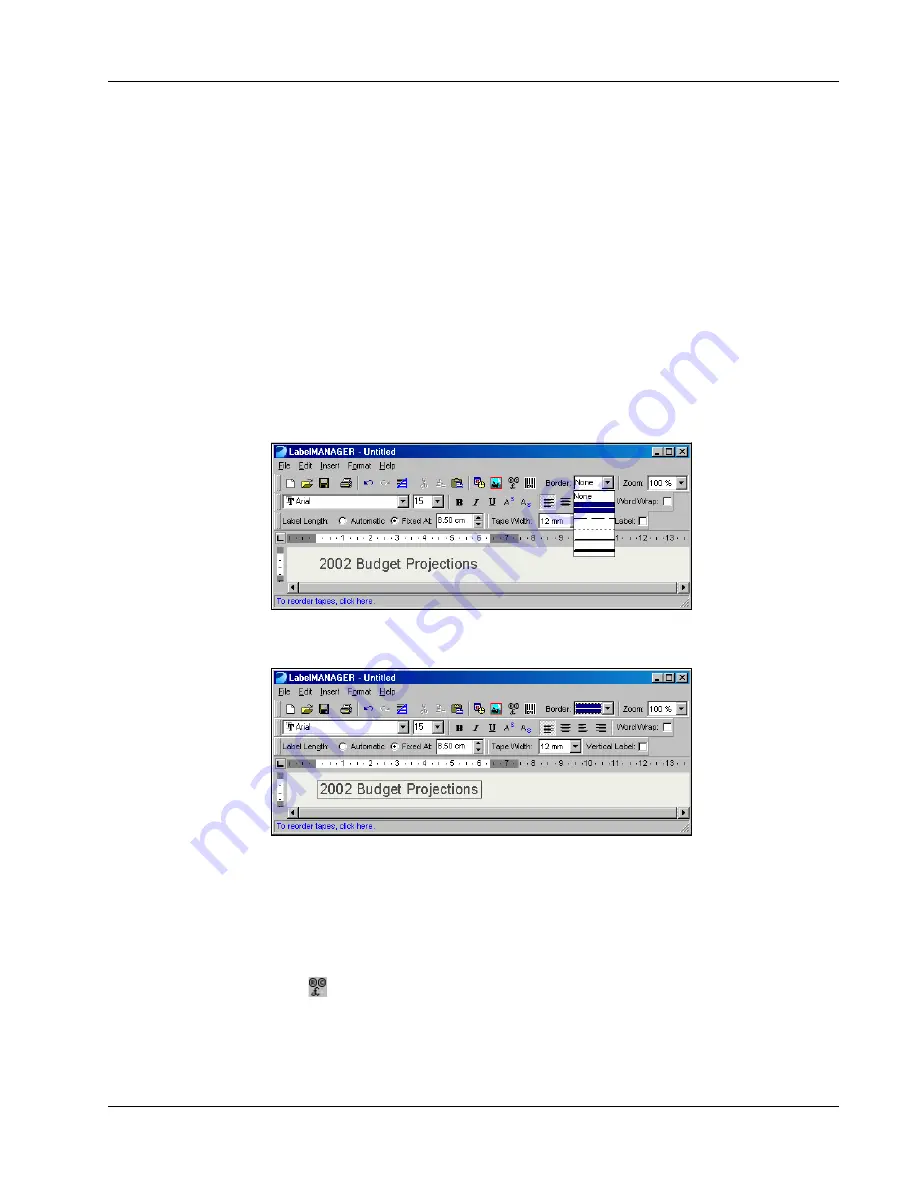
You can choose to add one of several pre-defined borders to your label. When you add a border, it 
surrounds the text and may cause the text to decrease in size.

To add a border

1

Place the cursor anywhere on the label.

2

Select a border style from the 

Borders

 pull-down menu.

The selected border surrounds the text. If necessary, the font size of the text is decreased to fit 
the label.

Adding Special Characters

You can choose to add a special character or symbol to the label.

To add a special character

1

Place the cursor at the point on the label where you want the character to appear.

2

Click 

 on the 

Standard

 toolbar or select 

Symbol

 from the 

Insert

 menu.

Содержание LabelManager Series

Страница 1: ...LabelMANAGER User Guide ...

Страница 2: ...iving antenna Increase the separation between the equipment and the receiver Connect the equipment to an outlet on a circuit different from that to which the receiver is connected Use shielded cables to connect this device to computers Consult the dealer or an experienced radio TV technician for help You may find helpful the following booklet prepared by the FCC Interference Handbook This booklet ...

Страница 3: ...ANAGER Window 2 Ordering Tape Cassettes 4 Getting Help 4 Chapter 2 Making Labels 5 Designing a Label 5 Printing Labels Using Data from Another Program 12 Printing from Other Applications 14 Print Settings 16 Chapter 3 Service and Support 19 Technical Support 19 Contacting DYMO 19 Appendix A Technical Specifications 21 ...

Страница 4: ...iv ...

Страница 5: ... labels from data in your favorite database program Installing the LabelMANAGER Software In addition to this User Guide the LabelMANAGER printer is shipped with a Quick Start card Follow the instructions in the Quick Start card to install the hardware and software Registering the Software The first time you start the LabelMANAGER application you are asked to register the software We highly recomme...

Страница 6: ...om the File menu Standard Toolbar Formatting Toolbar Tape Settings Toolbar Text Area Rulers Toolbar Icon Menu Command Description New Clears the label text If the label has been modified prompts you to save the changes Open Displays the Open File dialog box to open a saved label file If the current label has been modified and not saved prompts you to save the changes Save Saves the current label t...

Страница 7: ...el paste See Printing Labels Using Data from Another Program on page 12 Select All Selects the entire contents of the label Zoom Zooms in or out on the current label Options Displays the Options dialog box Toolbar Icon Menu Command Description Symbol Displays the Insert Symbol dialog box See Adding Special Characters on page 7 Date Time Displays the Insert Date and Time dialog box See Adding a Dat...

Страница 8: ...s or Help Index from the Help menu 2 Select the topic you want to read about The Help can also be accessed by pressing F1 in most windows and dialog boxes to display context sensitive help Toolbar Icon Menu Command Description Font Allows you to apply a font to the selected text Borders Allows you to add a border around the contents of the label and may reduce the size of the text and graphics See...

Страница 9: ...rd showed you how to print your first label In this section we will show you how to print a label for a file folder tab using the LabelMANAGER software You can format the label text and then save the label for future use When designing a label the first items to consider are the width of the label tape onto which you will print and the length of the area where you will place the label For this exa...

Страница 10: ...nual Budget Projections in the main window As the line of text becomes too long for a fixed width label at the current font size the font size will automatically decrease to fit the text on one line 5 To center the text click 6 Click or select Save from the File menu The Save File dialog box appears 7 Type a name for the label and click Save The label is saved to your hard disk with a dlm extensio...

Страница 11: ...defined borders to your label When you add a border it surrounds the text and may cause the text to decrease in size To add a border 1 Place the cursor anywhere on the label 2 Select a border style from the Borders pull down menu The selected border surrounds the text If necessary the font size of the text is decreased to fit the label Adding Special Characters You can choose to add a special char...

Страница 12: ...ted appears on the label in a size that matches the text font size Adding Special Font Effects In addition to the standard font styles bold italic underline and strikeout you can make your text stand out using a shadow or outline style With the outline style you choose the fill pattern To add a shadow effect to your text 1 Highlight the text on your label that you wish to appear with a shadow effe...

Страница 13: ...o add a date and or time stamp to the label The date and time is entered as text and will be the actual system date and time when you added the stamp to the label For example if today s date is 24 Oct 2002 and you add the date to a label design today save the label and then open it tomorrow 24 Oct 2002 will still appear on the label To add a date and time stamp 1 Place the cursor at the point on t...

Страница 14: ...ndard toolbar or select Paste from the Edit menu The graphic appears on the label at the cursor position To add a graphic from a file 1 Place the cursor at the point on the label where you want the graphic to appear 2 Click on the Standard toolbar or select Graphic from the Insert menu The Open File dialog box appears 3 Select the graphic file you wish to insert and click Open The graphic you sele...

Страница 15: ...e size of the barcode under Barcode Size 8 Click OK to insert the barcode on the label The barcode is placed on the label as a single object To remove the barcode you can use the backspace key or highlight the barcode and select Printing Vertically You can print your label vertically for example to be placed on the spine of a binder or a video tape When you print vertically the text on your label ...

Страница 16: ...preadsheet will print two three line labels one for DYMO and one for Esselte Text File Many programs can create a text file such as a text editing program a database application and so on When you export text from a database you usually create a delimited file with each entry separated by comma or tab characters and a carriage return line feed at the end of each entry Both the Smart Paste and the ...

Страница 17: ...example the following two addresses are separated by a single blank line and Smart Paste will print two three line labels However the following three lines of text contain no blank lines So Smart Paste will print three one line labels Printing Multiple Labels Using Smart Paste This section explains how text copied from different sources is turned into labels using the Smart Paste command When you ...

Страница 18: ...multiple labels from a database file 1 Export the records you wish to print as labels to a CSV or text file from your database program 2 From the Tape Settings toolbar select the tape width from the Tape Width pull down menu 3 Select the formatting for the labels from the Formatting toolbar For example you can change the font size and the horizontal position on the label 4 Select Merge Print from ...

Страница 19: ...n the labels you have loaded in the printer Refer to Table 1 for the correct settings 6 Click the Paper Size tab 7 Select the label size you have loaded in the printer from the Paper size drop down list Table 1 Label Size and Margin Settings Paper Name Paper Height Paper Width Top Margin Bottom Margin Left Margin Right Margin Address Label 1 24 mm 3 5 89 mm 0 23 5 8 mm 0 24 6 1 mm 0 4 10 2 mm 0 39...

Страница 20: ... A list of possible tape color combinations appears 2 Select the tape color combination that matches the tape cassette in the printer Depending upon the selection you make the background color in the main window may change so that you get a better idea of how your printed label will look Chain Printing When printing multiple labels the chain printing feature will automatically print a dashed cut l...

Страница 21: ...label is printed blank space is added at the beginning of the label and at the end of the label Normally the space is the same on both ends of the label However you have the option of printing the label with less space at the beginning or at end of the label To change the label alignment 1 Select Options from the Edit menu The Options dialog box appears DYMO Corp 44 Commerce Road Stamford CT 06902...

Страница 22: ...e Continuous mode printing ON selection only applies to printing from other applications This selection has no affect when printing from the LabelMANAGER software To set continuous mode printing 1 Select Page Setup or Print Setup from the File menu The Print Setup or Page Setup dialog box appears depending on your operating system 2 Click Properties The Properties dialog box appears 3 Select Conti...

Страница 23: ...he following table provides a list of telephone numbers to reach DYMO Sales and Support departments You can also reach DYMO at www dymo com Country Telephone Support Fax Support Australia 1800 633 868 1800 817 558 België Belgique 02 713 38 08 31 20 581 93 80 Canada 800 263 6105 Czech Republik 02 619 12 720 02 619 12 730 Danmark 35 25 65 08 31 20 581 93 80 Deutschland 069 66 56 85 29 31 20 581 93 8...

Страница 24: ... Slovakia 420 2 619 12 720 420 2 619 12 730 Suomi 09 229 07 04 31 20 581 93 80 Sverige 08 632 00 57 31 20 581 93 80 Turkey 212 286 26 30 PBX 212 286 26 28 United Kingdom 44 020 7341 55 29 31 20 581 93 80 United States 203 588 2500 Country Telephone Support Fax Support ...

Страница 25: ... inch 13 54 mm Maximum Tape Width 0 94 inch 24 mm Computer Interface USB 1 1 Dimensions 2 5 x 5 25 x 5 25 63 5 mm x 133 4 mm x 133 4 mm 8 5 x 9 6 x 3 4 215 mm x 245 mm x 85 mm Power Requirements 9 V DC 1 3 A Ambient Temperature 0 C to 40 C Humidity 10 to 90 RH non condensing Weight 1 pound 1 ounce 0 5 kg 1 pound 9 ounces 0 7 kg Print Head Life Minimum 200 cassettes 7 meters each 4 590 feet 1 4 km ...

Страница 26: ...Technical Specifications 22 ...

Страница 27: ...MANAGER 1 J JPG 10 L label alignment 17 label tape see tape cassettes M main window 2 multi line text 13 O outline font 9 P PCX 10 PNG 10 print settings 16 chain printing 16 continuous mode printing 18 label alignment 17 tape cassette color 16 printer specifications 21 printing chain printing 16 continuous mode 18 from a database 14 from a list 12 multiple labels 13 14 vertically 11 R registering ...

Страница 28: ...24 ...

Отзывы: