background image

17

Maintenance Manual for DUKE TSC Proofer 

Oven with Touch Screen Controls

trouBleshootinG

A Manually reset high temperature safety limit is provided 

on the right side of the control section of the unit to protect 

the oven elements. The high limit will not trip under normal 

operating conditions. Should the oven high limit trip, push 

the RESET button. The high limit will reset with a "click" if 

an over temperature trip occurred. If condition persists, call 

Duke Service.


























ProBleM 

Yes 

no

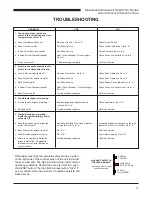
1.  oven does not heat with oven  

switch in the on position and oven  

temperature not set at 0°.

a.  Are oven indicator lights on? 

Observe Oven Fan. Go to “b”. 

Reset Hi-limit Switch

b.  Does Oven Fan work? 

Call Duke Service. 

Check Proofer Operation. Go to “d”.

c.  Is Oven Door Securely closed? 

Call Duke Service. 

Close Door securely. Go to “e”.

d.  Is Supply Circuit Breaker tripped? 

Reset Circuit Breaker. Try oven again.  

Check Fuses on Control Box. Goto “e”.


Go to “e”. 

e.   Does oven work? 

 Troubleshooting complete. 

Call Duke Service.

2.  Proofer does not heat with Proofer  

switch in the on position Proofer

a.  Are Proofer indicator lights on? 

Observe Proofer Fan. Go to “b”. 

Check Oven Operation. Go to “c”.

b.  Does Proofer Fan appear to work? 

Call Duke Service. 

Check Oven Operation. Go to “c”.

c.  Does Proofer work? 

Call Duke Service. 

Check Supply Circuit Breaker. Go to “d”.

d.  Is Supply Circuit Breaker tripped? 

Reset Circuit Breaker. Try Proofer again.  

Check Fuses on Control Panel. Go to “e”.


Go to “e”. 

e.  Does Proofer work? 

Troubleshooting complete. 

Call Duke Service.

3.  oven/Proofer lights not working.

a.  Is more than one light not working? 

Replace inoperative light bulbs and  

Check transformer. Go to “b”.


recheck. Go to “b”. 

b.  Do lights work? 

Troubleshooting complete. 

Call Duke Service.

4.  Proofer humidity not working/ 

insufficient with Humidity Control 


not set to off.

a.  Does there appear to be a light fog  

Decrease humidity if too much moisture  

Increase humidity if not enough moisture on  

on the Proofer door? 

on proofer door. Go to “b”. 

proofer door. Wait 15 minutes. Go to “b”.

b.  Does Proofer Fan appear to work? 

Go to "c". 

Call Duke Service

c.  Confirm water supply to unit is on. 

Go to "d". 

Turn water supply on. Go to "d".

d.  Check for restrictions in water line. 

Troubleshooting complete. 

Call Duke Service.


(Kinks in water line, Clogged filter,


inlet strainer or mineral build-up on 


sprayer nozzle) 


Содержание TSC-18

Страница 1: ...ht 2008 Duke Manufacturing Company All rights reserved Reproduction without written permission is prohibited Duke is a registered trademark of the Duke Manufacturing Company Duke Manufacturing Company 2305 N Broadway St Louis MO 63102 Phone 314 231 1130 Toll Free 1 800 735 3853 Fax 314 231 5074 www dukemfg com P N 512563D IN STORE MAINTENANCE BY QUALIFIED TRAINED PERSONNEL ONLY ...

Страница 2: ...Maintenance Manual for DUKE TSC Proofer Oven with Touch Screen Controls 2 ...

Страница 3: ... OVEN PROOFER START UP 6 PROGRAMMING CONTROLS 7 USB RECIPE UPLOAD 9 REVERT TO FACTORY DEFAULT RECIPES 10 USB MAINTENANCE AND OPERATION SCREENS LOAD UPDATE 10 CHANGE TEMPERATURE UNITS 12 CARE AND CLEANING 13 TROUBLESHOOTING 17 DOOR ADJUSTMENTS AND GASKET MAINTENANCE 18 AIR WASH DOOR INFORMATION AND CLEANING INSTRUCTIONS 23 BULB MOUNTING DETAIL 24 PARTS LIST AND ILLUSTRATIONS 25 WIRING DIAGRAM 29 CU...

Страница 4: ...to observe caution could result in personal injury In addition to the warnings and cautions in this manual use the following guidelines for safe operation of the unit Read all instructions before using equipment Do not attempt to defeat the grounded connector Install or locate the equipment only for its intended use as described in this manual Do not use corrosive chemicals water jet equipment or ...

Страница 5: ...LLATION OF WATER FILTER Install new filter by removing sanitary cap from top of cartridge insure two black O rings are in place then lift up into filter head and rotate cartridge 1 4 turn counter clockwise until it comes to a complete stop Flush 2 gallons 5 6 Liters of water through the new filter before using proofer to purge air from filter Remove hose from bottom of proofer by loosening the com...

Страница 6: ...he unit does not power up correctly or if 6 the doors do not close and seal properly call Duke for assistance OVEN PROOFER BREAD COOKIES BREAD 2 BREAD 3 BREAD 4 BREAD 5 60 MINUTES PROOFER DRY OUT POWER 60 MINUTES 20 MINUTES 60 MINUTES Figure 2 Main Screen 1 Turn the oven and proofer ON by touching the OVEN and PROOFER buttons located at the top of the touch screen 2 Check to make sure that the ove...

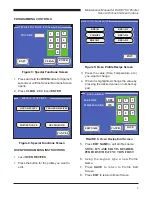
Страница 7: ...5 6 7 8 9 0 EXIT Figure 4 Special Functions Screen OVEN PROGRAMMING INSTRUCTIONS 1 Select OVEN RECIPES 2 Press the button for the profile you want to edit Figure 5 Oven Profile Recipe Screen 3 Press the value Time Temperature etc you want to change 4 When it is highlighted change the value by pressing the desired value on number key pad OVEN BREAD CANCEL SAVE BAKE TIME 14 00 1 2 3 4 5 6 7 8 9 0 ED...

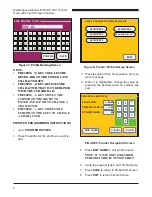
Страница 8: ... Screen 5 Press EDIT NAME to edit profile s name NOTE IF NAME EDIT IS DESIRED PERFORM THIS FUNCTION FIRST 6 Using the keypad type a new Profile Name 7 Press SAVE to return to Profile Edit Screen 8 Press EXIT to return to Main Screen SELECT PROOFER PROFILES TO EDIT EXIT 60 MINUTES 20 MINUTES PROOFER DRY OUT 60 MINUTES 60 MINUTES Figure 8 Proofer Profile Recipe Screen 3 Press the value Time Temperat...

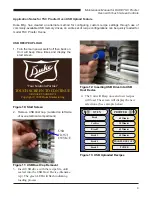
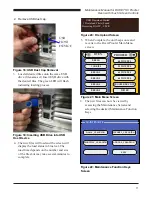
Страница 9: ...e new selections See example below Figure 10 Start Screen Figure 11 USB Dust Cap Removal Figure 12 Inserting USB Drive Into USB Host Device Figure 13 USB Uploaded Recipes Your Solutions Partner TOUCH SCREEN TO CONTINUE OR INSERT USB DRIVE Copyright 2008 Duke Manfacturing OVEN PROOFER Bread Cookies Bread 2 Bread 3 Bread 4 Bread 5 PROOFER DRY OUT POWER 60 Minutes 60 Minutes 60 Minutes 20 Minutes USB...

Страница 10: ...enu Screen With Factory Default Recipes Loaded Figure 14 Special Functions Screen Figure 15 Default Recipe Enable Screen USB maintenance and operations screens load update Turn the main power switch off then back on 1 Unit will beep three times and display the start screen Figure 17 Start Screen SPECIAL FUNCTIONS PIN Number Entry CLEAR ENTER PIN CODE EXIT OK DEFAULT RECIPES Now Enabled OVEN PROOFE...

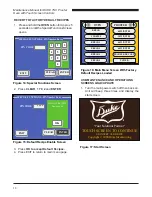
Страница 11: ...Screen When Complete the unit beeps once and 5 reverts to the Oven Proofer Main Menu screen OVEN PROOFER BREAD COOKIES BREAD 2 BREAD 3 BREAD 4 BREAD 5 60 MINUTES PROOFER DRY OUT POWER 60 MINUTES 20 MINUTES 60 MINUTES Figure 21 Main Menu Screen USB Download Started 1 Download File s Found Processing DAILY_ 1 SCR Figure 18 USB Dust Cap Removal Figure 19 Inserting USB Drive Into USB Host Device USB H...

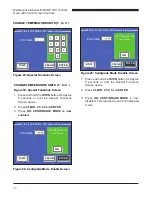
Страница 12: ...d the 1 OVEN button for Approx 5 seconds or until the Special Functions Screen opens Press 2 CLEAR 2 5 8 0 and ENTER Press 3 OK CENTIGRADE MODE is now disabled This returns the unit to Fahrenheit mode CHANGE TEMPERATURE UNITS F to C Figure 18 Special Functions Screen Press and hold the 1 OVEN button for Approx 5 seconds or until the Special Functions Screen opens Press 2 CLEAR 2 5 8 0 and ENTER Pr...

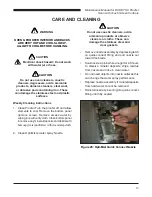
Страница 13: ...withadrycloth Cleanbottompanel toremoveanymineraldepositsanddebriswith hotsoapywaterandfollowwithcleandampcloth Clean Opti Mist proofer spray Nozzle 2 CARE AND CLEANING CAUTION Do not use caustic cleaners acids ammonia products or abrasive cleaners or cloths These can damage the stainless steel and door gaskets Removenozzleassemblybydepressinglatch on quick connect fitting and pull nozzle out towa...

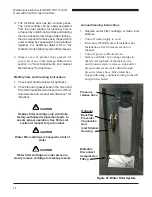
Страница 14: ...et Maintenance for directions CAUTION Water filter cartridge is heavy when full of water Annual Cleaning Instructions Replace water filter cartridge clean inlet 1 strainer Turn off water supply to oven Disconnect Wall Brackets if installed See Installation of wall brackets section of manual Turn off power to Proofer Oven Remove old filter by rotating cartridge to the left facing back of cabinet sl...

Страница 15: ...f water through the new filter before using proofer to purge air from filter Remove hose from bottom of proofer by loosening the compression nut at the disconnect fitting and pull hose out Place hose over container and turn on water It will take a minute for the filter to fill before water flows out of hose into container Once filter is flushed with 2 gallons of water turn off water supply again i...

Страница 16: ...ade Use 3 4 and 5 8 wrenches to remove nozzle from body remove clean and re install filter Soaknozzleinplainwhitevinegarfor4 8hours to dissolve mineral deposits Wipe residue from nozzle and rinse in clean water Do not insert objects into nozzle outlet as this can change the water spray performance Replace nozzle assembly if mineral deposits from hard water cannot be removed Reinstallnozzlebyinsert...

Страница 17: ... Proofer a Are Proofer indicator lights on Observe Proofer Fan Go to b Check Oven Operation Go to c b Does Proofer Fan appear to work Call Duke Service Check Oven Operation Go to c c Does Proofer work Call Duke Service Check Supply Circuit Breaker Go to d d Is Supply Circuit Breaker tripped Reset Circuit Breaker Try Proofer again Check Fuses on Control Panel Go to e Go to e e Does Proofer work Tro...

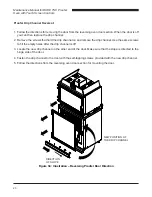
Страница 18: ...screwsonthefrontoftheoven to expose the hinge screw holes for the other swing direction 5 Use the six screws to fill the unused hinge screw holes on the front of the oven 6 Remove the latch strike plate from the front of the oven and move it to the other side Use the screws from the other side to fill the screw holes that are no longer used 7 Position the door on the front of the oven and tighten ...

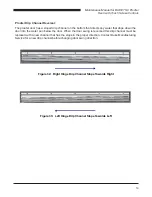
Страница 19: ...at drips down the door into the water pan below the door When the door swing is reversed this drip channel must be replaced with a new channel that has the slope in the proper direction Contact Duke Manufacturing Service for a new drip channel before changing door swing direction Figure 32 Right Hinge Drip Channel Slope Towards Right Figure 33 Left Hinge Drip Channel Slope Towards Left ...

Страница 20: ...the drip channel Use the same screws to fill the empty holes after the drip channel is off 3 Locate the new drip channel on the other end of the door Make sure that the slope is directed to the hinge side of the door 4 Fasten the drip channel to the door with the self tapping screws provided with the new drip channel 5 Follow the directions from the reversing oven door section for mounting the doo...

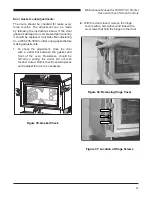
Страница 21: ...ng Co at 800 735 3853 to order a new gasket before making adjustments 1 To check the adjustment close the door with a dollar bill between the gasket and front of the oven Resistance should be felt when pulling the dollar bill out with thedoorclosed Dothischeckinseveralplaces and readjust the door as necessary Figure 35 Gasket Check 2 With the door closed remove the hinge covers with a screwdriver ...

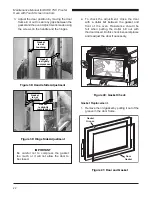
Страница 22: ... much or it will not allow the door to be closed Gasket Groove Door Gasket 4 To check the adjustment close the door with a dollar bill between the gasket and front of the oven Resistance should be felt when pulling the dollar bill out with thedoorclosed Dothischeckinseveralplaces and readjust the door if necessary Figure 40 Gasket Check Gasket Replacement 1 Remove the old gasket by pulling it out ...

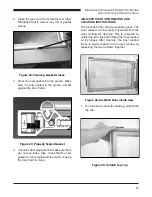
Страница 23: ...uter window by squeezing the two windows together Figure 44 Air Wash Door inside view 1 To open the windows for cleaning unlatch the top clip Figure 45 Unlatch Top clip 2 Clean the groove with a screwdriver or other flat bladed tool to remove any dirt or gasket pieces Figure 42 Cleaning Gasket Groove 3 Press the new gasket into the groove Make sure it is fully seated in the groove and flat against...

Страница 24: ...2794 Gasket Ð lens 58mm 502795 turn counter clockwise remove bulb cover lamp holder Assy G4 12v 10w Max lamp 12v halogen G4 Bi Pin 502796 2 Unlatch the bottom clip Figure 46 Unlatch Bottom Clip 3 Air Wash Door bottom easily swings open for cleaning Figure 47 Door Swings Open for Cleaning 4 A i r Wa s h i n n e r d o o r i s e a s i l y clipped to the outer door by squeezing them together CAUTION D...

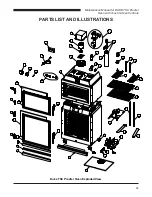
Страница 25: ...ofer Oven with Touch Screen Controls Duke TSC Proofer Oven Exploded View PARTS LIST AND ILLUSTRATIONS 15 26 27 28 5 22 10 10 14 9 9 9 9 12 13 11 6 5 4 3 1 2 19 19 17 17 30 30 20 20 16 16 32 31 25 24 23 29 34 33 21 36 37 18 40 38 39 35 7 41 ...

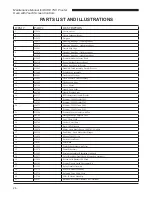
Страница 26: ...ght 18 512777 RTD thermostat Oven Proofer 19 512759 Element 500W Proofer 208V 512791 Element 500W Proofer 230V 20 154373 Element 2500W Oven 208V 502831 Element 2500W Oven 230V 21 512594 Proofer Motor Assembly with Fan 22 502792 Halogen Lamp Complete 10W 23 502794 Lens Glass Light 24 502795 Gasket Lens Glass 25 502796 Bulb 10W Halogen 26 154470 Motor Oven Single Speed 208 230V 50 60Hz 27 502338 Fan...

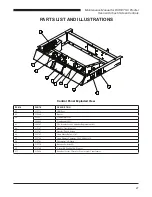
Страница 27: ...0V 502840 Transformer 208V 45 600183 TSC Proofer Oven Controller Replacement Kit 46 512547 Handle Guard Control 47 512767 Overlay Touch Screen 48 512781 Oven Motor Relay 230V 49 512790 Oven Heaters Contactor 240V 50 60Hz 3P 50 512765 Thermostat Hi Limit 51 512770 Breaker Switch 10A 52 512760 Assembly Fan Muffin Proofer 53 512880 Breaker Circuit 3 Amp for Proofer Light Transformer 46 44 43 42 45 48...

Страница 28: ...Maintenance Manual for DUKE TSC Proofer Oven with Touch Screen Controls 28 NOTES ...

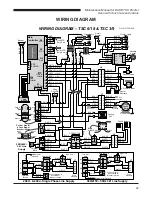
Страница 29: ...Oven Blower Breaker Switch WHT 3C WHT 3 BLK 1A Terminal Block 208V 240v Single Phase Line Supply L2 L1 BLK 1 RED 2 CONTACTOR High Limit J8 6 Proofer Elements Control Proofer Oven Blower Breaker Switch 1 2 3 4 COIL Oven Elements J7 BLK 1A RED 2A CONTACTOR COIL High Limit Oven Elements 380 415V 50Hz 3Ø Line Supply L3 L2 L1 1 2 3 4 J7 N J8 6 Proofer Elements Control Proofer Oven Blower Breaker Switch...

Страница 30: ...Maintenance Manual for DUKE TSC Proofer Oven with Touch Screen Controls 30 NOTES ...

Страница 31: ...r call model number serial number date of purchase your complete mailing address including zip code and description of the problem UK IRELAND Duke Mfg UK Duke House Unit 10 Greendale Business Park Woodbury Salterton Exeter Devon UK EX5 1EW Tel 01395 234140 FAX 01395 234154 FOR WARRANTY PARTS SERVICE NORTH AMERICA LATIN AMERICA Duke Manufacturing Company 2305 N Broadway St Louis MO 63102 Phone 314 ...

Страница 32: ...53 Fax 314 231 5074 www dukemfg com EU Headquarter Office Duke Manufacturing CR s r o Vitavska 219 Stechovice 25207 Phone 420 257 741 033 Duke Mfg UK Duke House Unit 10 Greendale Business Park Woodbury Salterton Exeter Devon UK EX5 1EW Tel 01395 234140 FAX 01395 234154 Asia Office 1905 19F First Trade Tower 985 Dong Fang Road Pudong Shanghai 200122 China Phone 86 21 6876 9272 ...

Отзывы: