Installation
11
3 INSTALLATION
The DSEP100 is designed to be mounted within a control panel, either on the panel DIN rail utilising
the integral mounts, or chassis mounted, utilising the mounting holes. For dimension and mounting
details, see the section entitled Specifications, Dimensions elsewhere in this document.
3.1 USER CONNECTIONS
3.1.1 CONNECTOR A – DC SUPPLY AND CONFIGURABLE INPUTS
The DC Supply on terminals 1 & 2 is optional if an AC Supply is connected to terminals 8 and 9.
Connecting a DC supply to terminals 1 & 2 at the same time as connecting an AC supply to terminals
8 & 9 is perfectly acceptable and has no detrimental affect on the operation of the device.
Terminal Function
Recommended Size
1
Plant –ve
1.0mm² (AWG18)
2
Plant +ve
1.0mm² (AWG18)
3
Digital Input A (Generator Closed Auxiliary)
0.5mm² (AWG20)
4
Digital Input B (Mains Closed Auxiliary)
0.5mm² (AWG20)
5
Digital Input C (Alarm Reset)
0.5mm² (AWG20)
6
Digital Input D (Alternative Config’ Select)
0.5mm² (AWG20)
7
Digital Input E (Auxiliary Mains Failure)
0.5mm² (AWG20)
3.1.2 CONNECTOR B – AC POWER SUPPLY
Used to power the DSEP100. This is optional if connected to a DC Supply on terminals 1 and 2.
Connecting a DC supply to terminals 1 & 2 at the same time as connecting an AC supply to terminals
8 & 9 is perfectly acceptable and has no detrimental affect on the operation of the device.
Terminal Function
Recommended Size
8
AC PSU Neutral
1.0mm² (AWG18)
9
AC PSU Live
1.0mm² (AWG18)
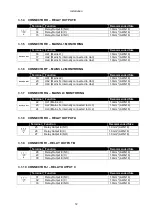
3.1.3 CONNECTOR C – RELAY OUTPUT D
Terminal Function
Recommended Size
D
10
Relay Output D (NO)
1.0mm² (AWG18)
11
Relay Output D (C)
1.0mm² (AWG18)
12
Relay Output D (NC)
1.0mm² (AWG18)
Содержание DSEP100
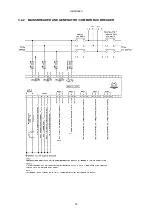
Страница 14: ...Installation 14 3 2 2 MAINS BREAKER AND GENERATOR COMMON BUS BREAKER...
Страница 15: ...Installation 15 3 2 3 ALTERNATE TOPOLOGY WIRING DIAGRAMS...
Страница 41: ...This Page is Intentionally Blank...
Страница 42: ...This Page is Intentionally Blank...


