


USER MANUAL
IP cameras for video surveillance
Page:
16
Page:
16
Last updated: May 2009
DSE srl - ITALY - WWW.DSE.EU
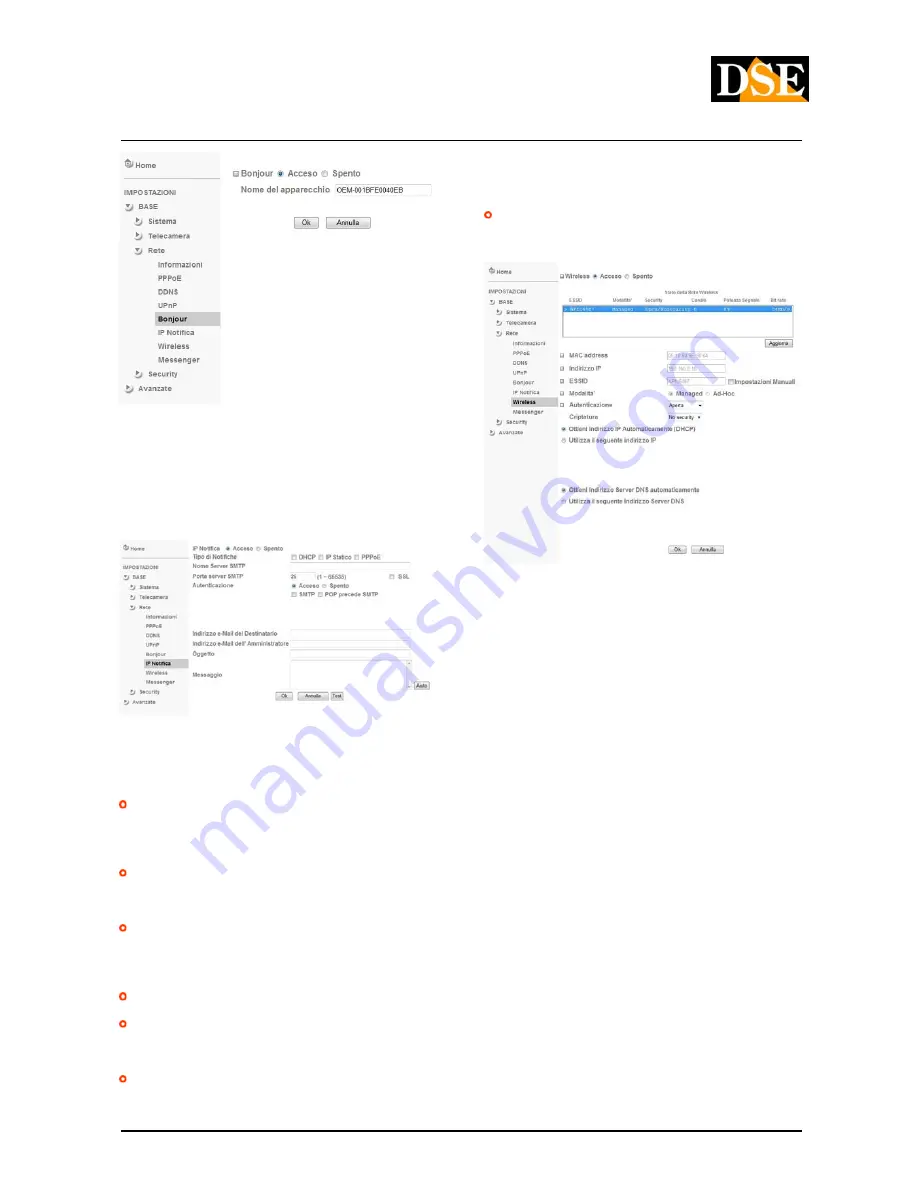
Bonjour is a system that requires no configuration and allows a dialogue between
networked devices without the need to set IP addresses or DNS server. All cameras in the
range support Bonjour. To learn how to integrate Bonjour in your browser please visit:
http://www.apple.com/support/downloads/bonjourfor windows.html
NOTIFICATION IP
If you enable this convenient function, you can make the camera to send an e-mail each
time you change its network configuration. This way you can connect the camera via the
Internet even if it does not have a fixed IP address without using DDNS services.
SIGNAL TYPE
- The e-mail can be sent to
SIGNAL TYPE
- The e-mail can be sent to
With automatic change of address from DHCP, change of fixed IP manually or by a new
access to the Internet with PPPoE. Typically if you are using the notification service it is
good to enable all 3 items.
NAME / PORT SERVER
- Enter the name and
NAME / PORT SERVER
- Enter the name and
port to use to access the SMTP server from the provider. If you use G-Mail you have to set
the port to 587, and select SSL.
SMTP AUTHENTICATION
- IS'
SMTP AUTHENTICATION
- IS'
possible
set the data required to authenticate to the SMTP server of the provider and send the email
if this requires authentication for sending (usually not required).
EMAIL RECIPIENT -
You 'can specify up to three e-mail notification recipients
EMAIL RECIPIENT -
You 'can specify up to three e-mail notification recipients
E-MAIL ADMINISTRATOR
- This address
E-MAIL ADMINISTRATOR
- This address
It is used as the sender. To it are then also sent any incoming system messages from the
SMTP server.
OBJECT / MESSAGE
- The message is
OBJECT / MESSAGE
- The message is
can use the System Labels (the
common is <ip>) in place of which will be inserted a figure relating to the network
configuration. Pressing the HELP button contains the list of available labels.
TEST
- Press the button to test sending
TEST
- Press the button to test sending
e-mail.
WIRELESS
Some camera models support, as well as a LAN connection via spin also connect to an
access point Wi-Fi. For the setting and the wireless connection setup, however, you must
sign a first row because then you can enable the wireless connection. Clicking the button
updates the camera will search for access points in the area and list them in the window.
Highlight the desired access point and set the connection parameters based on the settings
of your wireless network. There is usually no need to change any parameters if your access
point uses DHCP and you have not run custom settings. Confirm with OK and unplug the
point uses DHCP and you have not run custom settings. Confirm with OK and unplug the
wired network cable. Then use IP Installer to identify the new camera's IP address in the
wireless network.
MESSENGER
The connection via MESSENGER is a practical system, exclusive to this range of IP devices,
in order to connect the cameras without the need for any kind of local configuration through
routers and without having a fixed IP.
See settings in the section dedicated to access MSN MESSENGER.
SECURITY
ACCOUNT
Access to the cameras can be password protected. The system allows up to 10 passwords
with 3 different levels of access.


